Recently Microsoft has added a standard PowerShell module to manage Windows local users and groups called Microsoft.PowerShell.LocalAccounts. Earlier you had to manually download and import this module into PowerShell. Now LocalAccounts module is available by default in Windows Server 2016 and Windows 10 as a part of PowerShell 5.1. To use it in earlier Windows versions, you must install Windows Management Framework 5.1.Contents:
LocalAccounts PowerShell Module
There are 15 cmdlets in the LocalAccounts module. You can display the full list of module cmdlets as follows:
Get-Command -Module Microsoft.PowerShell.LocalAccounts
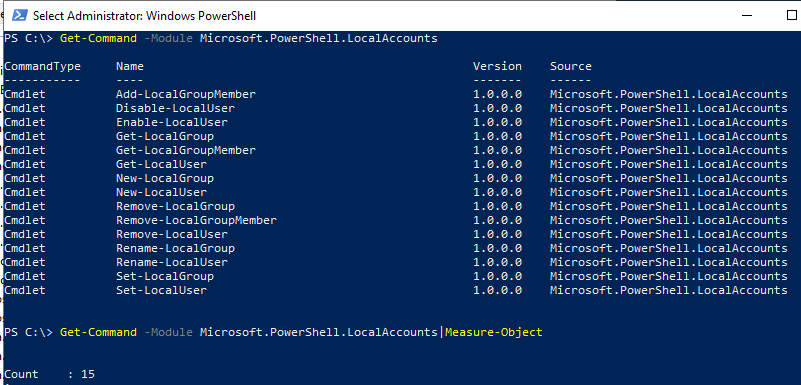
Add-LocalGroupMemberDisable-LocalUser– disable a local user account;Enable-LocalUser– enable (unlock) an account;Get-LocalGroup– get information about a local group;Get-LocalGroupMember– display the list of users in a local group;Get-LocalUser– show information about a local user;New-LocalGroup– create a new local group;New-LocalUser– create a local user;Remove-LocalGroup– delete a local group;Remove-LocalGroupMember– remove a member from a local group;Remove-LocalUser– delete a local user;Rename-LocalGroup– rename a local group;Rename-LocalUser– rename a user;Set-LocalGroup– modify group settings;Set-LocalUser– modify user settings.
Let’s consider some typical tasks to manage local users or groups using PowerShell cmdlets of the LocalAccounts module on a computer running Windows 10.
How to Manage Windows Local Users with PowerShell?
Display the list of existing local users in Windows:
Get-LocalUser

As you can see, there are 6 local user accounts on the computer, and 4 of them are disabled (Enabled=False).
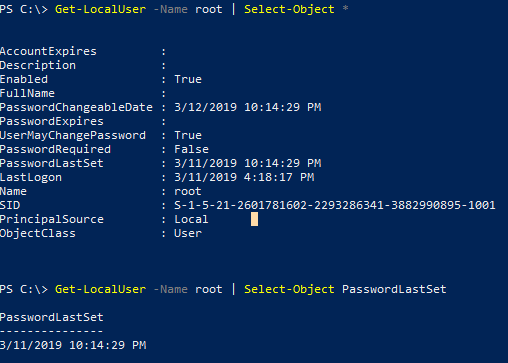
To display all properties of a local account (similar to Get-ADUser cmdlet used to display information about AD domain users), run this command:
Get-LocalUser -Name root | Select-Object *
AccountExpires :
Description :
Enabled : True
FullName :
PasswordChangeableDate : 3/12/2019 10:14:29 PM
PasswordExpires :
UserMayChangePassword : True
PasswordRequired : False
PasswordLastSet : 3/11/2019 10:14:29 PM
LastLogon : 3/11/2019 4:18:17 PM
Name : root
SID : S-1-5-21-2605456602-2293283241-3832290805-1001
PrincipalSource : Local
ObjectClass : User
To get the specific user attribute, like the last password change date, run this command:
Get-LocalUser -Name root | Select-Object PasswordLastSet
Let’s create a new local user with the New-LocalUser cmdlet. This cmdlet allows you to create the following types of accounts:
- Windows local accounts;
- Microsoft accounts;
- Azure AD accounts.
When creating a user account with the New-LocalUser cmdlet, you can’t specify the user password in plain text as the Password argument. You must request the password interactively and convert it to the secure string in advance:
$UserPassword = Read-Host –AsSecureString
Or specify the password directly in the PoSh console:
$UserPassword = ConvertTo-SecureString "H1PH0Ppa$$" -AsPlainText -ForceTo create a user in the AD domain, use the New-ADUser cmdlet.
New-LocalUser John -Password $UserPassword -FullName "Johh Lennon" -Description "Local Account for Remote Access"
To change the user’s password, use the LocalUser cmdlet (we suppose that you have already converted the new password into SecureString):
Set-LocalUser -Name john -Password $UserPassword –Verbose

To set “Password never expires” flag, run this command:
Set-LocalUser -Name john –PasswordNeverExpires $False
As you can see, you don’t need to convert the UserAccountControl value as when managing the AD user object properties .
As you remember, you can login Windows 10 using your Microsoft account. If you have to create a new user login to a Microsoft account, run this command. (Please, note that you don’t need to specify an account password since it is stored in Microsoft.)
New-LocalUser -Name "MicrosoftAccount\[email protected]" -Description "This is a Microsoft account"
To create a local account related to your Azure AD account (for example, you are using Office 365), run the following command:
New-LocalUser -Name "AzureAD\[email protected]" -Description " This is an Azure AD account"
To remove local user:
Remove-LocalUser -Name john -Verbose
How to Manage Windows Local Groups Using PowerShell?
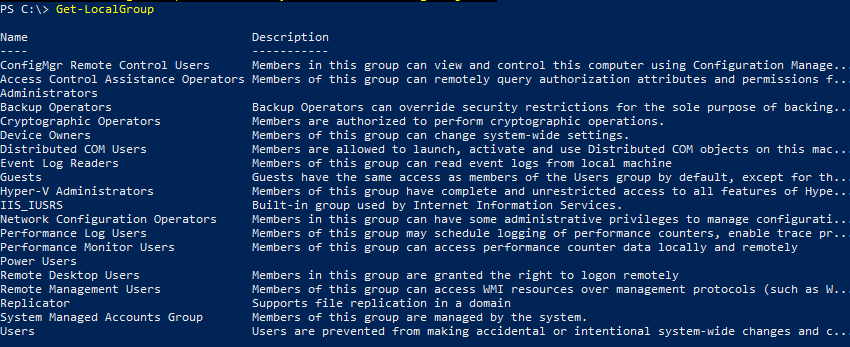
Now display the list of local groups on your computer:
Get-LocalGroup
Create a new group:
New-LocalGroup -Name RemoteSupport -Description 'Remote Support Group'
Add some local accounts and the group of local administrators to the new group:
Add-LocalGroupMember -Group 'RemoteSupport' -Member ('john','root','Administrators') -Verbose
If your computer is join to the AD domain, you can add domain accounts and groups to your local group. To do it, specify them in the following format: DomainName\jonhl or DomainName\’domain admins’.

You can also add a user to groups using the following pipeline (we will add a user to the local administrators group):
Get-Localuser -Name john | Add-LocalGroupMember -Group 'Administrators'
Display the list of users in a local group:
Get-LocalGroupMember -Group 'RemoteSupport'
As you can see, we are using only local accounts (PrincipalSource – Local). However, domain accounts (domain), Microsoft accounts (MicrosoftAccount) or Azure accounts (AzureAD) can also be used.

To display the list of groups, a specific user is a member of, you will have to check every local group on the computer:
foreach ($LocalGroup in Get-LocalGroup)
{
if (Get-LocalGroupMember $LocalGroup -Member john –ErrorAction SilentlyContinue)
{
$LocalGroup.Name
}
}
To remove a user from a group, run this command:
Remove-LocalGroupMember -Group 'RemoteSupport' –Member john
To manage local users on a remote computer, connect to it using WinRM and run Invoke-Command or Enter-PSSession cmdlets.
For example, you need to create a list of accounts in a local group on remote computers:
$winrm_ssn = new-pssession -computer Lon-Srv01,Lon-Srv02,Lon-Srv03
invoke-command -scriptblock {Get-LocalGroupMember -Group 'RemoteSupport'} -session $winrm_ssn -hidecomputername | select * -exclude RunspaceID | out-gridview -title "LocalAdmins"

