I have noticed a strange thing where by my laptop loses Internet connection over a Wi-Fi adapter after waking up from sleep or hibernation. In this case the wireless connection status says “No Internet access” or “Limited”, For some reason after waking up from sleep or hibernation the Wi-Fi adapter cannot automatically reconnect to my home Wi-Fi, and the list of wireless networks is empty. If the laptop is restarted, Windows will automatically connect to my Wi-Fi network and I can access the Internet at once as usual. The issue is quite irritating and tiresome, since I need to restart the laptop several times a day (enabling/disabling Wi-Fi adapter in the Device Manager has not helped).
In this article I will show you how I have coped with the problem of losing Wi-Fi connection in Windows 10 after waking up from sleep mode.
Update the Wi-Fi Adapter Drivers
Prior to moving to the next method, try to download and install the latest version for your Wi-Fi adapter drivers from the vendor’s website. If the problem with the disconnection from your Wi-Fi network had appeared suddenly, Windows may have automatically updated the driver of your Wi-Fi adapter recently. So, you should try to use an older version of the driver that remained in the local driver repository on your computer.
If you have found a suitable driver and the Wi-Fi connection is not lost with it, it is recommended to prevent Windows from automatically updating driver for this device.
Disable Power Saving Mode for Wireless Adapter
Windows 10 uses power saving mode for most hardware. Windows can automatically turn off different devices in order to save your laptop battery. It is quite a rational and effective way to extend the battery life of your device. However, some network adapter models cannot resume correct operation after waking up from the sleep mode without computer reboot. It may occur due to an incorrect device architecture, firmware or drivers. In this case it is recommended to disable power saving mode for your Wi-Fi network adapter. To do so:
- Open the Device Manager (
devmgmt.msc); - Expand the Network Adapters section and find your Wi-Fi adapter (usually it has Wireless or 802.11 in its name), then open its properties;
- Go to the Power Management tab and uncheck the option Allow the computer to turn off this device to save power. Save the changes by clicking OK.
If you have multiple network adapters in your computer/laptop, including an Ethernet LAN adapters (for example, Realtek PCIE Controller), you must disable power saving mode in their properties as well.

It is also recommended to change power saving options. To do it, go to the Control Panel -> Power Options -> Change plan settings -> Change advanced power settings -> Wireless adapter settings -> Power saving mode -> select Maximum performance.
Restart WLAN AutoConfig Service
In my case all methods discussed above did not help. As it turned out, the problem was related to the WLAN AutoConfig service.
WLAN AutoConfig service is used in Windows 10 to manage all wireless connections (Wi-Fi and Bluetooth). It is WlanSvc that is responsible for detecting, connecting to and disconnecting from wireless networks and creating a software access point (Hotspot) on Windows. If you stop the service, Windows won’t be able to see wireless networks and to connect to them.
After waking up from Sleep, open the list of services on your computer (Win+R -> services.msc) and find “WLAN AutoConfig” in the list. Make sure that it is configured to start automatically. Try to restart it. In my case, I couldn’t do it. When trying to restart/start the service, the following message appeared in the console: Windows could not start the WLAN AutoConfig service on Local Computer.

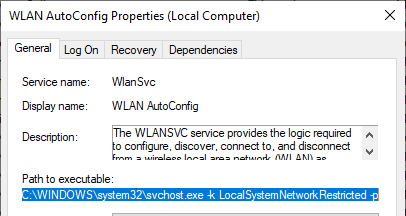
WlanSvc started successfully only after the restart of the computer. I found out that svchost.exe of WlanSvc hangs on after hibernation. It is C:\windows\system32\svchost.exe -k LocalSystemNetworkRestricted –p (you can see this path in the service properties).
Try to kill the process in the Task Manager (Ctrl+Shift+Esc). To do it, find Service Host: Local Service -> WLAN AutoConfig in the Processes tab, select Details in the context menu and end the process by clicking End Task. After that you can start the WlanSvc service in the service management console.

I wrote a simple PowerShell script to be run with the administrator privileges after Windows had waken up from hibernation or sleep mode to restart WLAN AutoConfig service:
$WLANProc = Get-CimInstance Win32_Process | Where-Object {$_.CommandLine -eq "c:\windows\system32\svchost.exe -k LocalSystemNetworkRestricted -p"}
Stop-Process -Id $WLANProc.ProcessId -Force
Start-Service WlanSvc

You may also need to restart your Wi-Fi adapter:
restart-netadapter -InterfaceDescription 'your_wireless_adapter_name' -Confirm:$false
You can run script automatically by Windows Event trigger by binding it to an event with code 1 from Power-Troubleshooter source in the System log (this event appears in the log after the wake up from hibernation or sleep).
It was the second method that has helped me to fix the issue of losing Wi-Fi network connection after wakeup from sleep in Windows 10.


