If you can access the Internet from your computer only via a proxy server, then by default you won’t be able to access external web resources from your PowerShell session: a webpage (Invoke-WebRequest cmdlet), update help using the Update-Help cmdlet, connect to Office365/Azure, or download an application package from an external package repository (using PackageManagement or NanoServerPackage). In this post I’ll show you how to access web from a PowerShell session via a proxy server with the authentication.
Let’s try to update the PowerShell Help from a computer behind a proxy server:
Update-Help
Or access an external web page:
Invoke-WebRequest http://contoso.com
If you haven’t got a direct Internet connection, the command will return a similar error:
Update-help : Failed to update Help for the module(s) ‘DhcpServer, DirectAccessClientComponents….’ with UI culture(s) {en-US} : Unable to connect to Help content. The server on which Help content is stored might not be available. Verify that the server is available, or wait until the server is back online, and then try the command again.
Invoke-WebRequest: Unable to connect to the remote server.

InvalidOperation: (System.Net.HttpWebRequest:HttpWebRequest).
The matter is that PowerShell (or rather, the .NET class System.Net.WebClient, which these cmdlets used to access external resources over HTTP/HTTPS) does not use proxy settings specified in the Internet Explorer. However, the WebClient class has some properties that allow you to specify both proxy settings (WebClient.Proxy) and proxy authentication data (WebClient.Credentials or WebClient.UseDefaultCredentials).
Manage WinHTTP Proxy Server Settings for PowerShell
Let’s check the current settings of the system proxy from PowerShell:
netsh winhttp show proxy
As you can see, proxy settings are not specified:
Current WinHTTP proxy settings:
Direct access (no proxy server).

You can import proxy server settings from the Internet Explorer parameters:
netsh winhttp import proxy source=ie
or set them manually:
netsh winhttp set proxy "192.168.0.14:3128"

If proxy authentication is necessary, the error like “(407) Proxy Authentication Required” will appear when you trying to run PowerShell commands. For example, when you try to connect to your Azure subscription with the command:
Add-AzureAccount -Credential (Get-Credential)
An error occurs:
Add-AzureAccount : user_realm_discovery_failed: User realm discovery failed: The remote server returned an error: (407) Proxy Authentication Required.
How to Set Proxy Authentication with PowerShell?
Let’s review two ways of using proxy authentication: you can use Active Directory SSO authentication, or specify user credentials for authentication manually.
If you are authorized on your computer under a domain account, and your proxy server supports Active Directory Kerberos, or NTLM authentication (if you have not disabled it yet), then you can use the current user credentials to authenticate on the proxy server (you do not need to enter your username and password):
$Wcl = new-object System.Net.WebClient
$Wcl.Headers.Add(“user-agent”, “PowerShell Script”)
$Wcl.Proxy.Credentials = [System.Net.CredentialCache]::DefaultNetworkCredentials
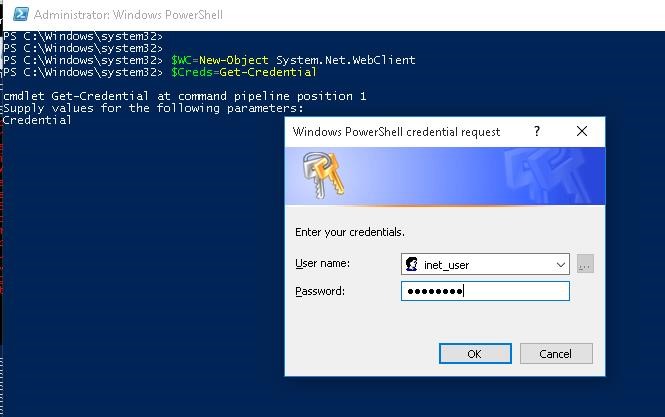
If you need to authenticate on the proxy server manually, run the following commands and specify user name and password in the corresponding credential window.
$Wcl=New-Object System.Net.WebClient
$Creds=Get-Credential
$Wcl.Proxy.Credentials=$Creds
Now you can try to access an external website or update the help using Update-Help command.
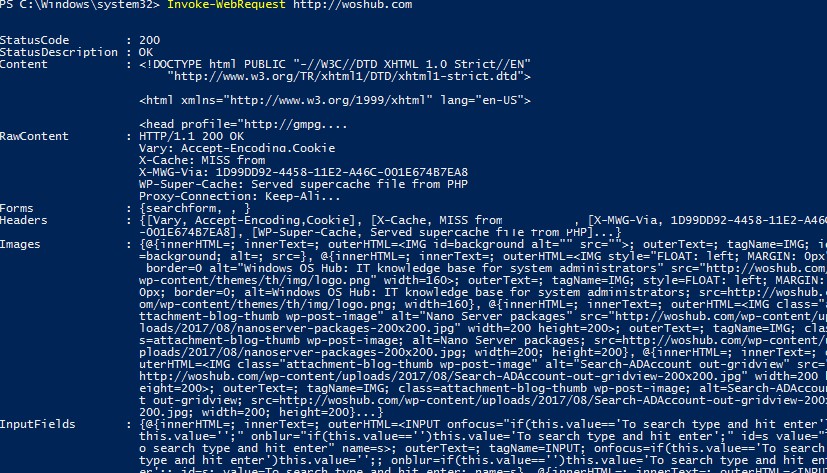
As you can see, the Invoke-Web Request cmdlet returned data from the external site webpage!
Set Proxy Server Settings in the PowerShell Profile File
You can create a PowerShell profile file to automatically set proxy settings when PowerShell starts.
To do this, run the command that will create the PowerShell profile file (C:\Users\username\Documents\WindowsPowerShell\Microsoft.PowerShell_profile.ps1):
notepad $PROFILE (or notepad $PROFILE.AllUsersCurrentHost – if you need to apply a PowerShell profile to all users of the computer).A PowerShell profile is a PS script that runs when your PowerShell.exe process starts.
Copy your PowerShell code into the notepad window. For example, you are using the Proxy Auto-Configuration (PAC) files to automatically configure proxy server settings on user computers. You can specify the URL address of the PAC file and authenticate on the proxy server under the current user with the following PowerShell profile script.
[system.net.webrequest]::DefaultWebProxy = new-object system.net.webproxy('http://10.1.15.5:80')
# If you need to import proxy settings from Internet Explorer, you can replace the previous line with the: "netsh winhttp import proxy source=ie"
[system.net.webrequest]::DefaultWebProxy.credentials = [System.Net.CredentialCache]::DefaultNetworkCredentials
# You can request user credentials:
# System.Net.WebRequest]::DefaultWebProxy.Credentials = Get-Credential
# Also, you can get the user password from a saved XML file (see the article “Using saved credentials in PowerShell scripts”):
# System.Net.WebRequest]::DefaultWebProxy= Import-Clixml -Path C:\PS\user_creds.xml
[system.net.webrequest]::DefaultWebProxy.BypassProxyOnLocal = $true
By default, the PowerShell script Execution Policy doesn’t allow all PS scripts to run, even from a PowerShell profile files. To allow scripts to run, you need to change your PowerShell Execution Policy. Run the command:
Set-ExecutionPolicy RemoteSigned
Save the Microsoft.PowerShell_profile.ps1 file and restart the PowerShell console window. Make sure that you can now access Web resources from a PowerShell session via a proxy without the need to run additional commands.
Check Current Proxy Server Setting from PowerShell
You can get the current proxy settings from the registry with the PowerShell command:
Get-ItemProperty -Path 'HKCU:\Software\Microsoft\Windows\CurrentVersion\Internet Settings' | Select-Object ProxyServer, ProxyEnable
In my example, the address and port of the proxy server are: 192.168.1.100:3128
Proxy server enabled: ProxyEnable =1

You can also get WebProxy settings like this:
[System.Net.WebProxy]::GetDefaultProxy()

If necessary, you can enable the use of proxy with the following command:
Set-ItemProperty -Path 'HKCU:\Software\Microsoft\Windows\CurrentVersion\Internet Settings' ProxyEnable -value 1
To disable proxy:Set-ItemProperty -Path 'HKCU:\Software\Microsoft\Windows\CurrentVersion\Internet Settings' ProxyEnable -value 0
Set Windows Proxy Setting Using PowerShell?
You can set proxy settings for current Windows user using PowerShell. For example, the following PowerShell function allows you to change proxy settings, but first it checks the availability of the proxy server and the port response on it using the Test-NetConnection cmdlet
function Set-Proxy ( $server,$port)
{
If ((Test-NetConnection -ComputerName $server -Port $port).TcpTestSucceeded) {
Set-ItemProperty -Path 'HKCU:\Software\Microsoft\Windows\CurrentVersion\Internet Settings' -name ProxyServer -Value "$($server):$($port)"
Set-ItemProperty -Path 'HKCU:\Software\Microsoft\Windows\CurrentVersion\Internet Settings' -name ProxyEnable -Value 1
}
Else {
Write-Error -Message "Invalid proxy server address or port:  $($server):$($port)"
}
}
Set-Proxy 192.168.1.100 3128