The Boot Manager in the modern Windows versions uses the BCD (Boot Configuration Data) file to boot the operating system installed on the computer. This file contains information about the installed OS and boot parameters. Windows cannot boot normally if the BCD file is deleted or corrupted. Also, you won’t be able to boot your Windows if the Master Boot Record (MBR) on the hard disk is damaged. In this post, we will show how to manually rebuild the boot configuration (BCD) file and fix MBR on Windows 10.
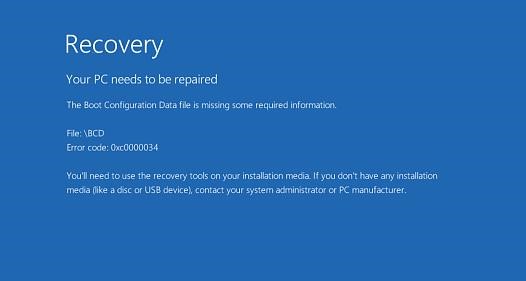
If the BCD file is missing or corrupted, if you removed/formatted a separate disk partition with the System Reserved label (and 500 MB in size) or a special OEM recovery partition, a user is likely to see the following message when trying to boot Windows 10: Your PC needs to be repaired
The Boot Configuration Data file is missing some required information
File: \Boot\BCD
Error code: 0xc0000034
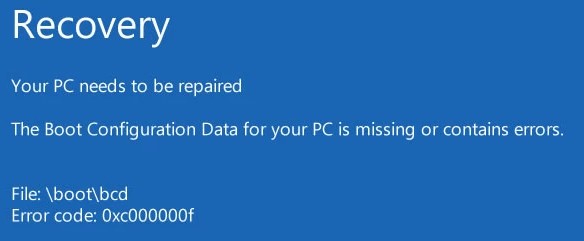
Also, the error may look like this: The Boot Configuration Data for your PC is missing or contain errors.
File: \boot\bcd
Error Code: 0xc000000f
If the MBR is corrupted, there may be a “No operating system found” error.
How to Automatically Repair Bootloader in Windows 10?
If this error appears, first of all, try to fix the problem with booting the OS using the Startup Repair mode that can be started from the Windows Recovery Environment (Windows RE).
If the automatic repair using Startup Repair did not help, boot your computer from Windows boot/installation disk or in the WinRE environment (Repair your computer -> Troubleshoot -> Advanced options -> Command Prompt). Start the command prompt and try to create a new BCD file and update the MBR record from scratch.
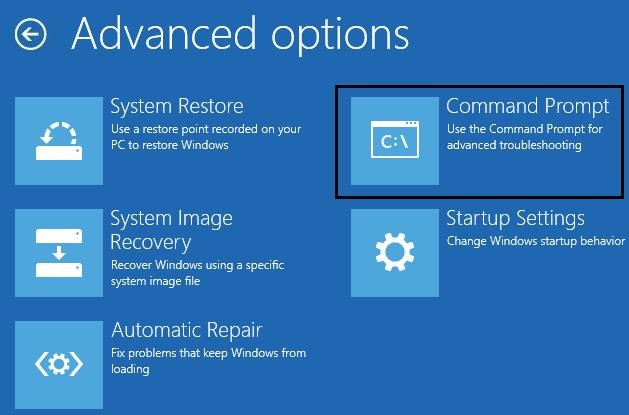
In this example, I will use Windows 10 installation disk. Change the primary boot device to DVD drive or USB flash drive in the BIOS settings (depending on which device you want to boot the computer from). Boot your computer from the Windows install image and press Shift + F10 on the language selection screen. You will see a command prompt.
Try to restore the BCD file automatically using this command:
bootrec /RebuildBCD
Reboot your computer and check if Windows boots (do not forget to change the boot priority settings in BIOS). If it isn’t, boot from the installation disk again and start the command prompt.
Identifying Disk Partition Style and Drive Letters
Very important. All instructions given below are suitable for standard BIOS computers with the MBR partition table.
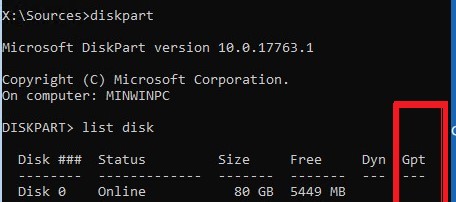
How to understand if you have a computer with BIOS or UEFI? The easiest way is to check the disk partition table on which Windows is installed: GPT or MBR. To do this, run the command:
diskpart
Then list available disks:
list disk
If the disk has an asterisk (*) in the Gpt column, then the GPT partition table is used on this disk (this means that you have a computer with UEFI and this post will not work for you). If there is no asterisk in the GPT column, then you have the MBR partition table on the disk, and you can continue to follow this instructions.
Next, you need to identify the local drives and volumes on your computer (most likely the volume letters assigned to them will be different from those you see when working in Windows). It is easier to do it using diskpart. Run these commands:
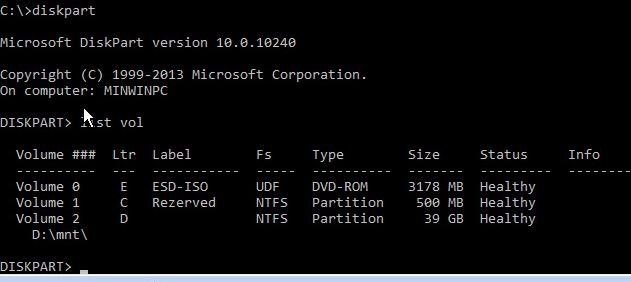
diskpart
list vol
You will see the list of partitions, the drive letters assigned to them and their sizes. In our case, there is one hard drive on the computer with the two volumes on them:
- System Reserved partition with the size of 500 MB and the drive letter C: assigned to it. By default, BCD file is located in this little service partition;
- NTFS partition with the size of 39 GB and the letter D: assigned. This partition contains installed Windows, programs and user data.
Important. Remember the assigned drive letters, since they will be used in the commands later.
Repair Master Boot Record (MBR) in Windows 10
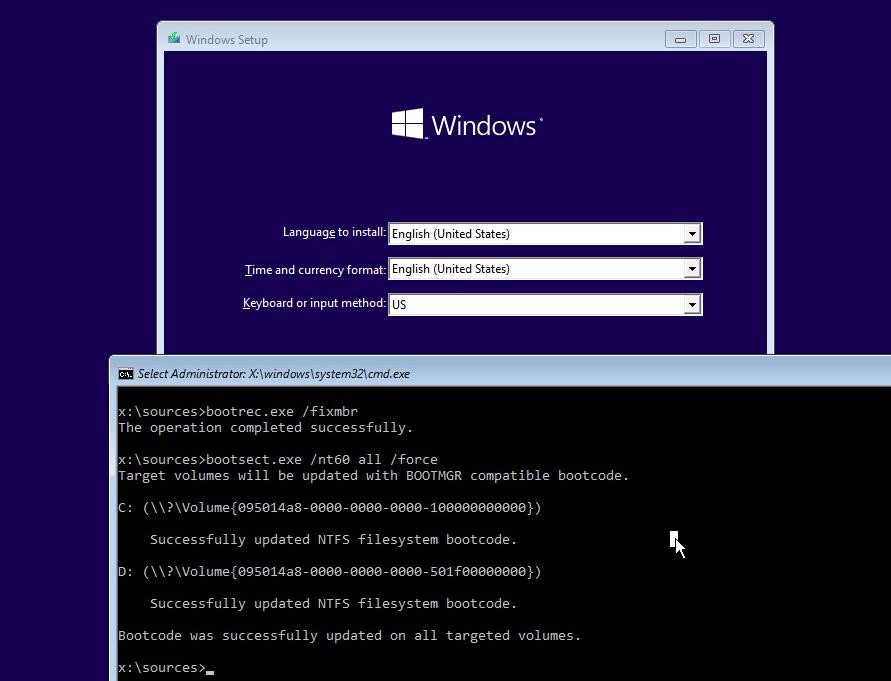
Using the following commands, we’ll overwrite the Master Boot Record on boot sector of your hard drive, and add the necessary links to Windows 10 bootloader.
bootrec.exe /fixmbr
bootsect.exe /nt60 all /force
If bootsect.exe command is not found, try to specify the full path to it:X:\boot\bootsect.exe /nt60 all /forceBefore moving on, try to automatically re-create the BCD bootloader configuration with following commands (this is the easiest way for beginners):
bootrec /FixBoot – the command recreates the boot sector on the system partition;bootrec /ScanOsbootrec /RebuildBcd – scan all disks and search for installed Windows, add found copies to the BCD bootloader configuration.
After that, restart the computer and check the Windows boot. If the OS doesn’t boot, follow the instructions below.
How to Manually Rebuild Boot Configuration File on Windows 10?
Then using BCDedit command, create a new Boot Configuration Data file.
Delete the old (corrupted) BCD file in System Reserved partition and create a new one instead:
del c:\boot\bcd If the drive letter is not assigned to the System Reserved partition (by default), you can assign it yourself using diskpart. Run: diskpart
Select your local disk (in my case, only one hard disk is installed on the computer, but you can list local disks with the list disk command): select disk 0
The screenshot above shows that the System Reserved partition is called Volume 1. Select it: select volume 1
Assign a drive letter (I assigned a letter C:, but you can use any other letter, in this case change the path in the following commands): assign letter C:
exit
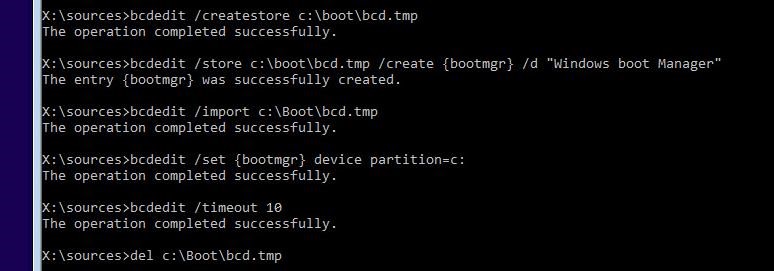
Create an empty temporary file bcd.tmp:
bcdedit /createstore c:\boot\bcd.tmp
Create an entry for the Boot Manager (bootmgr):
bcdedit.exe /store c:\boot\bcd.tmp /create {bootmgr} /d "Windows Boot Manager"
Import settings from bcd.tmp to your BCD:bcdedit.exe /import c:\boot\bcd.tmp
Specify that the Boot Manager is located on the System Reserved partition (the letter C: is assigned to it): bcdedit.exe /set {bootmgr} device partition=c:
Configure the timeout to select an OS:bcdedit.exe /timeout 10
Delete the temporary file:del c:\boot\bcd.tmp
So we have a file with the bootloader parameters. Now you have to add the entries about the installed Windows.
Create a new entry for Windows 10 in the BCD configuration:
bcdedit.exe /create /d "Windows 10" /application osloader
The command will return the unique identificator (GUID) of this bootloader entry.The entry {8a7f03d0-5338-11e7-b495-c7fffbb9ccfs} was successfully created.

Specify that bootmgr must use this entry by default (after the timeout, this entry is used to boot):
bcdedit /default {8a7f03d0-5338-11e7-b495-c7fffbb9ccfs}
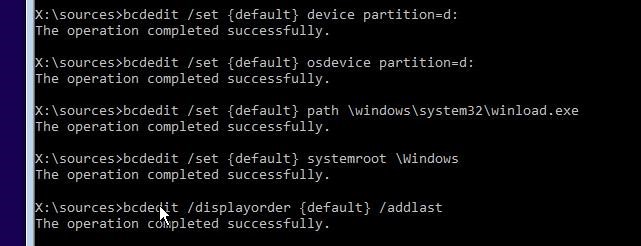
Now you have to specify the paths to the installed Windows 10 copy in the new bootloader entry. We have seen in WinPE that the letter D: is assigned to Windows partition. Use this drive letter in the following commands:
bcdedit.exe /set {default}device partition=d:
bcdedit.exe /set {default} osdevice partition=d:
bcdedit.exe /set {default} path \Windows\system32\winload.exe
bcdedit.exe /set {default} systemroot \Windows
Make this boot record in BCD visible, since it is hidden by default:bcdedit.exe /displayorder {default} /addlast
So we have re-created Windows 10 bootloader and BCD file, and fixed the boot sector on MBR. Now you can restart your computer and make sure that Windows 10 boots as usual.