Full multiple partitions support for any USB storage device has appeared in Windows 10 starting with build 1703 (Creators Update). Now, a Windows 10 user can get access to all partitions on a USB flash drive (or SD card), as well as create multiple logical partitions on such a media using the built-in OS tools. Previously, when connecting a USB stick with several partitions (that were created on Linux or using third-party tools) to a computer running Windows, the OS displayed only the first primary partition (all other partitions were ignored). Normal operation with multiple partitions in Windows was available only for the drives identified as fixed (non-removable/local).
Windows 10 Creators Update (and newer) automatically displays all partitions available on a USB stick or SD card and ignores the RMB bit. In this case, the USB drive is still identified as a Removable device.
How to Create Multiple Partitions on a USB Drive in Windows 10?
Let’s try to create several partitions on a USB stick in Windows 10. Suppose that a primary partition is already created on the USB stick, which occupies the entire volume of the USB media. We will compress it and create the second (and subsequent) partitions:
- Connect the USB stick to the computer’s USB port;
- Format the USB flash drive in the NTFS file system and then open the Disk Management (diskmgmt.msc) console;
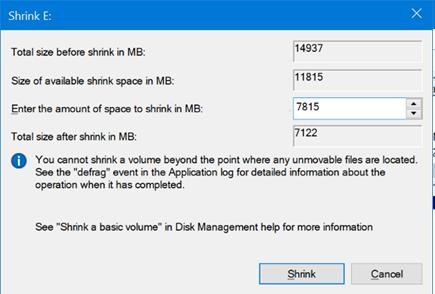
- Right-click the partition on the USB stick and select Shrink Volume in the context menu;
- Specify the size of free space after shrinking and click Shrink. For example, we want to create two partitions of 7 GB and 8 GB on the 15 GB USB flash device;
- Right-click on the unallocated disk area and select New Simple Volume to create an additional partition;
- Select the drive letter, volume label and file system type (I formatted the second partition in the FAT32 file system).
As you can see, we have got the USB stick with two partitions. The first partition is formatted in NTFS, and the second in FAT32. Both partitions are displayed in Windows and ready to use.
Partition USB Drive in Windows 10 Using DiskPart
You can also create several partitions on a USB flash drive using the DiskPart CLI tool. In this example, we will create two partitions: the first partition with the FAT32 file system, and the second with NTFS (you cannot create the first partition with FAT32 from the GUI of the Disk Management console).
Open an elevated command prompt and run the DiskPart command. In the context of Diskpart, you must run the following commands one by one:
list disk
select <here you must specify the disk number assigned to the USB drive in your system>
clean
create partition primary size=3000
format quick fs=fat32 label="FirstFAT32Partition"
assign letter=J
active
create partition primary
format fs=ntfs quick label="Data(NTFS)"
assign letter=K
list vol
exit
Create Multiple Partitions on a USB Flash Drive Using PowerShell
You can also create several partitions on a USB flash drive using PowerShell cmdlets from the built-in Storage module.
Get the USB disk ID on your computer:
Get-DiskThe following command will remove all data from the USB storage device.
Delete the existing partitions on the USB drive:
Get-Partition –DiskNumber 1 | Remove-Partition
Use the following PowerShell commands to create two logical partitions on a USB flash drive and format them:
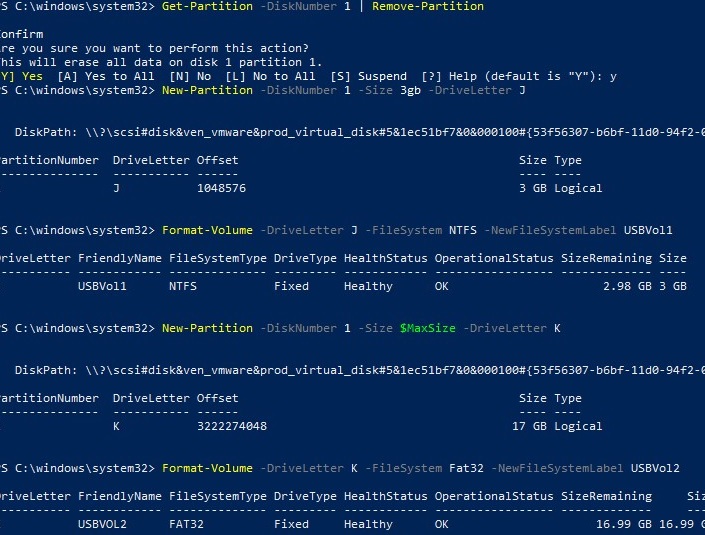
New-Partition –DiskNumber 1 -Size 4gb -DriveLetter J
Format-Volume -DriveLetter J -FileSystem NTFS -NewFileSystemLabel USBVol1
New-Partition –DiskNumber 1 –UseMaximumSize -DriveLetter K
Format-Volume -DriveLetter K -FileSystem Fat32 -NewFileSystemLabel USBVol2
Keep in mind that USB sticks with multiple partitions will be correctly displayed only on Windows 10 1703 and newer. In earlier versions of Windows, only the first partition will be still displayed.
Why might you need several partitions on a USB flash drive?
- If the USB drive needs to be used in different OS with different file systems (for example, in Windows and Linux/Android);
- As the simplest way to hide data on the USB media;
- If you use a USB flash drive to boot and install Windows on the UEFI computers. The fact is that the UEFI computer allows you to boot only from a FAT32 drive. But you cannot put a file larger than 4 GB on it (FAT32 file system limitation). As a result, you will have to split the Windows install.wim file into several parts, or create a second NTFS partition on the bootable USB device and copy the installation WIM/ESD file there.
