Quite a number of applications on Windows Server and Windows 10 require .NET Framework 3.5 (in spite of .NET Framework 4.6 is installed by default). For example, I couldn’t install and run SQL Server Management Studio without .NET 3.5. Let’s look at how to install .Net Framework 3.5 on Windows Server 2016/2019 and Windows 10.
Install .NET Framework 3.5 on Windows Server
If your Windows Server has direct Internet access, you can install .NET Framework 3.5 in several ways:
- Via Server Manager;
- Using DISM command:
DISM /Online /Enable-Feature /FeatureName:NetFx3 /All - Using PowerShell:
Install-WindowsFeature NET-Framework-Core
In this case, all the necessary .NET 3.5 distribution files for your Windows Server version are downloaded from the Windows Update servers. For this installation method to work, you need to make sure:
- Your server is not configured to receive updates from the local WSUS server (check the update settings in GPO or directly in the servers’ registry);
- Proxy and firewall settings should not restrict access to Windows Update servers.
If there is no direct Internet access from the server, then when you trying to install .NET 3.5 on Windows Server using the Server Manager console (Add Roles and Features -> Features -> NET Framework 3.5 Features), the installation fails with the error 0x800f081f (The source files could not be found) or 0x800F0950.
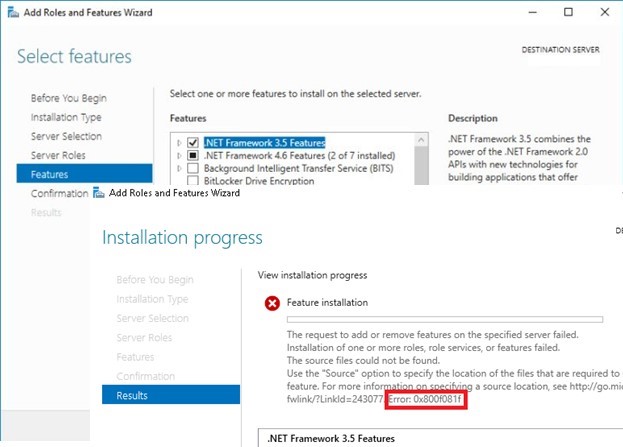
Although, .NET Framework 3.5 is included in the list of Windows Server 2016/2019 features, its binary files are missing in Windows component store (Features on Demand concept). This is done to reduce the Windows size on the disk. You can install the component using the GUI or PowerShell. You can check for the presence of the .NET Framework 3.5 on the local component store on Windows Server with the command:
Get-WindowsFeature *Framework*

As you can see the status of the NET-Framework-Core feature is Removed.
In order to install the NET-Framework-Core, you will need the Windows Server 2016/2019 distribution in the form of an ISO file, a DVD drive, or in the unpacked form in a shared network folder. Mount the ISO file with the Windows Server install image as a virtual drive (for example, drive D:). Now, you can install the Windows features from the GUI or using PowerShell.
Using Server Manager to Install .NET Framework 3.5 on
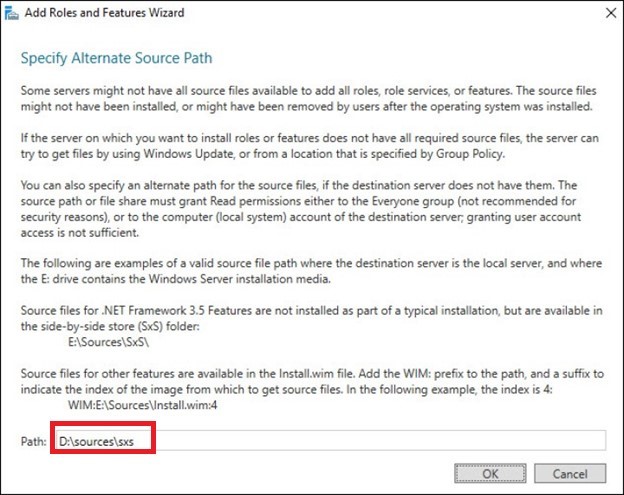
You can install .NET 3.5 feature using Server Manager graphic console. To do so, select the .Net Framework 3.5 feature as earlier, but prior to clicking Install, click a small link at the bottom of the form — Specify an alternate source path.

In this window you have to specify the path to the component store (SxS folder) of your Windows Server 2016 install image. If you mounted the ISO image as a virtual disk, the path may look like D:\sources\sxs. It can also be the network share, where you copied the distribution files (for example, \\fs1\iso\ws2016\sources\sxs). Then click OK.
Just run the installation.
How to Install .NET Framework 3.5 using DISM or PowerShell?
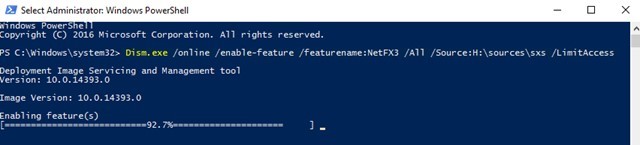
It is much easier to install .NET Framework 3.5 feature from the elevated command prompt or PowerShell console. Just run the command:
Dism.exe /online /enable-feature /featurename:NetFX3 /All /Source:D:\sources\sxs /LimitAccess
Where D:\ is the drive with Windows Server 2016 source files.
The LimitAccess parameter prevents DISM from connecting to Windows Update servers to receive component binary files. Only source files in the specified folder are used.
You can also install it using the Add-WindowsFeature PowerShell cmdlet:
Add-WindowsFeature NET-Framework-Core -Source d:\sources\sxs
After the component installation is completed, a server restart is not required.
You can also manually copy 2 cab files microsoft-windows-netfx3... from the \sources\sxs folder of your Windows Server install image. In this case, to install .NET 3.5, just run the command:
dism /online /Add-Package /PackagePath:C:\distrib\net35\microsoft-windows-netfx3-ondemand-package~31bf3856ad364e35~amd64~~.cab.
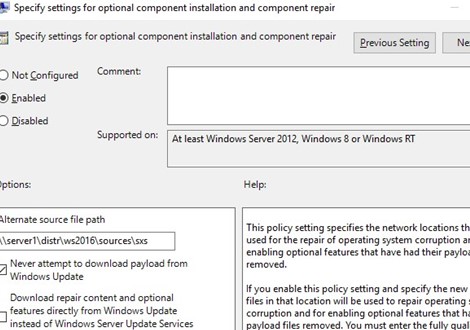
Managing Optional Component Installation with GPO
Using the Group Policy setting Specify settings for optional component installation and component repair (located under GPO section Computer Configuration -> Administrative Templates -> System), you can configure specific settings for installing Windows components from a local source or Windows Update even when using WSUS.
Here you can specify that when installing or repairing Windows components, you should always download files from the Windows Update servers (Internet) instead of the local WSUS server (the “Download repair content and optional features directly from Windows Update instead of Windows Server Update Services” option). You can also specify the path to the directory with the Windows Server components (or wim file) that you want to use during features installation (specified in the “Alternate source file path” parameter).
How to Enable .NET Framework 3.5 on Windows 10?
On Windows 10, you can install the .NET Framework 3.5 from the Windows Feature window in the Control Panel.
- Run the command
optionalfeatures.exe; - In the list of components, select.NET Framework 3.5 (includes .NET 2.0 and 3.0), click Ok;
- If your computer has direct Internet access, in the next window select “Let Windows Update download the files for you” and the latest version of the .NET Framework 3.5 will be downloaded and installed from Microsoft servers.
The same DISM and PowerShell commands to download and online install the .NET Framework 3.5:DISM /online /Enable-Feature /FeatureName:"NetFx3"
andEnable-WindowsOptionalFeature -Online -FeatureName "NetFx3"
If you do not have Internet access, you can install .NET 3.5 on Windows 10 using:
- Offline installer – download the latest version of .NET Framework 3.5 SP1 Runtime (dontetfx35.exe) here: https://dotnet.microsoft.com/download/dotnet-framework/net35-sp1;
- If you have an installation disk or ISO image with Windows 10 (version and build must match), connect/mount it for example, to drive D:. To install .NET 3.5, use the DISM command (
DISM /online /enable-feature /featurename:NetFX3 /All /Source:D:\sources\sxs /LimitAccess) or PowerShell (Add-WindowsCapability -Online -Name NetFx3~~~~ -Source D:\Sources\SxS)
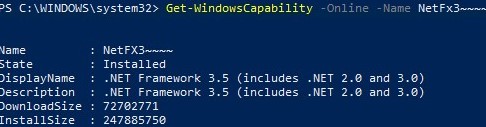
To verify that the .NET Framework is successfully installed, run the command:
Get-WindowsCapability -Online -Name NetFx3~~~~
Name         : NetFX3~~~~
State        : Installed
DisplayName  : .NET Framework 3.5 (includes .NET 2.0 and 3.0)
DownloadSize : 72702771
InstallSize  : 247885750
You can also verify that the .NET Framework 3.5 is installed on your computer using the command:
(Get-ItemProperty -Path "HKLM:\SOFTWARE\Microsoft\NET Framework Setup\NDP\v3.5").Version

Similarly, you can check for other versions of .NET installed.