This is a step-by-step guide on how to create a bootable USB flash drive with a Windows 10 or Windows 7 install image for a UEFI computer. We’ll need the following:
- USB flash drive (USB v2 or v3) with a capacity of at least 4 GB for Windows 7 or 8 GB for Windows 10;
- 64-bit Windows install image (32-bit Windows versions won’t boot on the UEFI computer). A Windows distribution could be in the form of the installation DVD or an ISO image file.
In order to make a UEFI computer boot from a USB flash drive, you must format it in the FAT32 file system.
Let’s look at a few of the most popular ways that you can create a bootable UEFI USB flash drive for installing Windows 10.
Use Media Creation Tool to Create Windows 10 Install USB Stick
Microsoft’s official tool for creating installation media and ISO images with Windows 10 is Media Creation Tool. You can download the latest version here – https://www.microsoft.com/en-us/software-download/windows10

Old versions of the Windows USB/DVD download tool formatted USB drive in the NTFS file system when burning Windows 7 image. A computer with UEFI architecture cannot boot from that media in native mode. Therefore, this tools is not suitable for creating an installation flash drive with Windows 7.
- Run the file MediaCreationTool20H2.exe;
- Select Create installation media (USB flash drive, DVD, or ISO file) for another PC);
- Select the language, edition and architecture (bitness) of the Windows 10 image that you want to write to the USB drive;
- Then select that you want to write the image to a USB flash drive;
- Select your flash drive in the list of removable devices and USB drives.
That’s all. Click Next -> Next -> Finish and wait until the install Windows image is written to the USB drive.
In this case, all data on the USB flash drive will be deleted permanently during formatting.
This USB flash drive can be used to boot on both UEFI and BIOS computers.
Using Rufus to Create Windows UEFI USB stick
It is much easier for novice users to create bootable UEFI flash drive for installing Windows using the graphical interface of the popular Rufus utility. At the moment, the Rufus version 3.10 is available on the developer’s website https://rufus.ie. The tool is quite compact (about 1 MB), doesn’t require installation and it’s completely free. In addition, it works much faster than others.
Run the Rufus tool with administrator privileges and specify the following settings:
- Device: select your USB flash drive;
- Boot selection: specify Windows ISO image file (you can create an ISO image with the latest Windows 10 build using the Media Creation Tool, see example);
- Partition scheme: GPT;
- Target system: UEFI (non-CSM);
- File system: FAT32.
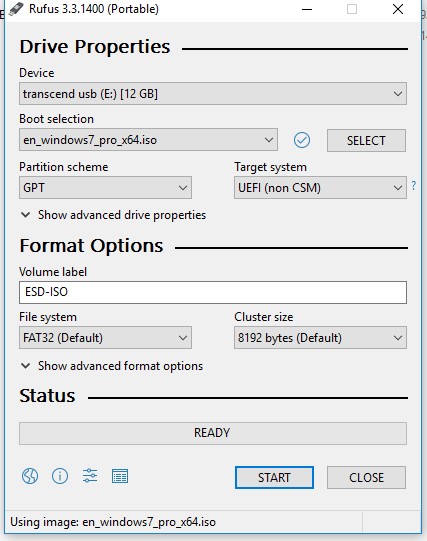
Click START to write a Windows image to a USB flash drive. After 10-15 minutes, your bootable USB flash drive with Windows install image for UEFI computer is ready.
Using Diskpart to Create UEFI Boot-Stick with Windows
You can create a bootable UEFI flash drive with the Windows install image manually. The procedure described below is suitable for advanced users, is performed from the command line and allows you to fully control (and understand) all the steps in the process of creating a bootable USB flash drive.
Step-by-step guide on how to create a boot Windows flash drive for a UEFI system using diskpart:
- Connect a USB flash drive to the corresponding PC port;
- Run the command prompt as an administrator;
- Run the DISKPART tool by typing in the command prompt:
Diskpart - Display the list of all drives in the computer:
list disk - Find the disk that corresponds to your USB flash drive (in our example it is Disk 2) and select it:
Select Disk 2 - Warning. The following command will completely remove all information and partitions on the USB flash drive. So, it is better to make sure that you have selected your removable USB device in the previous step, and not one of the computer’s hard drives. Remove all data from the drive using this command:
clean - Create a primary partition:
create partition primary - Make this partition active (a system volume):
active - List the system volumes with this command:
list volume - Select the partition you have created (in our example, it is Volume 3):
select volume 3 - Format the selected partition with FAT32:
format fs=fat32 quick
Note. Unlike legacy computers with BIOS, which allow booting from partitions with FAT, FAT32, exFAT or NTFS file systems, a UEFI allows to boot only from a bootloader located on a boot drive formatted with the FAT32. - Assign a drive letter to the formatted partition:
assign - Exit DISKPART:
exit
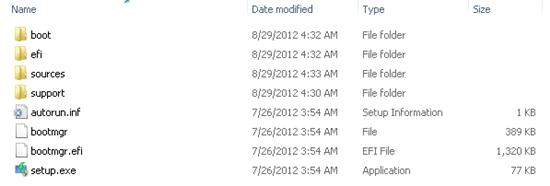
Copy the contents of your Windows x64 install image to the USB flash drive that you have prepared. You can do it using Windows Explorer, your favorite file manager or from the command prompt, for example:
xcopy d:\* f:\ /s /e
(where D:\ is an installation DVD or mounted ISO image containing a Windows distro, and F:\ is a letter assigned to the USB flash drive);
Note. Since the maximum file size on the FAT32 file system should not exceed 4 GB, you won’t be able to copy the large image file install.wim. The size of the install.wim file may be more than 4 GB if you integrated updates, drivers, etc. into it. In this case, you will have to split the install.wim file into several files up to 4 GB in size (for example, 3 GB files). To do this, you can use the command Dism /Split-Image:Dism /Split-Image /ImageFile:D:\sources\install.wim /SWMFile:c:\tmp\install.swm /FileSize:3000
Or using the imagex tool:imagex /split D:\sources\install.wim c:\tmp\install.swm 3000
The resulting files (install.swm, install2.swm, install3.swm …) need to be copied to the USB flash drive into the directory F:\sources. The Windows Installer will assemble the swm files and apply the full wim image to the disk during the install process.
This completes the process of creating a bootable UEFI flash drive with Windows 10.
Create UEFI Bootable USB Drive to Install Windows 7
If you are creating an install USB flash drive with Windows 7 for a UEFI computer, you need to perform additional steps:
- Go to f:\efi\microsoft\boot folder on the USB flash drive;
- Entirely copy its contents one level up (to the F:\efi\boot directory);
- Copy the bootmgfw.efi file to the f:\efi\boot folder and rename it to bootx64.efi.
Note. The UEFI environment should pass control to the bootx64.efi file. The file bootmgfw.efi can be copied from the deployed Windows 7 x64 computer (located in the %windir%\Boot\EFI folder). You can also get it using 7ZIP archiver, for example, from install.wim in the ISO install image. You can find it in the folder sources\install.wim\1\Windows\Boot\EFI\bootmgfw.efi.
Note. Some motherboards require bootx64.efi to be additionally copied to the USB flash drive root; it has to have either the same name or shellx64.efi.
Create UEFI Bootable USB Media with PowerShell
You can also use PowerShell cmdlets to create a bootable UEFI flash drive.
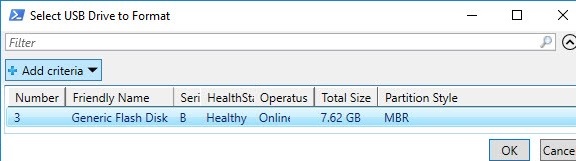
The following PowerShell one-liner will list the connected USB media devices. After you select the flash drive you need, it will be cleaned up, the primary partition will be created and formatted in the FAT32 file system (using cmdlets from the Storage disk management module):
$Results = Get-Disk |Where-Object BusType -eq USB |Out-GridView -Title 'Select USB Drive to Create UEFI bootable device' -OutputMode Single |Clear-Disk -RemoveData -RemoveOEM -Confirm:$false -PassThru |New-Partition -UseMaximumSize -IsActive -AssignDriveLetter |Format-Volume -FileSystem FAT32
Mount the install ISO image of Windows 10:
$Volumes = (Get-Volume).Where({$_.DriveLetter}).DriveLetter
Mount-DiskImage -ImagePath C:\ISO\Windows10-2004x64.iso
$ISO = (Compare-Object -ReferenceObject $Volumes -DifferenceObject (Get-Volume).Where({$_.DriveLetter}).DriveLetter).InputObject
Because in PowerShell, I could not detect which drive letter was assigned to the mounted ISO image; I had to compare the list of disks before and after mounting using Compare-Object.
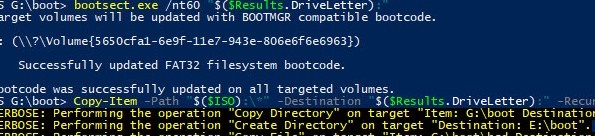
Now you need to go to the Boot directory and copy the contents to a USB flash drive using Copy-Item cmdlet:
Set-Location -Path "$($ISO):\boot"
bootsect.exe /nt60 "$($Results.DriveLetter):"
Copy-Item -Path "$($ISO):\*" -Destination "$($Results.DriveLetter):" -Recurse -Verbose
Please note that in order to install the Windows operating system in UEFI mode, you must use the GUID Partition Table (GPT) for your computer’s hard disk. To convert an MBR disk to a GPT partition table without data loss, you can use the mbr2gpt tool).
After the procedures above, you have a bootable USB flash drive to install Windows on a UEFI computer in the native mode.