Mbr2gpt.exe is a new built-in Windows 10 console tool that allows you to convert a disk with the MBR (Master Boot Record) partition table to a GPT (GUID Partition Table) without data loss and without the need to delete existing partition. The mbr2gpt tool can be used to convert the partition table both in Windows PE (Windows Preinstallation Environment) and directly from the running Windows 10. You can use this tool to change the partition table from MBR to GPT both on the data (non system) disk and on the system disk, on which Windows 10 is installed (using the /allowFullOS option).
How does the MBR2GPT Tool Work?
The mbr2gpt.exe tool is part of the Windows 10 image, starting from build 1703 (Creators Update). You can use mbr2gpt to convert a disk from MBR to GPT in offline mode on earlier Windows 10 builds (1507, 1511 and 1607). Previous Windows versions (Win 7/8.1) are not officially supported.
Note. Earlier, a third-party tool gptgen, could be used to convert a non-system disk from MBR to GPT without losing existing partitions. But to convert a system disk, you had to completely clean up the disk, create GPT partition table and new partitions on it, and then perform a clean install of Windows 10.
The MBR2GPT documentation says, that the following conditions must be met to convert a disk partition table to GPT:
- Current disk partition table is MBR;
- There is free space on the disk for placing the primary and secondary GPT tables at the beginning and end of the disk;
- The MBR table should contain no more than 3 partitions, one of which is active (additional and logical partitions should be missing);
- The BCD configuration must have a boot record pointing to a Windows partition.
The logic of Mbr2gpt when converting an MBR disk to a GPT is as follows:
- Disk check;
- If there is no EFI (ESP) system partition, it is created using free space from one of the partitions (if there is not enough free space, an error message will appear “
cannot find room for the EFI system partition”); - UEFI boot files are copied to the EFI partition;
- GPT metadata and partition table are applied to the disk (the MBR partition table is converted to GPT without losing data on existing partitions);
- The BCD bootloader configuration is updated.
The syntax of the MBR2GPT tool is:
mbr2gpt /validate|convert [/disk:] [/logs:] [/map:=] [/allowFullOS]
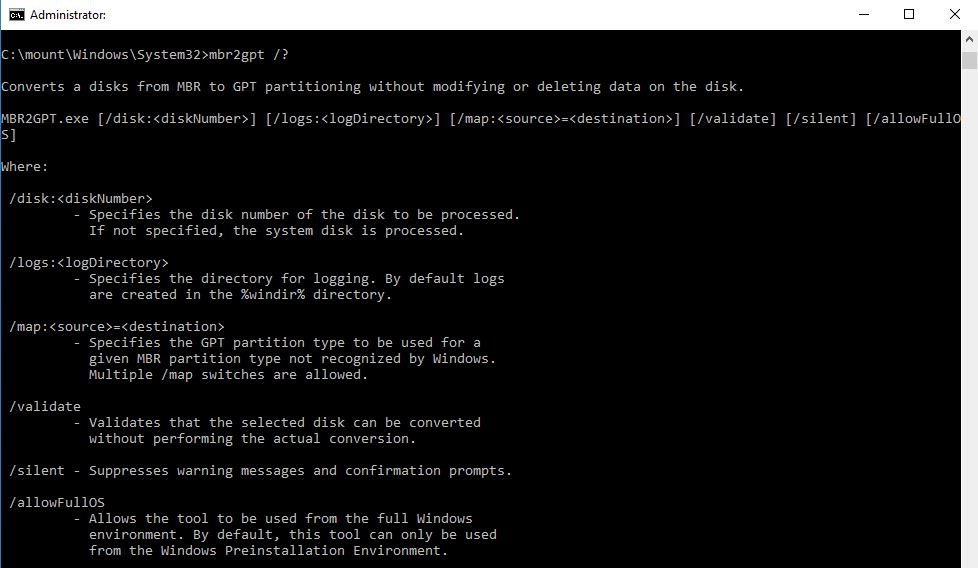
- /validate– the disk is only validated if the partition table can be converted (including the check of free space to store the primary and the secondary GPT table: 16 KB + 2 sectors in the beginning of the disk and 16 KB + 1 sector in the end);
- /convert– starts converting the disk if the validation has been successful;
- /disk:— specifies the number of the disk to be converted into GPT. If the number is not set, the system disk will be converted (like Diskpart command:
select disk system) - /logs:— specifies the path to the directory where MBR2GPT should write log files. If the path is not set, the
%windir%folder is used. The log files are diagerr.xml, diagwrn.xml, setuperr.log and setupact.log; - /map:— allows you to specify additional partition table mappings between MBR and GPT. For example, /map:42={af9b60a0-1431-4f62-bc68-3311714a69ad}. The number of the MBR partition is specified in decimal notation, and GPT GUID contains delimiters. You can specify multiple mappings at once;
- /allowFullOS– by default, the MBR2GPT can be used only in Windows PE. You can use the allowFullOS parameter in order to convert system disk directly from running Windows 10. Using this key, you can run the tool in the full Windows environment. If you do not specify this parameter when using mbr2gpt from Windows, an error will appear:
ERROR: MBR2GPT can only be used from the Windows Preinstallation Environment. Use /allowFullOS to override.
Convert Disk from MBR to GPT without Dara Loss from Windows 10
The disk conversion operation from the MBR to GPT is irreversible. Make sure your computer supports UEFI before converting.
Before converting the disk partition table, let’s validate the current system disk for conversion from MBR to GPT:
mbr2gpt.exe /disk:0 /validate /Logs:C:\logs /allowFullOS
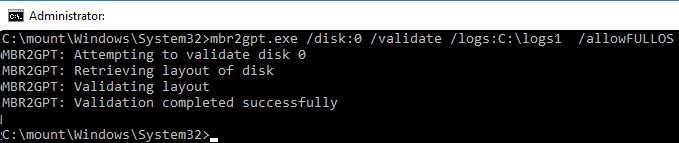
MBR2GPT: Attempting to validate disk 0
MBR2GPT: Retrieving layout of disk
MBR2GPT: Validating layout, disk sector size is: 512
The line MBR2GPT: Validation completed successfully shows that this disk can be converted. The line MBR2GPT: Disk layout validation failed means that the disk cannot be converted, because it does not satisfy the conditions.
Another common error Cannot find OS partition (s) for disk 0 is most often associated with the use of a third-party bootloader or choosing a wrong disk to convert. You can also try to move the Windows boot files to the system partition (bcdboot c:\Windows /f bios /s c:), and check the entries for the WinRE environment in the BCD (reagentc /disable && reagentc /enable) are correct.
If the system disk is encrypted using BitLocker, decrypt it before conversion.
Now you can convert the partition table on the system disk:
mbr2gpt.exe /convert /disk:0
MBR2GPT will now attempt to convert disk 0.
If conversion is successful the disk can only be booted in GPT mode.
These changes cannot be undone!
MBR2GPT: Attempting to convert disk 0
MBR2GPT: Retrieving layout of disk
MBR2GPT: Validating layout, disk sector size is: 512 bytes
MBR2GPT: Trying to shrink the system partition
MBR2GPT: Trying to shrink the OS partition
MBR2GPT: Creating the EFI system partition
MBR2GPT: Installing the new boot files
MBR2GPT: Performing the layout conversion
MBR2GPT: Migrating default boot entry
MBR2GPT: Adding recovery boot entry
MBR2GPT: Fixing drive letter mapping
MBR2GPT: Conversion completed successfully
MBR2GPT: Before the new system can boot properly you need to switch the firmware to boot to UEFI mode!
Converting a disk from MBR to GPT from installed Windows 10 is done in seconds.
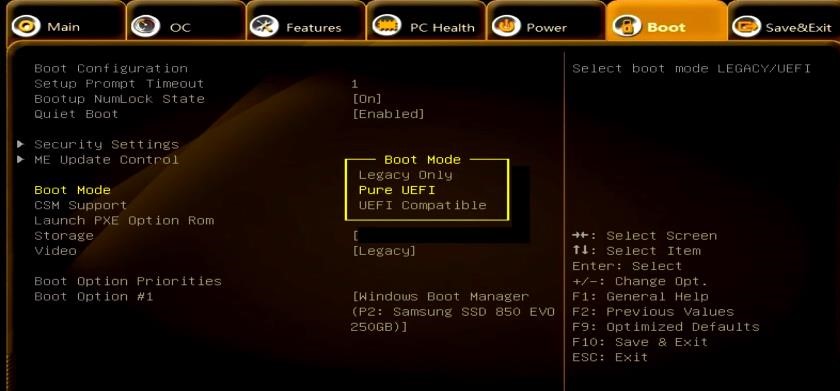
To make a computer boot from the new EFI partition, you have to change its settings to boot in the UEFI mode. Restart your computer and in the UEFI settings change the boot mode from Legacy (BIOS) to UEFI (Pure) and save the changes.
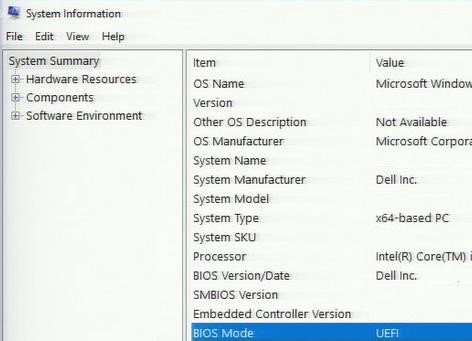
Windows 10 should boot successfully. Using msinfo32.exe you can make sure that Windows 10 has booted in the BIOS Mode = UEFI.
Key benefits of moving to native UEFI mode and GPT partition table:
- You can create a partition larger than 2 Tb size;
- Protection of the boot environment with Secure Boot;
- ELAM (Early Launch Antimalware) technology;
- Device Guard and Credential Guard features in Windows 10 Enterprise;
- Measured Boot
Converting MBR to GPT during Windows 10 Installation
You can use the mbr2gpt tools during Windows 10 installation. For example, you created a bootable UEFI flash drive, and are trying to install Windows 10 on a disk with an MBR partition table on a UEFI-based computer. In this case, an error will appear:
Windows cannot be installed to this disk. The selected disk has an MBR partition table. On EFI system, Windows can only be installed to GPT disks.
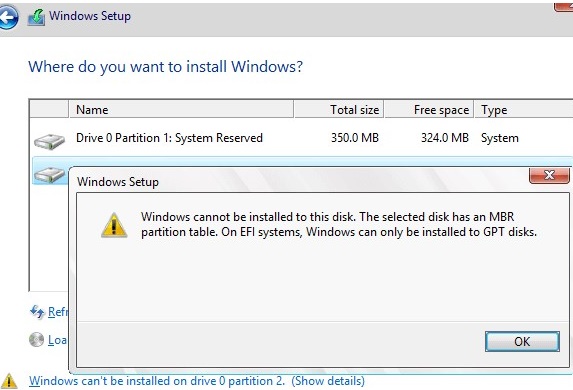
If you don’t want to lose existing data partitions on the MBR disk (it was used to boot in Legacy mode or on a computer with BIOS) when changing disk partition table to GPT, you can convert the MBR disk to GPT directly from the Windows 10 install window.
- Press the keys
Shift+F10on the Windows 10 setup screen to open the command prompt of the WinPE environment; - Check if the disk partition table can be converted to GPT. Run the command:
mbr2gpt /validate - If the command returned
Validation completed successful, you can convert this disk; If the errorFailed to retrieve geometry for disk -1appears, most likely you have several disks connected to your computer. Run the commanddiskpart->list diskin order to identify disk numbers. You can validate a specific disk by the disk number with the command:mbr2gpt /validate /disk:0 - To convert a disk partition table run the command
mbr2gpt /convertor with the disk numbermbr2gpt /convert /disk:0 - The mbr2gpt tool will create a new EFI system partition boot partition, copy the Windows bootloader to it and convert the partition table to GPT (existing partitions will be saved). You just have to switch to the Windows 10 Setup window, click the Refresh button in the disk selection screen and start installing Windows 10 on the selected partition.
MBR2GPT Known Issues
After converting the partition table using mbr2gpt, most often there are problems with BitLocker and Hyper-V (available in Pro and Enterprise Windows 10 editions).
If you converted your system disk and are trying to enable BitLocker, you may receive an error message: The system cannot find the file specified. This is most likely the problem with the Windows Recovery Environment (WinRE).
Try to rename the file %windir%\System32\Recovery\ReAgent.xml and enable the BitLocker (a new ReAgent.xml file will be created automatically).
There may also be an error when starting Hyper-V virtual machines:
Virtual machine could not be started because the hypervisor is not running.
To fix this error, you need to enable Hyper-V autostart in the BCD configuration:
BCDEDIT /Set {current} hypervisorlaunchtype auto
If you try to convert disks with previous Windows versions (7/8.1), the tool will give the error mbr2gpt cannot install new boot files. In this case, it is recommended that you perform in-place upgrade to Windows 10 first and only then convert the partition table.