You can configure network ports forwarding in all Windows versions without using third-party tools. Using a port forwarding rule, you can redirect an incoming TCP connection (IPv4 or IPv6) from the local TCP port to any other port number, or even to a port on a remote computer. Moreover, it is not necessary for Windows to have a service that listens on a specific TCP port. Windows port forwarding is most commonly used to bypass firewalls or to hide an internal host or service from the external network (NAT/PAT).
In the Linux world, port forwarding is configured quite simply using iptables or firewalld. On Windows Server systems, the Routing and Remote Access Service (RRAS) is typically used to configure port redirections. However, there is an easier way to configure the port forwarding, which works well in any Windows version.
How to Configure Port Forwarding on Windows 10 using Netsh Portproxy?
You can configure port forwarding in Windows using the Portproxy mode of the Netsh command. The command syntax is as follows:
netsh interface portproxy add v4tov4 listenaddress=localaddress listenport=localport connectaddress=destaddress connectport=destport
where
- listenaddress – is a local IP address to listen for incoming connection (useful if you have multiple NICs or multiple IP addresses on one interface);
- listenport – local listening TCP port number (the connection is waiting on);
- connectaddress – is a local or remote IP address (or DNS name) to which you want to redirect incoming connection;
- connectport – is a TCP port to which the connection from
listenportis forwarded to.
Using the netsh interface portproxy addv4tov6/v6tov4/v6tov6 options, you can create port forwarding rules between IPv4 and IPv6 addresses.
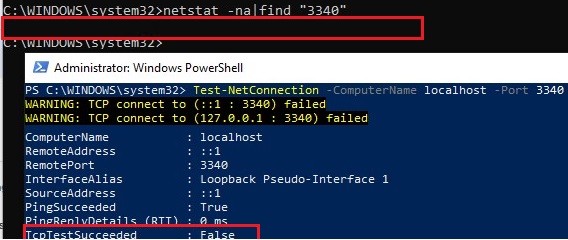
Let’s suppose our task is to make the RDP service to respond on a non-standard port, for example 3340 (the port can be changed in the settings of the Remote Desktop service, but we are using RDP to make it easier to demonstrate port forwarding). To do this, we need to redirect incoming traffic from TCP port 3340 to another local port – 3389 (this is the default RDP port number). Please note that the local port number that you specified in listenport should not listened (used) by another service or process. Check that the port number is not used:
netstat -na|find "3340"
Alternatively, you can check that the port is not listening locally using the PowerShell cmdlet Test-NetConnection:
Test-NetConnection -ComputerName localhost -Port 3340
To create a port forwarding rule on Windows 10, run a command prompt as an administrator and run the following command:
netsh interface portproxy add v4tov4 listenport=3340 listenaddress=10.1.1.110 connectport=3389 connectaddress=10.1.1.110

Where 10.10.1.110 – the current IP address of this computer.
Now, use the netstat tool to check that Windows is now listening on local port 3340:
netstat -ano | findstr :3340

Note. If this command returns nothing and port forwarding through the netsh interface portproxy doesn’t work, make sure that you have the iphlpsvc (IP Helper) service running on your computer.

IPv6 support must be enabled on the network interface for which the port forwarding rule is created.
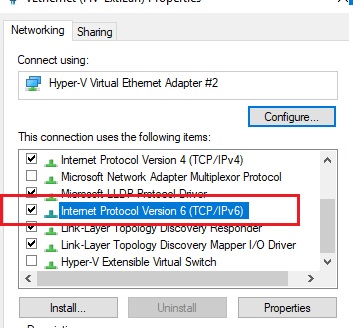
These are the prerequisites for the correct operation of port forwarding. Without the IP Helper service and without IPv6 support enabled, the port redirection won’t work.
To make port forwarding work on Windows Server 2003/XP, you must additionally set the IPEnableRouter parameter to 1 in the registry key HKLM\SYSTEM\ControlSet001\Services\Tcpip\Parameters.
You can find out what process is listening on the specified port using its PID (in our example, the PID is 636):
tasklist | findstr 636
Let’s try to connect to this port from a remote computer using any RDP client. Port 3340 should be specified as the RDP port number. It is specified after the colon following the RDP server address. For example, 10.10.1.110:3340
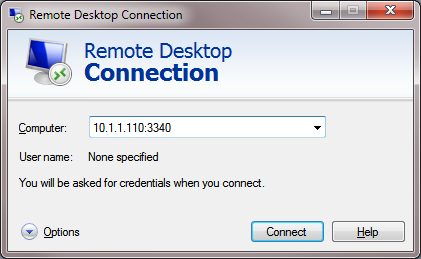
The RDP connection should be established successfully.
If you want to forward an incoming TCP connection to a remote computer, use the following command:
netsh interface portproxy add v4tov4 listenport=3389 listenaddress=0.0.0.0 connectport=3389 connectaddress=192.168.100.101
This rule will redirect all incoming RDP traffic (from local TCP port 3389) from this computer to a remote host with an IP address 192.168.1.100. Also, you can use the Windows SSH tunnel to forward the local port to a remote server.
Managing Port Forwarding Rules in Windows
Make sure that your firewall (Microsoft Windows Defender Firewall or a third-party firewall that are often included into an antivirus software) allows incoming connections to the new port. You can add a new allow rule to Windows Defender Firewall with the command:
netsh advfirewall firewall add rule name=”forwarded_RDPport_3340” protocol=TCP dir=in localip=10.1.1.110 localport=3340 action=allow
Or using the New-NetFirewallRule PowerShell cmdlet:New-NetFirewallRule -DisplayName "forwarder_RDP_3340" -Direction Inbound -Protocol TCP –LocalPort 3340 -Action Allow
When creating an incoming firewall rule for port 3340 via Windows Defender Firewall graphical interface, no program needs to be associated with it. This port is only listened by the network driver.
You can create any number of Windows port forwarding rules. All netsh interface portproxy rules are persistent and are stored in the system after a Windows restart. Also, there were cases when in Windows Server 2012 R2 the port forwarding rules were reset after server reboot. In this case, you need to check whether there is a periodic disconnection on the network interface, and whether the IP address changes when the OS boots (it is better to use a static IP instead of dynamic DHCP). As a workaround, I had to add a batch script to the Windows Task Scheduler with the netsh interface portproxy rules that run on the system startup.
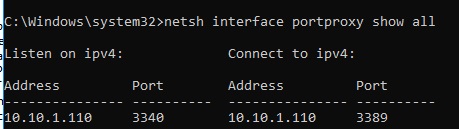
To display a list of all active TCP port forwarding rules on Windows, run the command:
netsh interface portproxy show all
In our case there is only one forwarding rule from local port 3340 to 3389:
Listen on ipv4:             Connect to ipv4:
Address         Port        Address         Port
--------------- ----------  --------------- ----------
10.1.1.110     3340        10.1.1.110     3389
Tip. You can also list port forwarding settings in portproxy as follows:
netsh interface portproxy dump
#========================
# Port Proxy configuration
#========================
pushd interface portproxy
reset
add v4tov4 listenport=3340 connectaddress=10.1.1.110 connectport=3389
popd
# End of Port Proxy configuration

To remove a specific port forwarding rule:
netsh interface portproxy delete v4tov4 listenport=3340 listenaddress=10.1.1.110
To remove all existing mapping rules and completely clear the port forwarding rules table:
netsh interface portproxy reset
Important. This forwarding scheme works only for TCP ports. You won’t be able to forward UDP ports this way. Also you can’t use the loopback interface 127.0.0.1 as the connectaddress.
You can use Windows Server with the RRAS and NAT role installed to configure port forwarding for UDP traffic. You can configure port forwarding between server interfaces using the graphical snap-in (rrasmgmt.msc) or with the command:
netsh routing ip nat add portmapping Ethernet1 udp 0.0.0.0 53 192.168.100.100 53
Another portproxy feature is an opportunity to make it look like any remote network service is running locally.
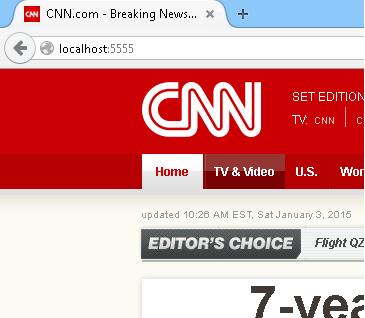
For example, let’s redirect the connection from the local port 5555 to a remote HTTP server with IP address 157.166.226.25 (CNN website):
netsh interface portproxy add v4tov4 listenport=5555 connectport=80 connectaddress= 157.166.226.25 protocol=tcp
Now if you go to http://localhost:5555/ in your browser, the CNN Start page will open. So despite the browser is accessing the local computer, it opens a page from an external web server.
Port forwarding rules can also be used to forward a port from the external IP address of a physical NIC to a port of a virtual machine running on the same host. In Hyper-V, you can configure port forwarding on a Virtual Switch level (see below).
Windows cannot forward a range of TCP ports. If you need to forward multiple ports, you will have to manually create multiple portproxy forwarding rules. The easiest way is to generate a list of netsh interface portproxy add commands with different port numbers in notepad and then paste them into the command prompt for execution.
Port Forwarding in Hyper-V Server
When using the Hyper-V role on your computer (it can be installed on both Windows 10 and Windows Server, or as a free Hyper-V Server), you can configure DNAT port forwarding rules using PowerShell. Suppose you want to redirect all https traffic that your Hyper-V host receives to the IP address of the virtual machine running on the host. To do this, use the Hyper-V StaticMapping commands.
First you need to create a Virtual Switch with NAT:
New-VMSwitch -Name "HTTPS-NAT" -SwitchType NAT -NATSubnetAddress 192.168.100.0/24
Then you need to connect the necessary VM to the specified vswitch and enable the address translation rule for all virtual machines connected through this Hyper-V virtual switch:
New-NetNat -Name HTTPS-NAT -InternalIPInterfaceAddressPrefix 192.168.100.0/24
Add-NetNatStaticMapping -ExternalIPAddress "0.0.0.0/24" -ExternalPort 443 -Protocol TCP -InternalIPAddress "192.168.100.77" -InternalPort 443 -NatName HTTPS-NAT
After executing these PowerShell commands, all HTTPS traffic that comes to port 443 of the Hyper-V host will be forwarded to the private IP address of the virtual machine.