CHKDSK.exe (check disk) is a classical built-in Windows tool for checking hard drives for errors. The chkdsk allows you to check your disk and file system for physical and logical errors, find bad sectors and fix problems found. In this post, we’ll look at the specifics of using the chkdsk tool in Windows 10, as well as a way to check the disk using the Repair-Volume PowerShell cmdlet.
The chkdsk in Windows 10 allows you to check and fix hard drives with NTFS and FAT32 file systems. Chkdsk is not applicable to ReFS volumes because they use different data integrity technologies.
How to Check Disk for Errors Using CHKDSK on Windows 10?
To check your hard drive for errors, run the elevated command prompt (with administrator permissions). Then, run the command:
chkdsk E: /F /R
This command will start E:\ drive checking, the errors found will be fixed automatically (/F), if there are bad sectors, an attempt will be made to recover the data (/R). A full disk check may take a long time depending on your storage capacity and the number of files.
The chkdsk tool performs four sequential passes to check volume metadata:
- Stage 1 – verifying files;
- Stage 2 – verifying indexes;
- Stage 3 – verifying security descriptors;
- Stage 4 – verifying Usn Journal and sectors.
After completing the disk check, you will see detailed disk statistics, information about bad sectors and files, as well as the steps taken to recover data.
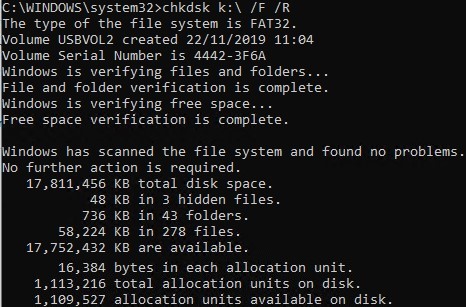
If the chkdsk utility found no problems, the following message will appear:
Windows has scanned the file system and found no problems.No further action is required.
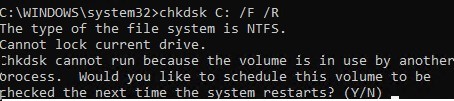
You won’t be able to perform an online scan and fix errors on the system drive (C:\). When you run the chkdsk C: / F / R command, you will see that the disk is locked and can only be checked on the next Windows restart:
Cannot lock current drive. Chkdsk cannot run because the volume is in use by another process. Would you like to schedule this volume to be checked the next time the system restarts? (Y/N).
If you want to check the disk on the next boot, press Y -> Enter. The message appears “This volume will be checked the next time the system restarts”.
Now, if you restart Windows, the disk check will start. You need to wait until it ends.
If you want to check the drive for an error offline (skip online check), use the offlinescanandfix option:
chkdsk E: /f /offlinescanandfix
When using the offlinescanandfix option for the system drive, you will be prompted to schedule a drive scan on the next reboot. Offline disk check speed in Windows 10 has been significantly increased compared to previous OS versions.
/X is another useful chkdsk option. It allows you to unmount a volume before checking it by forcibly closing all open file descriptors.
Also notice the new chkdsk option – /spotfix. This parameter is applicable only to NTFS volumes. The spotfix parameter can significantly reduce the offline disk check time from hours to seconds. Instead of a full drive scan, it only searches for and fixes errors previously recorded in the $corrupt file (populated during a normal disk check). In this case, chkdsk immediately fixes errors without wasting time scanning the entire drive. This is especially useful when checking large volumes. It is not recommended to cancel/interrupt the chkdsk command. However, if you manually kill the chkdsk.exe process, you won’t damage the volume (it will not be damaged more than it was originally). In any case, it is recommended to run a full disk scan after a while.
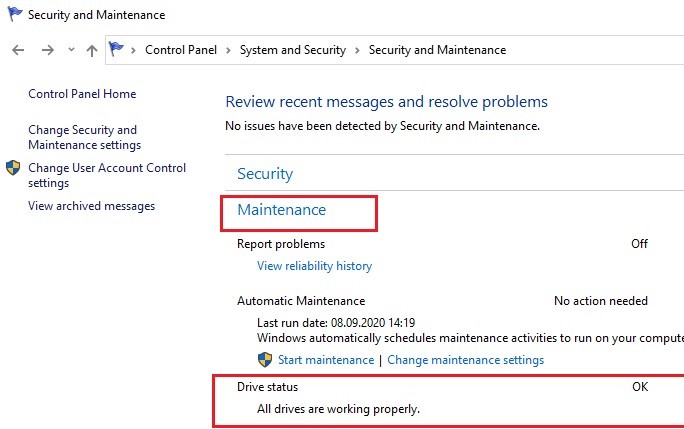
In Windows 10, disk maintenance (check and defragmentation) is performed automatically on a schedule or when your computer is idle. You can find information on the status of automatic disk check in Control Panel -> System and Security -> Security and Maintenance -> Drive status. The screenshot shows the drive state “All drives are working properly”.
You can find the disk check task (named ProactiveScan) , which runs as part of Windows 10 Automatic Maintenance, in Task Scheduler -> Microsoft -> Windows -> Chkdsk.
Also, in modern Windows 10 builds, the storage diagnostics tool StorDiag.exe (Storage Diagnostic Tool) has been added. This utility performs several disk check operations at once (chkdsk, fsutil and fltmc). The diagnostic log can be saved as an ETW trace. For example:
stordiag.exe -collectEtw -checkfsconsistency -out %userprofile%\desktop
Checking Drive Errors with PowerShell
PowerShell 4.0 introduced a separate Repair-Volume disk check cmdlet. This cmdlet is the PowerShell replacement for the chkdsk command.
To perform an online check of the hard drive for errors from PowerShell, run the command:
Repair-Volume –driveletter C –scan
If you need to perform an offline disk check and automatically fix errors, use the offlinescanandfix parameter:
Repair-Volume –driveletter E –offlinescanandfix
If no errors are found on the disk, you will see a NoErrorsFound message.
It also supports quick error fixing using the spotfix parameter (only errors found during the online scan are fixed):
Repair-volume –driveletter E –spotfix
You can check several local drives at once:
Repair-Volume -DriveLetter EHI –SpotFix
The Repair-Volume cmdlet supports CIM sessions that allow you to scan drives on remote computers:
Repair-Volume –driverletter c -scan –cimsession my-fs01,my-fs02,my-dc01 You can also check the SMART status of hard drives using cmdlets from the Storage PowerShell module:
Get-PhysicalDisk | Sort Size | FT FriendlyName, Size, MediaType,SpindleSpeed, HealthStatus, OperationalStatus -AutoSize

View Check Disk (CHKDSK) Results in Windows 10
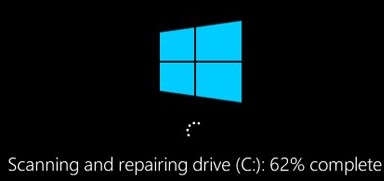
When you perform an online disk check, you can see complete chkdsk statistics in the cli console. However, if you scheduled a disk check with the offlinescanandfix option, you won’t see the chkdsk summary report on the Windows boot screen. The Windows 10 boot screen only shows the overall percentage of the disk check completed. In Windows 7 and earlier Windows versions the detailed information about chkdsk actions was displayed directly on the boot screen.
In Windows 10 you can view the results of the automatic hard disk check only in the Windows Event Viewer.
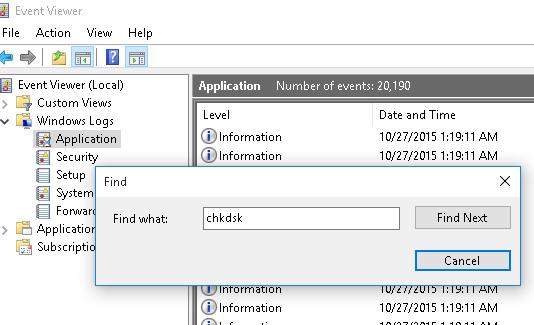
Open Windows Event Viewer by typing event in the search bar and select Event Viewer application (or by running Eventvwr.msc command).
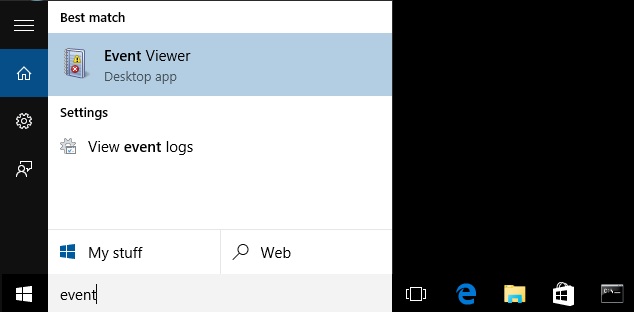
In the next window, go to Windows Logs -> Application.
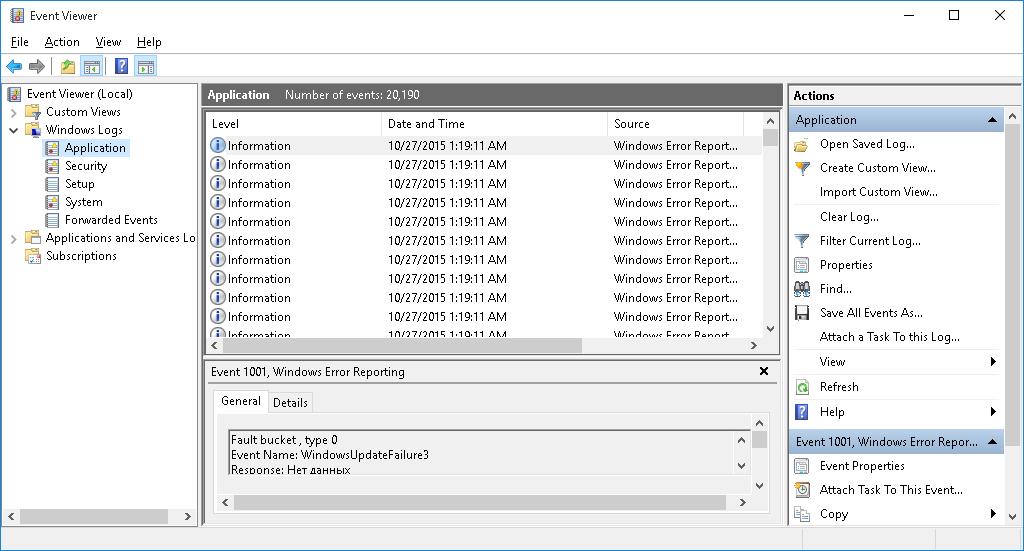
Right-click Application and select the Find menu item. In the search bar, type chkdsk and click Find next. You can search by the event source. To search for disk check events at Windows startup, you need to enable the filter by events from the Wininit source. For user-initiated check disk events, see the Chkdsk source.
The first found event with the Event ID 1001 and the source Wininit has to be displayed. In the General tab, a detailed log with the results of the latest disk check will be shown.
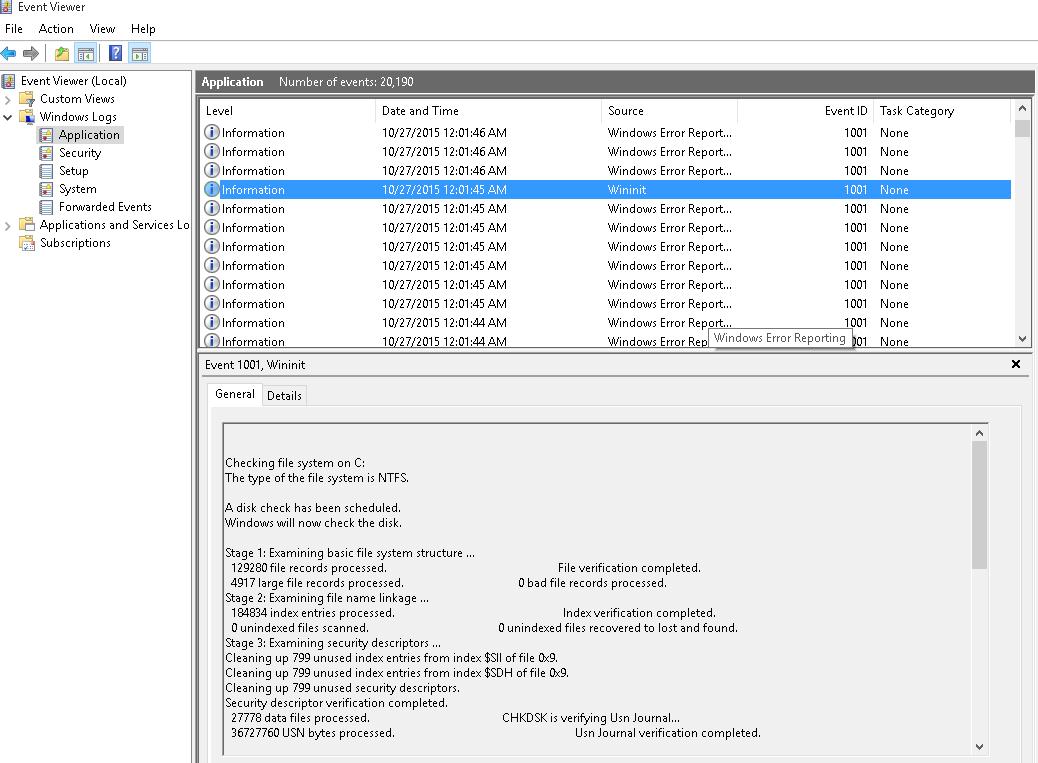
Checking file system on C:
The type of the file system is NTFS.
A disk check has been scheduled.
Windows will now check the disk.
Stage 1: Examining basic file system structure ...
122280 file records processed.                                                         File verification completed.
4817 large file records processed.                                     0 bad file records processed.
Stage 2: Examining file name linkage ...
184654 index entries processed.                                                       Index verification completed.
0 unindexed files scanned.                                           0 unindexed files recovered to lost and found.
Stage 3: Examining security descriptors ...
Cleaning up 788 unused index entries from index $SII of file 0x9.
Cleaning up 788 unused index entries from index $SDH of file 0x9.
Cleaning up 788 unused security descriptors.
Security descriptor verification completed.
27477 data files processed.                                           CHKDSK is verifying Usn Journal...
36724460 USN bytes processed.                                                          Usn Journal verification completed.
Stage 4: Looking for bad clusters in user file data ...
12280 files processed.                                                               File data verification completed.
Stage 5: Looking for bad, free clusters ...
6433211 free clusters processed.                                                       Free space verification is complete.
CHKDSK discovered free space marked as allocated in the volume bitmap.
Windows has made corrections to the file system.
No further action is required.
41423341 KB total disk space.
15155466 KB in 90632 files.
75328 KB in 27779 indexes.
0 KB in bad sectors.
223839 KB in use by the system.
55762 KB occupied by the log file.
25979887 KB available on disk.
4096 bytes in each allocation unit.
10354722 total allocation units on disk.
6493022 allocation units available on disk.
Internal Info:
00 f9 01 00 88 cd 01 00 a9 dd 03 00 00 00 00 00 ................
ad 00 00 00 66 00 00 00 00 00 00 00 00 00 00 00 ....f...........
Windows has finished checking your disk.
Please wait while your computer restarts.
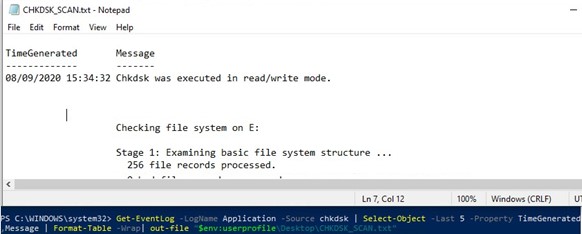
You can get information from check disk events using PowerShell. The following command will export the 5 most recent disk check results from the event log and save them to the current desktop as a text file CHKDSK_SCANS.txt.
Get-EventLog -LogName Application -Source chkdsk | Select-Object -Last 5 -Property TimeGenerated,Message | Format-Table -Wrap| out-file "$env:userprofile\Desktop\CHKDSK_SCANS.txt"
This file can be opened in any text editor.
Thus, we got a disk check log performed during Windows 10 startup.