Windows Recovery Environment (WinRE) is the minimal OS based on Windows Preinstallation Environment (WinPE) which includes a number of tools to repair, reset and diagnose Windows. If the main host OS doesn’t boot for any reason, the computer tries to start WinRE, which may help to resolve the issues manually or automatically. In WinRE, you can automatically fix the bootloader, restore the OS from an image backup, roll back to a system restore point, run a command prompt, etc.
Windows RE consists of three files, which are located in a hidden System Reserved partition:
- winre.wim – WIM image with WinPE and several additional recovery tools;
- boot.sdi – used to create a RAM disk in memory;
- ReAgent.xml — WindowsRE configuration file.
In this post, we’ll show you how to boot your computer into WinRE, and how to repair the Windows 10 recovery environment if it doesn’t work.
How to Boot Windows into the Recovery Environment?
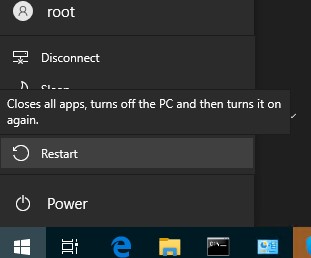
In order to boot your computer into the recovery environment the next time you restart Windows, you need to press the Restart button in the Start menu while holding down the Shift key.
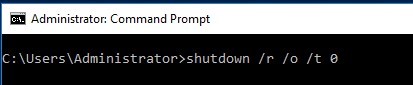
You can also reboot the computer in WinRE mode from the command prompt using the new -o parameter of the shutdown command:
shutdown /f /r /o /t 0
This command cannot be executed when connected to a computer via RDP. An error appears “The parameter is incorrect (87)”.
There is also another command to force the entry into the recovery environment at the next computer boot:
reagentc /boottore
The computer automatically boots into the Windows Recovery Environment if three previous attempts to boot Windows normally have failed. In order to boot your computer into WinRE, it is enough to interrupt the normal Windows boot with the power button 3 times in a row.
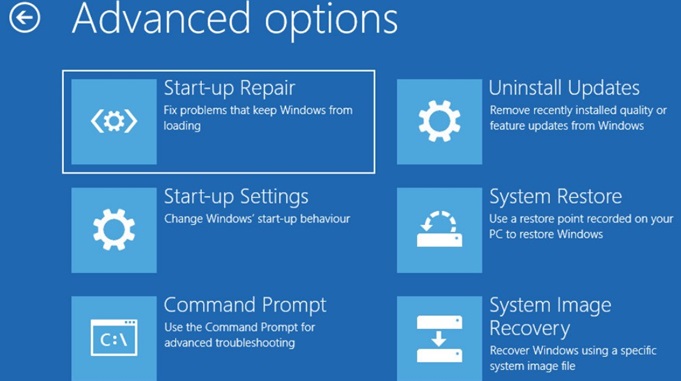
WinRE Repair and Troubleshooting Tools
There are several recovery and troubleshooting tools available in WinRE recovery environment to help you fix various Windows problems. WinRE on Windows 10 includes the following tools:
- Reset this PC – allows you to reset your Windows to factory settings (personal data and files will be deleted);
- System Restore – allows you to restore the state of Windows using a previously created restore point;
- System Image Recovery – allows to restore Windows from a full image backup on external media;
- Automatic Repair/Start-up Repair – Windows tries to automatically find and fix possible problems (the wizard can independently repair the bootloader, BCD configuration and MBR (Master Boot Record);
- Windows Startup Settings – allows you to select various Windows boot scenarios: Safe Mode, disable driver digital signature enforcement, disable automatic restart on system failure (this is the only way to see the BSOD error code on the Windows boot screen),etc.;
- Uninstall Updates – allows to remove the recently installed updates;
- Go back to the previous version – allows you to roll back to the previous Windows 10 build;
- Command Prompt – run command line to manually run diagnostic and repair commands.
If you want to run a command prompt or other error fixing tool, WinRE will ask you for the password of the local administrator account (the password will be compared with the data in the local SAM database).
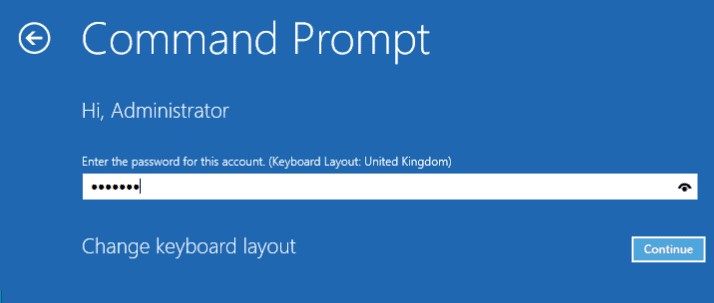
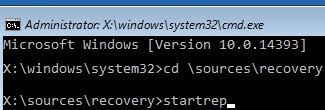
You should see a command prompt window X:\Windows\System32>.
From the command line, you can check the disk with the chkdsk tool, check and repair the Windows image using sfc.exe or DISM, run regedit.exe, bootrec.exe, startrep.exe (this tools allows you to find and fix problems with the registry, drivers, partitions, etc.) and other commands (there are quite a few posts on the site where we show how to fix various Windows problems in the recovery environment or WinPE).
To close the WinRE command prompt and return to the boot mode selection, run the command:
exit
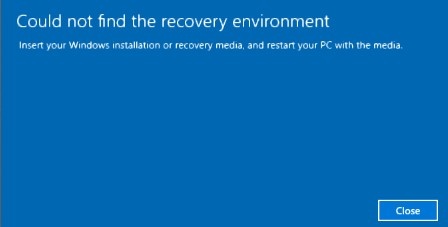
Could not Find the Recovery Environment in Windows 10
In some cases, the computer can’t boot into the Windows Recovery Environment. If you try to reset the Windows, or boot into recovery mode, you may see errors like “Could not find the recovery environment”. This means that the partition with the WinRE or the .wim file of the recovery environment has been deleted/damaged; either ReAgent or BCD is not configured correctly.
The reasons why the WinRE environment stops booting or does not work correctly can be different:
- The WinRE is disabled in Windows settings;
- The Boot Configuration Data Store (BCD) doesn’t contain entries to boot in recovery mode;
- The file winre.wim (WinRE environment image) is missing or moved;
- The WinRE configuration file ReAgent.xml is missing or contains incorrect settings.
Next, we will look at the main ways to restore the WinRE environment in Windows 10 (for Windows 7 and Windows 8.1, the procedure is the same).
Repairing WinRE (Windows Recovery Environment) with ReAgentc Tool
How to Manually Enable or Disable Windows Recovery Environment in Windows 10?
Try to disable and enable WinRE on your computer by running the following commands in the elevated command prompt:reagentc /disable
reagentc /enable
If you converted the disk partition table from MBR to GPT using the MBR2GPT tool, you may encounter the error:
MBR2GPT: Failed to update ReAgent.xml, please try to manually disable and enable WinRE.
To fix, you need to reboot and manually disable and enable WinRE.
If the error “REAGENTC.EXE: Unable to update Boot Configuration Data” appears, first fix the problem with the Windows bootloader (instructions for UEFI and BIOS computers).
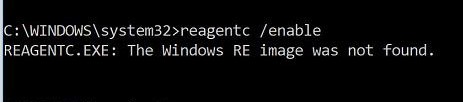
If you receive the error message “REAGENT.EXE: The Windows RE image was not found”, the winre.wim file or the System Recovery partition has probably been deleted.
Check BCD Entries for WinRE
Make sure that the Boot Configuration Data (BCD) contains the correct entries to boot the WinRE environment. If WinRE has been successfully enabled using the reagent, the correct WinRE entries should automatically appear in the boot configuration. However, you’d better check the value of recoverysequence parameter.
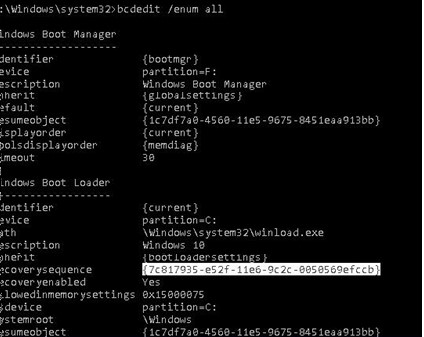
Display the current BCD entries:
bcdedit /enum all
In the list of boot options, find the Windows Boot Loader section with identifier={current}. In our example, this entry looks like this:
Windows Boot Loader
-------------------
identifier {current}
device partition=C:
path \Windows\system32\winload.exe
description Windows 10
locale en-US
inherit {bootloadersettings}
recoverysequence {7c817935-e52f-11e6-9c2c-0050569efccb}
recoveryenabled Yes
allowedinmemorysettings 0x15000075
osdevice partition=C:
systemroot \Windows
resumeobject {1c7df7a0-4560-11e5-9675-8451eaa913bb}
nx OptIn
bootmenupolicy Standard
Find and remember the GUID value of recoverysequence attribute. In our example, it is {7c817935-e52f-11e6-9c2c-0050569efccb}.
Then you need to find the boot configuration section having the identifier value equal to the GUID value obtained earlier and having Windows Recovery Environment in the description field. This entry can look like this:
Windows Boot Loader
-------------------
identifier {7c817935-e52f-11e6-9c2c-0050569efccb}
device ramdisk=[F:]\Recovery\WindowsRE\Winre.wim,{7c817936-e52f-11e6-9c2c-0050569efccb}
path \windows\system32\winload.exe
description Windows Recovery Environment
locale en-US
inherit {bootloadersettings}
displaymessage Recovery
osdevice ramdisk=[F:]\Recovery\WindowsRE\Winre.wim,{7c817936-e52f-11e6-9c2c-0050569efccb}
systemroot \windows
nx OptIn
bootmenupolicy Standard
winpe Yes
If you cannot find this entry, look for another BCD record with another GUID as an identifier and the text “Windows Recovery Environment” in the description field, which contains the path to Winre.wim in the device and osdevice values .
The path to WIM file can point to another drive (for example, [\Device\HarddiskVolume2]). If such section has been found, you can link this entry to boot WinRE as the recovery environment for the current OS. Copy the GUID of the found entry and replace it using the command:
bcdedit /set {current} recoverysequence {FoundGUID} If you are using multiboot, keep in mind that each OS adds its own Windows Recovery Environment entry to the Microsoft Boot Manager. It is important not to get lost in them.
The Location of the Winre.wim File
Make sure that Winre.wim is present in the specified location. Typically, it is stored in one of the following locations:
- Folder C:\Windows\System32\Recovery folder;
- Separate hidden System Reserved partition;
- Factory made OEM recovery partition.
In our example, it should be located on the F:\ drive (F:\Recovery\WindowsRE \Winre.wim).
Also check the path to the wim file specified in ReAgent.xml (located in C:\Windows\System32\Recovery folder or in Recovery folder on the recovery partition). Open this file in any text editor and check the value of <ImageLocation path= attribute. If the path specified doesn’t exist (the original partition has been deleted), you can change the path to <ImageLocation path=”\Recovery\WindowsRE”), create the folder C:\Recovery\WindowsRE and copy the Winre.wim to it. Disable and enable WinRE again:
reagentc /disable
reagentc /enable
The current Recovery Agent configuration can be obtained using reagentc /info command. This command can will help to get the Boot Configuration Data (BCD) identifier and the physical path to Windows RE image file:
(location: \\?\GLOBALROOT\device\harddisk0\partition1\Recovery\WindowsRE)

Reset WinRE Settings in ReAgent.xml file
If the methods described above didn’t help you to recover WinRE, you can try to reset the recovery environment settings in ReAgent.xml file (backup this file in advance).
On Windows 10, just delete the ReAgent.xml file and it will be automatically created the next time you enable WinRE with the command:
reagentc /enable
In Windows 7/Vista, open ReAgent.xml in a text editor (it’s better to use Notepad++) and clear the values of the following parameters: WinreBCD, WinreLocation, ImageLocation, InstallState, WinREStaged:
<WinreBCD id="{00000000-0000-0000-0000-000000000000}"/>
<WinreLocation path="" id="0" offset="0" guid="{00000000-0000-0000-0000-000000000000}"/>
<ImageLocation path="" id="0" offset="0" guid="{00000000-0000-0000-0000-000000000000}"/>
<InstallState state="0"/>
<WinREStaged state="0"/>
Save the changes. Make sure that Winre.wim is present in the %windir%\System32\Recovery folder. Enable WinRE with the command:
reagentc /enable
Find and Copy the Winre.wim File Manually
If you cannot find the Winre.wim file in any of the standard folders, try locating it using your file manager or with the following command:
dir /a /s c:\winre.wim
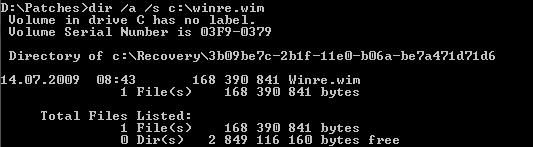
Don’t forget to look for this file in the hidden partitions as well, which need to be assigned a drive letter in advance.
If you have found the file, copy it in to a default location using the commands:
attrib -h -s c:\Recovery\3b09be7c-2b1f-11e0-b06a-be7a471d71d6\winre.wim
xcopy /h c:\Recovery\3b09be7c-2b1f-11e0-b06a-be7a471d71d6\winre.wim c:\Windows\System32\Recovery
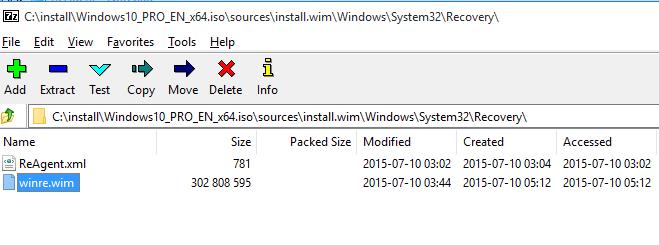
If you couldn’t find the file, copy it from a similar Windows instance (the OS version and bitness must match), or from the install media/bootable USB flash drive. To do so, open the \sources\install.wim (or install.esd) on the DVD/ ISO image using 7-Zip and extract the \Windows\System32\Recovery\Winre.wim and ReAgent.xml to the c:\Windows\System32\Recovery folder. The original boot.sdi file must be copied from the \Windows\Boot\DVD folder.
You can replace the built-in winre.wim image with the more advanced DaRT 10 recovery image, which contains additional tools useful for diagnosing and fixing Windows boot problems.
Replace the path to the winre.wim file in the Recovery Agent configuration:
reagentc /setreimage /path C:\windows\system32\recovery
Now just enable Windows Recovery Agent with this command:
reagentc /enable