The majority of Windows administrators, who are familiar with PKI, know about the MakeCert.exe tool, which allows to create a self-signed certificate. This tool is part of the Microsoft .NET Framework SDK and Microsoft Windows SDK. On modern Windows versions (Windows 10/8.1 and Windows Server 2019/2016/2012R2) you can create a self-signed certificate using built-in PowerShell cmdlet New-SelfSignedCertificate without using additional tools.
Using the New-SelfSignedCertificate PowerShell Cmdlet to Create a Self-Signed Certificate
To create a self-signed certificate with PowerShell, you can use the New-SelfSignedCertificate cmdlet, which is a part of PoSh PKI (Public Key Infrastructure) module:
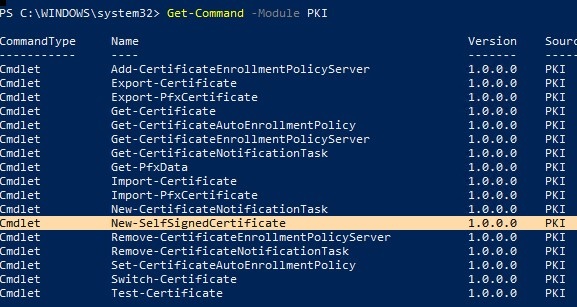
To list all available cmdlets in the PKI module, run the command.
Get-Command -Module PKI
It is recommended to use self-signed certificates for testing purposes or to provide certificates for internal Intranet services (IIS, Exchange, Web Application Proxy, LDAPS, ADRMS, DirectAccess, etc.) if you cannot deploy PKI/CA infrastructure or purchase a trusted certificate from an external provider. Don’t forget that you can easily get a free SSL certificate from Let’s Encrypt. Here’s an example of how to issue the Let’s Encrypt SSL certificate and bind it to the IIS site on Windows Server.
To create a certificate, you have to specify the values of –DnsName (name of a server, the name may be arbitrary and different from localhost name) and -CertStoreLocation (a local certificate store in which the generated certificate will be placed). You can use the cmdlet to create a self-signed certificate on Windows 10 (in this example), Windows 8.1 and Windows Server 2019/2016/ 2012 R2 /2012.
To create a new SSL certificate (of the default SSLServerAuthentication type) for the DNS name test.contoso.com (use a FQDN name) and place it to the list of personal certificates on a computer, run the following command:
New-SelfSignedCertificate -DnsName test.contoso.com -CertStoreLocation cert:\LocalMachine\My
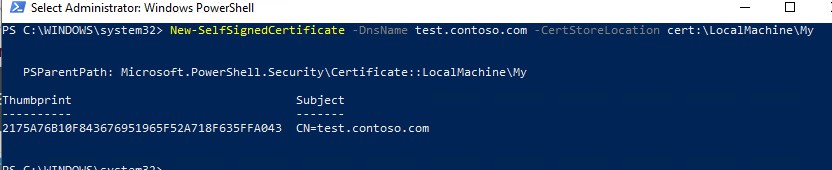
Directory: Microsoft.PowerShell.Security\Certificate::LocalMachine\My
Thumbprint                               Subject
----------                               -------
2175A76B10F843676951965F52A718F635FFA043   CN=test.contoso.com
If you run this command in non-elevated PowerShell session (without local admin permissions), an error appears:
New-SelfSignedCertificate : CertEnroll::CX509Enrollment::_CreateRequest: Access denied. 0x80090010 (-2146893808 NTE_PERM)
If you have specified non-standard cryptographic provider (CSP), for example, using the -KeyAlgorithm "ECDSA_secP256r1" -Provider "Microsoft Smart Card Key Storage Provider" parameters, make sure it is installed on your computer (the default is Microsoft Enhanced Cryptographic Provider CSP). Otherwise, an error will appear:
New-SelfSignedCertificate: CertEnroll::CX509Enrollment::_CreateRequest: Provider type not defined. 0x80090017 (-2146893801 NTE_PROV_TYPE_NOT_DEF).
This command creates a new certificate and imports it in the computer’s personal certificate store. Open the certlm.msc MMC snap-in, make sure that a new certificate appears in the Personal section of the certificate store.
By default, a self-signed certificate is generated with the following settings:
- Cryptographic algorithm: RSA;
- Key length: 2048 bit;
- Acceptable key usage: Client Authentication and Server Authentication;
- The certificate can be used for: Digital Signature, Key Encipherment;
- Certificate validity period: 1 year.
As you can see, the certificate properties indicate that this certificate can be used for Client Authentication, but it is also valid for Server Authentication.

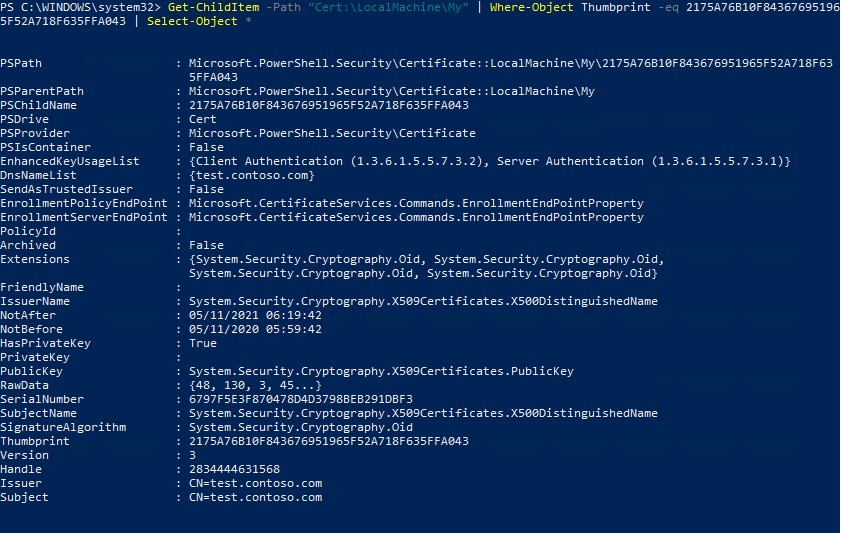
Using the Get-ChildItem cmdlet, you can display all the parameters of the created certificate by its Thumbprint:
Get-ChildItem -Path "Cert:\LocalMachine\My" | Where-Object Thumbprint -eq 2175A76B10F843676951965F52A718F635FFA043 | Select-Object *
PSPath                   : Microsoft.PowerShell.Security\Certificate::LocalMachine\My\2175A76B10F843676951965F52A718F635FFA043
PSParentPath             : Microsoft.PowerShell.Security\Certificate::LocalMachine\My
PSChildName              : 2175A76B10F843676951965F52A718F635FFA043
PSDrive                  : Cert
PSProvider               : Microsoft.PowerShell.Security\Certificate
PSIsContainer            : False
EnhancedKeyUsageList     : {Client Authentication (1.3.6.1.5.5.7.3.2), Server Authentication (1.3.6.1.5.5.7.3.1)}
DnsNameList              : {test.contoso.com}
SendAsTrustedIssuer      : False
EnrollmentPolicyEndPoint : Microsoft.CertificateServices.Commands.EnrollmentEndPointProperty
EnrollmentServerEndPoint : Microsoft.CertificateServices.Commands.EnrollmentEndPointProperty
PolicyId                 :
Archived                 : False
Extensions               : {System.Security.Cryptography.Oid, System.Security.Cryptography.Oid,
System.Security.Cryptography.Oid, System.Security.Cryptography.Oid}
FriendlyName             :
IssuerName               : System.Security.Cryptography.X509Certificates.X500DistinguishedName
NotAfter                 : 05/11/2021 06:19:42
NotBefore                : 05/11/2020 05:59:42
HasPrivateKey            : True
PrivateKey               :
PublicKey                : System.Security.Cryptography.X509Certificates.PublicKey
RawData                  : {48, 130, 3, 45...}
SerialNumber             : 6797F5E3F870478D4D3798BEB291DBF3
SubjectName              : System.Security.Cryptography.X509Certificates.X500DistinguishedName
SignatureAlgorithm       : System.Security.Cryptography.Oid
Thumbprint               : 2175A76B10F843676951965F52A718F635FFA043
Version                  : 3
Handle                   : 2834444631568
Issuer                   : CN=test.contoso.com
Subject                  : CN=test.contoso.com
Such a self-signed certificate will expire in 1 year from the date of its creation. You can set a different certificate validity period using the –NotAfter option. For example, you can issue an SSL/TLS certificate with a three-year validity period with the following commands:
$todaydt = Get-Date
$3years = $todaydt.AddYears(3)
New-SelfSignedCertificate -dnsname test.contoso.com -notafter $3years -CertStoreLocation cert:\LocalMachine\My
You can create a certificate chain. First, a root certificate (CA) is created, and based on it, an SSL server certificate is generated:
$rootCert = New-SelfSignedCertificate -Subject 'CN=TestRootCA,O=TestRootCA,OU=TestRootCA' -KeyExportPolicy Exportable  -KeyUsage CertSign,CRLSign,DigitalSignature -KeyLength 2048 -KeyUsageProperty All -KeyAlgorithm 'RSA'  -HashAlgorithm 'SHA256'  -Provider 'Microsoft Enhanced RSA and AES Cryptographic Provider'
New-SelfSignedCertificate -CertStoreLocation cert:\LocalMachine\My -DnsName "test2.contoso.com" -Signer $rootCert -KeyUsage KeyEncipherment,DigitalSignature
In order to export the generated certificate with a private key to a password-protected PFX file, you need to specify its Thumbprint. It can be copied from the results of New-SelfSignedCertificate command. You also need to specify the certificate security password and convert it to SecureString format:
$CertPassword = ConvertTo-SecureString -String “YourPassword” -Force –AsPlainText
Export-PfxCertificate -Cert cert:\LocalMachine\My\2779C7928D055B21AAA0Cfe2F6BE1A5C2CA83B30 -FilePath C:\test.pfx -Password $CertPassword

The certificate public key can be exported as follows:
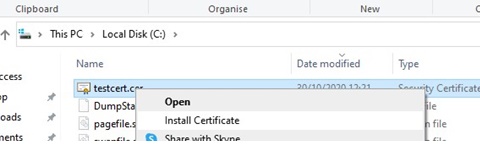
Export-Certificate -Cert Cert:\LocalMachine\My\2779C7928D055B21AAA0Cfe2F6BE1A5C2CA83B30 -FilePath C:\tstcert.cer
Make sure the *.cer (PFX) certificate file appears in the specified directory. If you right-click it and select the “Install Certificate” menu item, you can use the Certificate Import Wizard to add the certificate to the trusted root certificates on your computer.
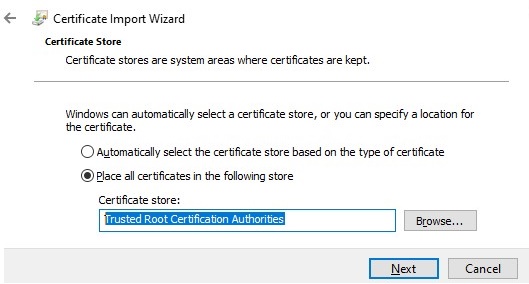
Select Cert Store location -> Local Machine, Place all certificates in the following store -> Trusted Root Certification Authorities.
You can create a certificate and immediately import it into the Trusted Root Certificate store of the computer using the commands:$SelfSignCert=New-SelfSignedCertificate …..
$certFile = Export-Certificate -Cert $SelfSignCert -FilePath C:\ps\export-certname.cer
Import-Certificate -CertStoreLocation Cert:\LocalMachine\AuthRoot -FilePath $certFile.FullName
This public key or the certificate file itself can be deployed to all computers and servers in the Active Directory domain using GPO (How to deploy certificates on domain computers using GPO).
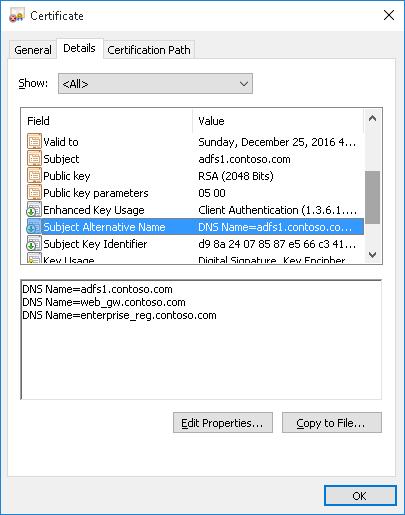
Create a Self-Signed Certificate with Subject Alternative Names
One of the useful features of New-SelfSignedCertificate cmdlet is the ability to create a certificate with several different names, Subject Alternative Names (SAN).Note. The Makecert.exe tool, unlike the New-SelfSignedCertificate cmdlet, cannot generate SAN and Wildcard certificates.
If you want to create a certificate with multiple names, the first name of the DnsName parameter will be used as the CN (Common Name) of the certificate. For example, let’s create a self-signed SAN certificate with the following names:
- Subject Name (CN): adfs1.contoso.com
- Subject Alternative Name (DNS): web_gw.contoso.com
- Subject Alternative Name (DNS): enterprise_reg.contoso.com
The command for creating a certificate will look like this:
New-SelfSignedCertificate -DnsName adfs1.contoso.com,web_gw.contoso.com,enterprise_reg.contoso.com -CertStoreLocation cert:\LocalMachine\My
Also, you can also generate a wildcard certificate for the entire domain namespace. To do it, specify *.contoso.com as a server name.
New-SelfSignedCertificate -certstorelocation cert:\localmachine\my -dnsname *.contoso.com
Generate a Self-Signed Certificate for Code Signing on Windows
In PoweShell 3.0, the New-SelfSifgnedCertificate cmdlet only generates SSL certificates that cannot be used to sign the driver, application or script code (unlike certificates generated by the MakeCert utility).
In PowerShell version 5.0 and later, a new version of the New-SelfSifgnedCertificate cmdlet can now be used to issue Code Signing certificates.
To create a self-signed application code signing certificate, run the command:
$cert = New-SelfSignedCertificate -Subject "My Code Signing Certificate” -Type CodeSigningCert -CertStoreLocation cert:\LocalMachine\My
Now you can sign your PowerShell Script with a self-signed certificate:
Set-AuthenticodeSignature -FilePath C:\PS\my_posh_script.ps1 -Certificate $cert
If you are receiving an UnknownError warning when executing the command, this means that the certificate is not trusted, because it is located in the user’s personal certificates store.

You need to move it to the Trusted Root Certificate store.
Move-Item -Path $cert.PSPath -Destination "Cert:\CurrentUser\Root"
After that, you can sign your PowerShell script with this self-signed certificate.
Using SHA-256 Self-Signed SSL Certificate in IIS on Windows Server IIS
Please note that when creating a self-signed certificate for IIS through the Internet Information Manager console (Create Self-Signed Certificate action menu item), an SSL certificate is created using the SHA-1 encryption algorithm. Such certificates are considered untrusted by many browsers and cannot be used to establish a secure connection (or you may see other SSL errors). The New-SelfSignedCertificate cmdlet allows you to create a more popular type of certificate using the SHA-256 encryption algorithm.

You can bind a self-signed SHA-256 certificate generated with PowerShell to an IIS site on Windows Server. If you create an SSL certificate using PowerShell and put it in the computer’s certificate store, it will automatically be available to IIS sites.
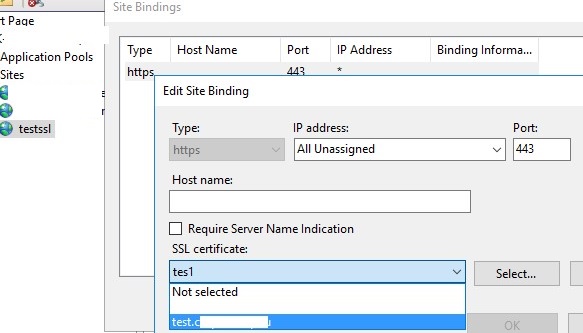
Start the IIS Manager console, select your site, and then in the Site Binding options, select the certificate you created and save your changes.