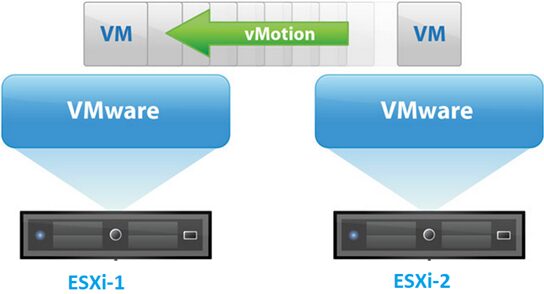
vMotion allows you to migrate a running VMWare virtual machine from one physical ESXi host to another one without interrupting its operation and stopping any services. In this post we’ll discuss VMWare vMotion features: how vMotion works, what vMotion types exist and how to migrate a virtual machine between ESXi hosts or storage manually. We will also consider typical methods of vMotion optimization and troubleshooting.
As we have already mentioned, vMotion allows you to perform live migration of virtual machines without any downtime or interrupting users. vMotion is not positioned as a way to provide VM high availability. First of all, it is a simple and convenient tool to move production VMs, when you have to maintain/update/replace physical servers with the installed ESXi hypervisor or storage arrays. Also, DRS (Dynamic Resource Scheduler), a technology that allows to distribute (balance) load of physical servers, is based on vMotion. A similar Microsoft technology to migrate VMs between Hyper-V hosts is called Hyper-V Live Migration.
How VMWare vMotion Works?
To migrate a VM between physical hosts using vMotion, the following VMWare components are used:
- A VMWare vCenter management server;
- A shared storage (connected using Fibre Channel, iSCSI or NAS), that stores virtual machine files. The shared storage allows multiple physical ESXi hosts access files of the same VM in a SAN;
- A shared fast network (at least 1GB Ethernet) between the source and target ESXi hosts. When migrating a VM, it retains its original MAC address, and vMotion notifies a network switch that the location of the virtual machine MAC address has changed. It allows to keep active network connections;
- Compatibility of CPUs on the hosts or enabled Enhanced vMotion Compatibility (EVC) option.
How does vMotion performs live migration? First, a shadow clone of a source VM with the same configuration (from the VMX file) is created on a target host. The clone VM sees all VM files on the shared storage. The RAM contents and the state of the running VM is transferred over the network from the source to the target ESXi host. vMotion makes a VM memory snapshot and copies it to the target server over the network. At the same time, vMotion tracks changes on memory pages and copies only modified memory segments (it may occur in several stages, each time less data are copied and it takes less time).
At some point, the state of the source VM is frozen, changed memory segments and CPU instructions are copied and the VM is started on the target ESXi host. The whole process takes a couple of seconds for a medium-sized VM on a 1/10 GB Ethernet network.
VMware vMotion Types
By vMotion, VMWare means a whole stack of different technologies that allow you to move running VMs on the fly between hosts, storage arrays, cities or on-premises and cloud infrastructure.
vMotion types:
- Standard vMotion – migration of a running VM between ESXi hosts;
- Storage vMotion – online moving virtual machine files between datastores (SAN storage arrays, NAS, vVol, NFS, etc.);
- Shared-Nothing vMotion – migration of a VM between ESXi servers in a network without using a shared storage (an L2 network is required);
- Long Distance vMotion – migration of a VM between remote sites (maximum Round Trip Time is up to 150 ms, including L3 networks as well). It introduced in vSphere 6.0;
- Encrypted vSphere vMotion – allows to encrypt VM when transferring it over the network (available in vSphere 6.5);
- Cross-Cloud Cold and Hot Migration – online or offline migration between on-prem and cloud infrastructure.
VMware Storage vMotion Features
As we have told, the Storage vMotion allows you to move the files of running virtual machine (vmdk virtual disks and configuration files) to another VMFS/NFS/vVol datastore (LUN, storage array) without stopping the VM.
Requirements to run Storage vMotion successfully:
- The type of the VM disks must be persistent or RDM;
- VM migration during the VMware Tools installation is not supported;
- The VMFS version of the datastore matters for migration. For example, you cannot move a vmdk file over 2 TB from VMFS5 to VMFS3;
- License on the ESXi host;
- A host the VM is running on must have access to both the source and target datastore;
- The Changed Block Tracking (CBT) technology is used when copying a virtual machine disk. It allows to track the changed data blocks and copy them.
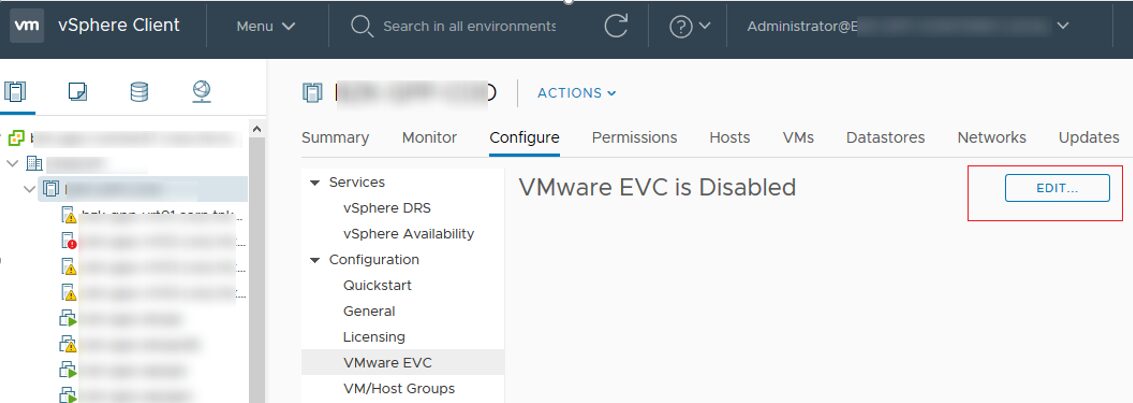
Enhanced vMotion Compatibility (EVC) in VMWare
Enhanced vMotion Compatibility (EVC) mode for VMware HA/DRS clusters is used if the cluster is based on hosts having CPUs of different generations. If you enable EVC for a cluster, a hypervisor begins masking CPU instructions that are not supported by all hosts. When EVC is enabled, all CPU features of ESXi hosts in a cluster become compatible with some basic minimum set of processor instructions set by a vSphere administrator in the cluster settings.
Thus, thanks to EVC, you can migrate a VM between hosts with different sets of supported processor instructions. Do not mix hosts with different processor vendors, like Intel or AMD, in the same vSphere cluster. EVC allows to achieve compatibility between the processors by the same vendor.
You can enable VMWare EVC on the cluster level. Go to Configure -> Configuration -> VMWare EVC and click Edit.
If you enable EVC for a cluster, you will have to select EVC mode (for AMD or Intel hosts) and select from the dropdown list the minimum CPU generation by this vendor you have got in your VMWare cluster.
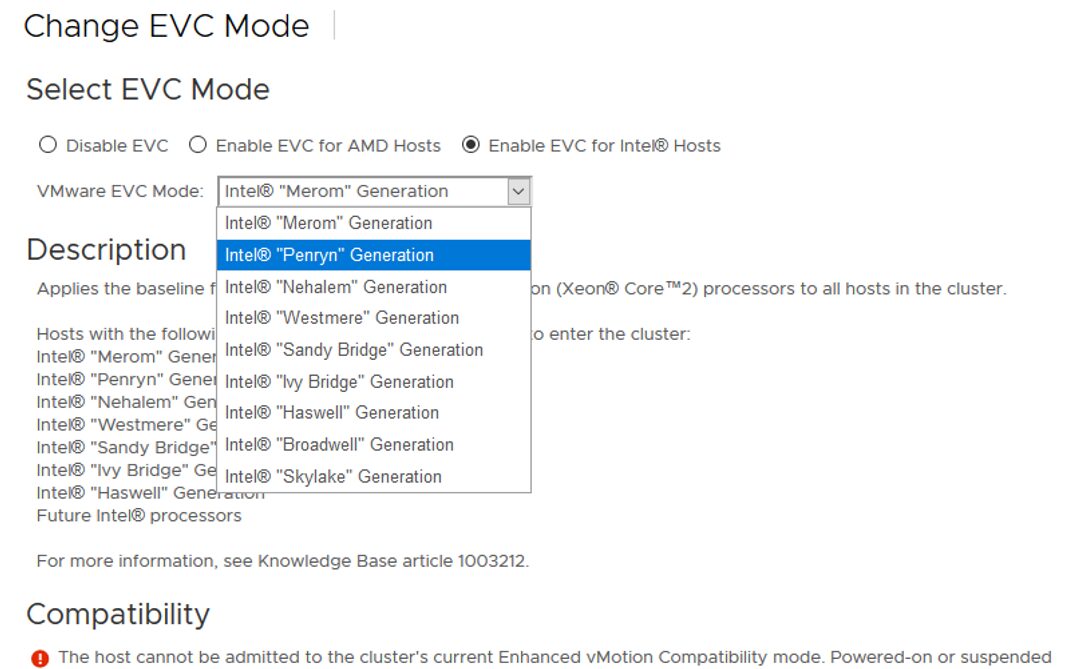
VMWare recommends to always enable EVC no matter what hosts you have in your cluster. If you want to expand your cluster, it will be easier for you to do it. There is even a separate KB article proving that even if your VMs don’t use the full set of CPU instructions, it won’t affect the host performance.
VMware vSphere 6.7 introduces migration technologies between the cloud and on-premises (Cross-Cloud Cold and Hot Migration). To migrate a VM to the cloud, you can now enable Per-VM EVC in the VM settings (available in vSphere 6.7 with Hardware Version 14).
You can get baseline EVC levels set for a VM in a cluster using PowerCLI:
Get-VM | Select Name,HardwareVersion,
@{Name='VM_EVC_Mode';Expression={$_.ExtensionData.Runtime.MinRequiredEVCModeKey}},
@{Name='Cluster_Name';Expression={$_.VMHost.Parent}},
@{Name='Cluster_EVC_Mode';Expression={$_.VMHost.Parent.EVCMode}} | ft
To get the maximum supported EVC mode:Get-VMHost | Select-Object Name,ProcessorType,MaxEVCMode
How to Enable vMotion in VMWare vSphere?
Let’s see how to enable and configure vMotion in VMWare vSphere 6.7. To use vMotion, it is enough to have an Essentials Plus VMWare license.
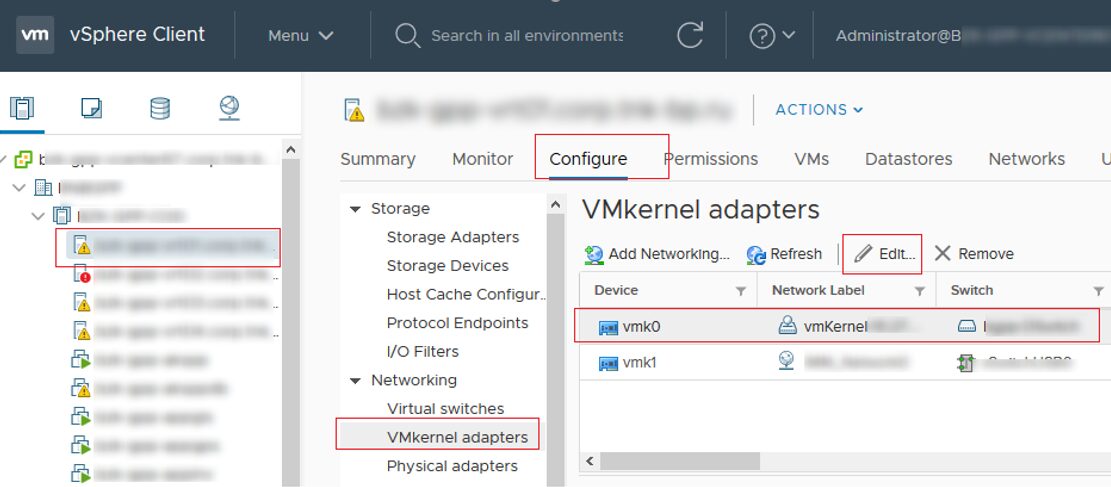
vMotion is enabled at the VMkernel level of the ESXi host virtual switch. Select the host and go to Configure -> Networking -> VMkernel adapters.
Select your VMkernel adapter and click Edit.
In the vmk port properties, enable vMotion in the Enabled Services section.
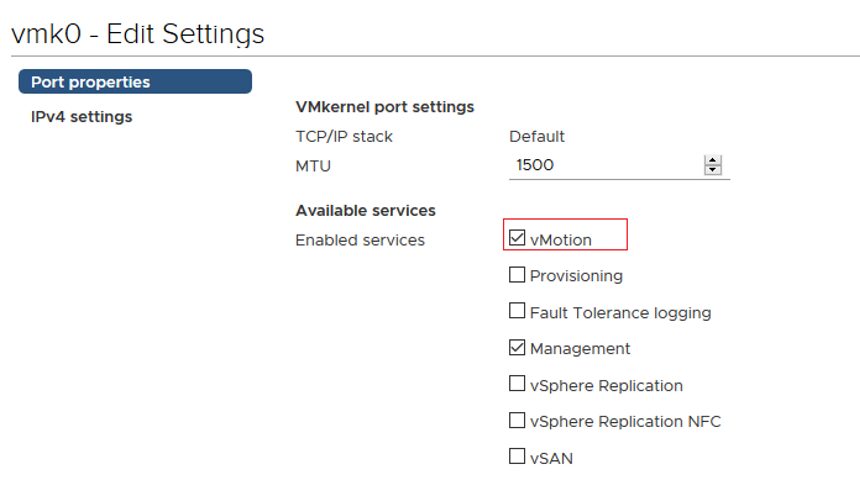
In my example, the VMWare HA cluster has been already created and vSphere Distributed Switch (VDS) is used.
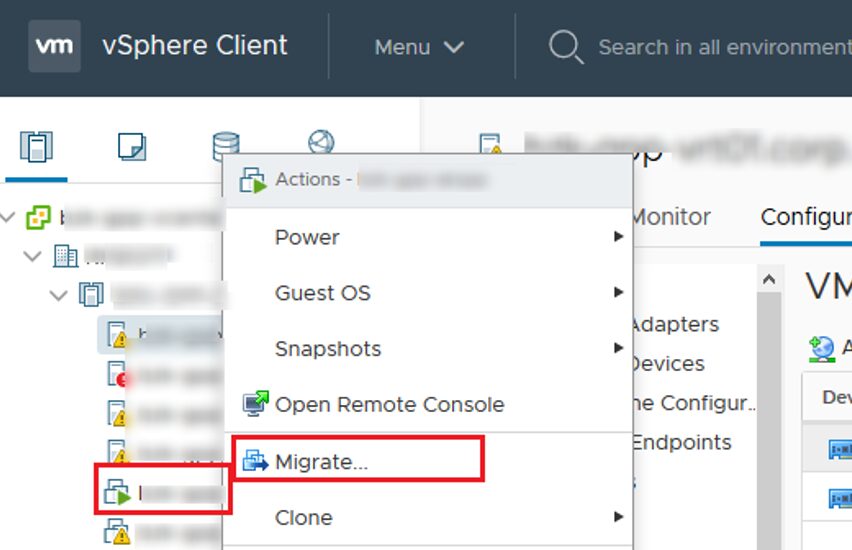
How to Migrate a VM Between Hosts Using vMotion?
To migrate a running VM between two ESXi hosts, open the vSphere Client, right click the VM you want to move and select Migrate.
Select the migration type you want to use:
- Change compute resource only — migrates a VM to another ESXi host;
- Change storage only — this means Storage vMotion (change the datastore where VM files are located);
- Change both compute resource and storage — a migration mode without a shared storage (vMotion without shared storage/Shared-Nothing), the VM files are copied between hosts over the network
I have selected the first option.
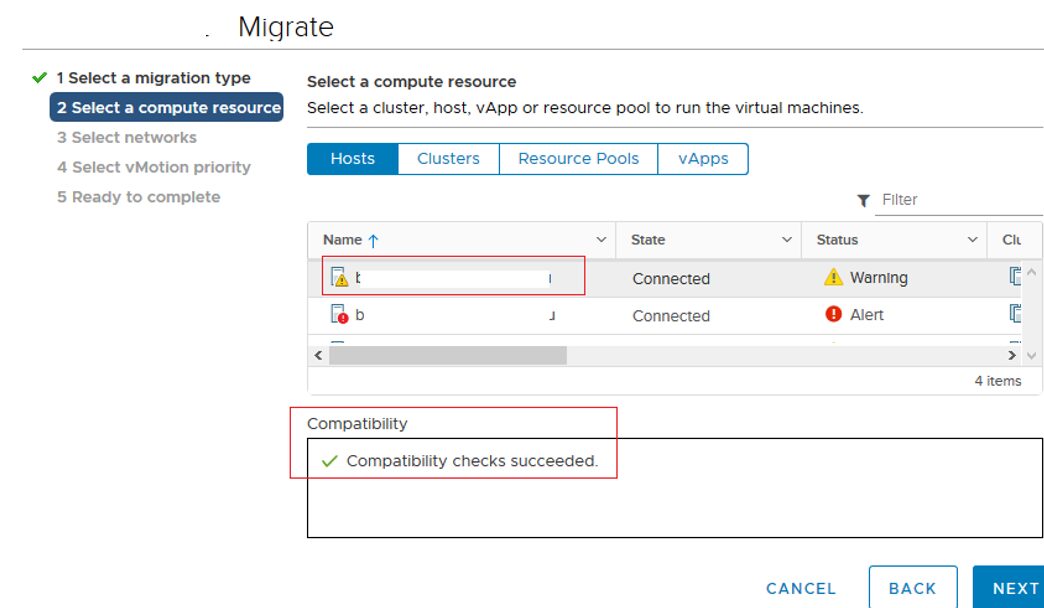
The migration wizard will offer you to select a host, a cluster, a resource pool or a vApp to move the virtual machine to. Select a host. If vMotion is configured correctly and no conflicts have been found, you will see Compatibility checks succeeded message in the Compatibility section. If you see any errors in the compatibility tab, study them thoroughly and fix them.
Click Next.
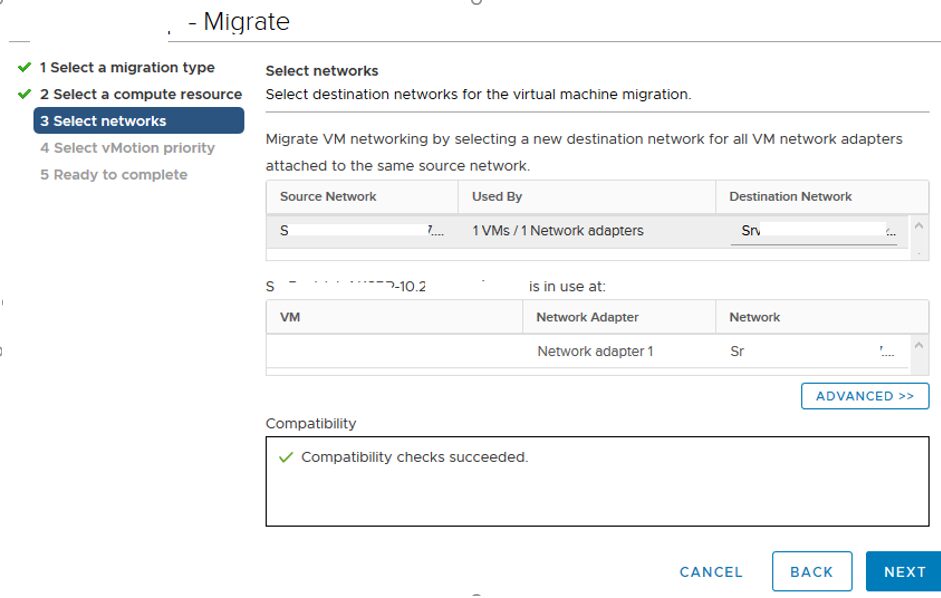
The VM migration wizard will prompt you to select a network to place the vNIC of a VM on the target host. If you want the VM to be available after the migration, place it in the same network segment (VLAN) as on the source host. If you are using a standard vSphere Switch, create the same Port Group on all ESXi hosts. When using VDS, the port groups on all cluster hosts are the same.
In the last step, select the priority of the vMotion task. By default, the highest priority is used (Schedule vMotion with high priority). I always use it.

Then click Next -> Finish and the VM migration to another host will start. You can track the migration status in the Recent Tasks panel (the Relocate virtual machine task). In my case, the migration of the VM using vMotion over 10 GB Ethernet took about 3 seconds.
Make sure that your VM is now running on another ESXi host.

You can migrate a running VM to another host in PowerCLI using the Move-VM PowerShell cmdlet. For example, we want to move all VMs from contoso-esxi01 to contoso-esxi02:
Get-VMHost contoso-esxi01|Get-Vm| Move-VM –Destination (Get-VMHost contoso-esxi02)
Why VMWare vMotion is not Working?
Here is the list of typical reasons why vMotion can fail or a VM migration can be very slow:
- CPU incompatibility (enable the EVC/Enhanced vMotion Compatibility mode);
- vMotion is not enabled in the VMkernel interface;
- Incorrect network settings of an ESXi host or virtual switches, port groups (Jumbo Frames configured incorrectly, an IP address conflict in the vMotion network, incorrect vSwitch settings, slow network, packet loss);
- No shared storage (for vSphere version 5.1 or earlier). In vSphere 5.1 or higher Shared-Nothing VMotion is available;
- A CD/DVD or an ISO image is not available on the target host;
- Enabled Anti-Affinity rules;
- VMWare Tools are being installed in the guest OS;
- If the guest OS is actively changing its RAM contents, vMotion may be late to move modified data to the VM copy on another host over the network;
- If a target host doesn’t have enough CPU or RAM resources to create a shadow VM, vMotion will fail with an error.
If vMotion migration errors occur, your VM doesn’t shutdown and is still running on the source host.
How to Improve/Optimize vMotion Speed to Migrate a VM Quickly?
You can speed up your virtual machine migration in several ways.
- First of all, it is better to use a network with the highest performance between two ESXi hosts. Use at least 10 GB network, 25 GB is even better (a network adapter of your ESXi server and a physical switch must support this mode);
- Use different physical interfaces for vMotion traffic;
- The vMotion migration uses threads (aka streams). One thread is created for each VMkernel with vMotion enabled. However, this thread can only use one processor core.
To provide more than one CPU core for vMotion processes, create multiple VMkernel interfaces, enable vMotion for them and link them to one NIC interface. A vMotion thread has an average throughput of about 15 GbE, so to load 100 GbE, you need 6 threads.Also, you can increase the number of vMotion threads for a VMkernel interface using Migrate.VMotionStreamHelpers option in Advanced System Settings.