Using local accounts (including the local administrator) to access another computer over network in Active Directory environments is not recommended on a number of reasons. The same local administrator username and password are often used on many computers, which can put multiple devices at risk if a single computer is compromised (Pass-the-hash attack threat). Moreover, access to the network resources with local accounts is hard to personify and centrally monitor, because such events are not logged on AD domain controllers.
To mitigate the risk, administrators can rename the default local Windows Administrator account. To regularly change the local administrator password on all computers in the domain, you can use the MS LAPS tool (Local Administrator Password Solution). But these solutions won’t be able to solve the problem of restricting network access for all local user accounts, since there can be more than one local account on a computer.
You can restrict network access for local accounts using the Deny access to this computer from the network policy. But this policy requires to explicitly list all accounts that need to be denied network access to the computer.
In Windows 8.1 and Windows Server 2012 R2, two new well-known security groups with new SIDs appeared. One includes all local users, and the second includes all local administrators.
| S-1-5-113 | NT AUTHORITY\Local account | All local accounts |
| S-1-5-114 | NT AUTHORITY\Local account and member of Administrators group | All local accounts with the administrator privileges |
Now, to restrict access for local accounts, you can use their common SIDs.
These groups are added to the user’s access token during logon to the computer under a local account.
To make sure that in Windows 10/Windows Server 2016 your local administrator account is assigned two new security groups (NT AUTHORITY\Local account (SID S-1-5-113) and NT AUTHORITY\Local account and member of Administrators group (SID S-1-5-114)), run the command:
Whoami /all
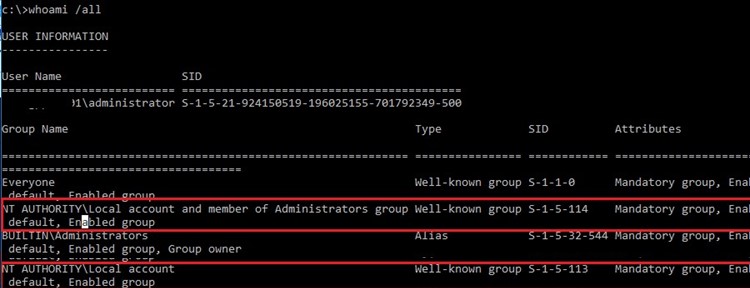
You can use these built-in local security groups on Windows 7/ 8 and Windows Server 2008 R2/ Windows Server 2012 after installing update KB 2871997 (June 2014).
You can check if these security groups exist on your Windows device by SID using the following PowerShell script:
$objSID = New-Object System.Security.Principal.SecurityIdentifier ("S-1-5-113")
$objAccount = $objSID.Translate([System.Security.Principal.NTAccount])
$objAccount.Value
If the script returns NT Authority\Local account, then this local group (with S-1-5-113 SID) exists on your computer.
In order to block the remote network access under local user accounts containing these SIDs in the token, you can use the settings from the GPO section Computer Configuration -> Windows Settings -> Security Settings -> Local Policies -> User Rights Assignment.
Deny Remote Desktop (RDP) Access for Local Users and Administrators
The Deny log on through Remote Desktop Services policy allows you to specify users and groups that are explicitly denied to logon to a computer remotely via Remote Desktop. You can deny RDP access to the computer for local and domain accounts. By default, RDP access on Windows is allowed for the administrators and members of the local Remote Desktop User group.
If you want to restrict RDP connections for local users only (including local administrators), open the local GPO editor gpedit.msc (if you want to apply these settings on computers in the Active Directory domain, use the domain Group Policy Editor – gpmc.msc). Go to the GPO section User Rights Assignment and edit the Deny log on through Remote Desktop Services policy.
Add the built-in local security groups “Local account and member of Administrators group” and “Local account” to the policy. Update local Group Policy settings using the command: gpupdate /force.

The deny policy takes precedence over the Allow log on through Remote Desktop Services policy. If a user or group is added in both policies, RDP access for that user will be denied.
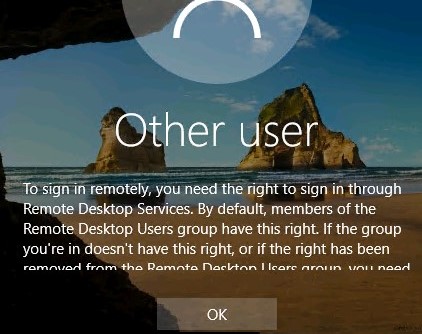
Now, if you try to connect to your computer under local user via RDP, an error will appear:
To sign in remotely, you need the right to sign in through Remote Desktop Services. By default, members of the Remote Desktop Users group have this right. If the group you’re in doesn’t have this right, or if the right has been removed from the Remote Desktop Users group, you need to be granted this right manually.
Deny Access to Computer from the Network
You can deny network access to a computer under local credentials with the Deny access to this computer from the network policy.
Add the local groups “Local account” and “Local account and member of Administrators group” to the Deny access to this computer from the network policy. Also, you should always deny anonymous access and access under a guest account. For a domain environment, we recommend that you use the Deny access to this computer from the network policy to completely block access to workstations and domain-member servers under accounts from the Domain Admins and Enterprise Admins security groups. These accounts should only be used to access domain controllers. This will reduce the risks of capturing the administrative (privileged) account hash and privilege escalation.
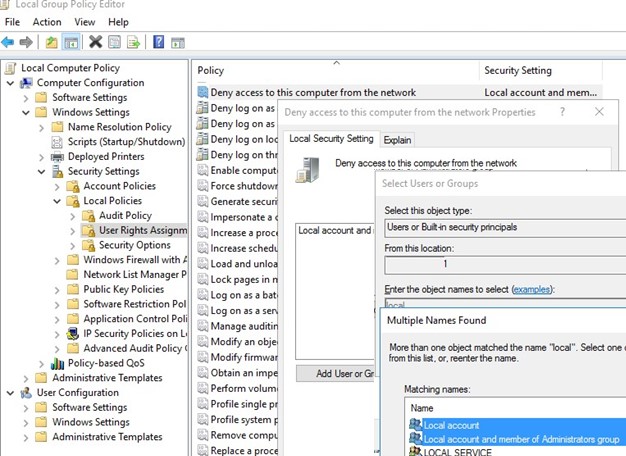
After applying the policy, you won’t be able to remotely connect to this computer over the network under any local Windows account. When trying to connect to a shared network folder or map a network drive from this computer under a local account, an error will appear:
Microsoft Windows Network: Logon failure: the user has not been granted the requested logon type at this computers.
When trying to establish a Remote Desktop connection under the local administrator account (.\administrator), an error message appears.
The system administrator has restricted the types of logon (network or interactive) that you may use. For assistance, contact your system administrator or technical support.

If you apply this policy to a computer that is part of a Windows workgroup (not joined to an Active Directory domain), you can only logon to that computer locally.
Deny Users to Sign in Locally to Windows 10
Using the Deny log on locally policy, you can also restrict interactive logins to the computer/server under local Windows accounts. Go to the GPO User Rights Assignment section, edit the Deny log on locally policy. Add the required local security group to it.Be especially careful with deny Group Policy settings. If configured incorrectly, you may lose access to computers. As a last resort, you can reset your local GPO settings like this.
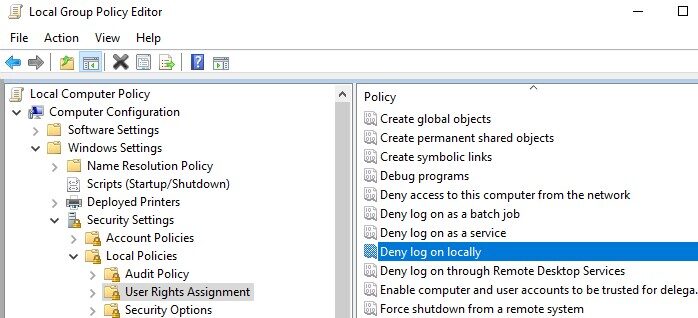
Now, if a user or administrator tries to logon to the computer under a local account, a message will appear.
The sign-in method you are trying to use isn’t allowed. For more info, contact your network administrator.

The same message will appear if you have restricted the list of computers allowed to login in the user account settings in AD.
Thus, you can deny network access under local Windows accounts to computers and domain-member servers, and increase the security of the corporate environment.

