A RAM disk is a virtual disk created in a free area of the memory (RAM) that it sees by the OS as a separate physical disk. Due to the RAM disk being stored in the fast RAM, all read/write operations on this disk are performed almost instantaneously, even faster than when using an SSD (the data transfer speed of the most productive SSDs is about 560 MB/s, while DDR4 memory – 12,000-25,000 MB/s.)
It is recommended to use a RAM disk in systems with an excess of free memory. You can use the RAM disk to place the cache or temporary files of apps/system, temporary SQL databases. Thus you can achieve a significant increase in the applications and databases performance.
In Windows OS, there are no integrated tools to create RAM disks, so you have to use third-party software to do it (AMD RAMDisk, ImDisk, PassMark OSFMount, StarWind RAM Disk, etc.).
However, you can create a RAM disk in Windows Server without using any third-party apps. To do it, you can use the iSCSI driver.
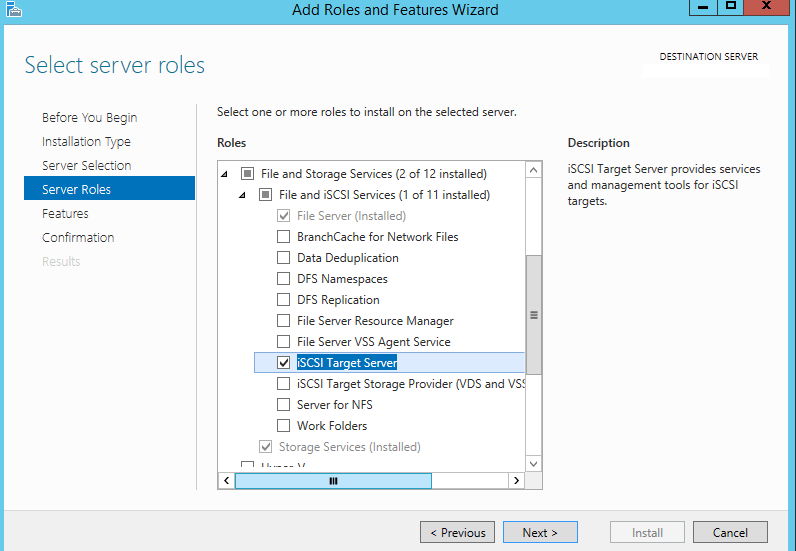
First, install the iSCSI Target Server component (it is the part of the File and Storage Services role).
If you have Windows Firewall enabled, you must allow iSCSI Service traffic.
To allow traffic to the loopback interface for iSCSI, change the value of the DWORD parameter AllowLoopBack to 1 in the HKLM\Software\Microsoft\iSCSI Target registry key. You can change the registry parameter from PowerShell using a single command:
Set-ItemProperty -Path 'HKLM:\SOFTWARE\Microsoft\iSCSI Target' -Name AllowLoopBack -Value 1

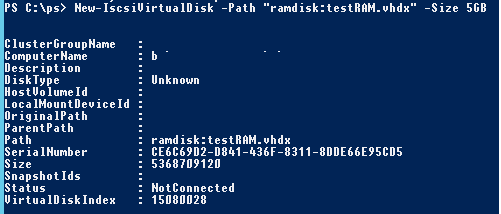
Now open the PowerShell console and create a 5 GB virtual RAM disk using this command:
New-IscsiVirtualDisk -Path "ramdisk:testRAM.vhdx" -Size 5GB
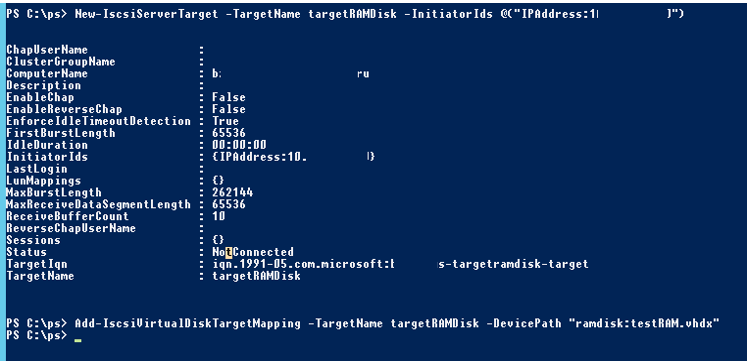
Now you need to create an iSCSI target pointing to the IP address of your server (not localhost!):
New-IscsiServerTarget -TargetName targetRAMDisk -InitiatorIds @("IPAddress:10.1.1.200")
Connect the RAM disk to the created iSCSI target:
Add-IscsiVirtualDiskTargetMapping -TargetName targetRAMDisk -DevicePath "ramdisk:testRAM.vhdx"
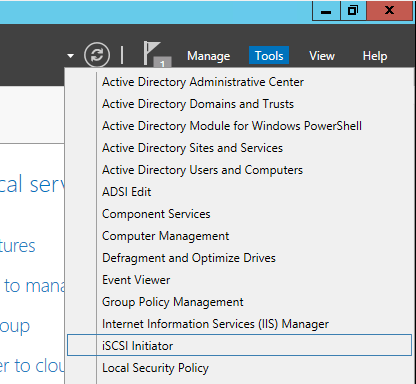
Run the iSCSI Initiator management console through Server Manager.
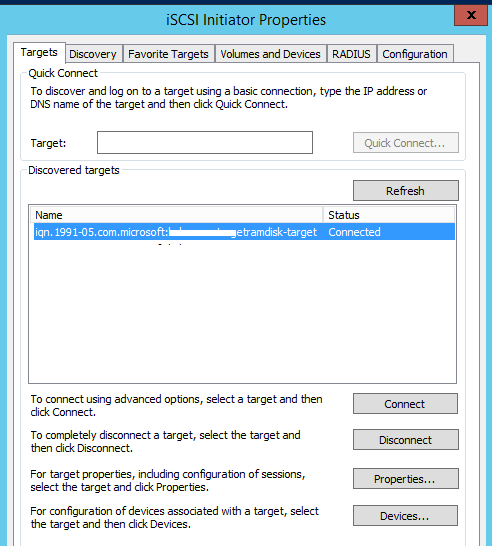
Specify the IP address of your server in the Targets tab and click Quick Connect to add your iSCSI target.
You can connect the iSCSI Target with the command:
Get-IscsiTarget | Connect-IscsiTarget
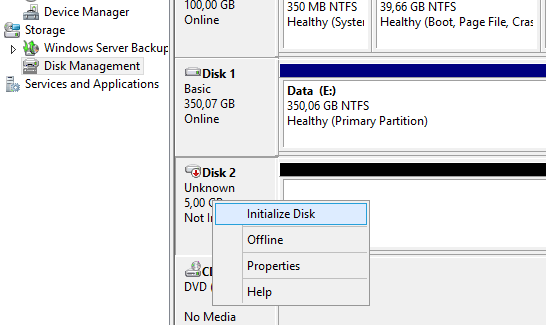
Open the Disk Management console and make sure that the new 5 GB disk appeared there. This is the RAM disk we created. Initialize the disk, create a partition and format it. Assign a disk letter to it.You can initialize a RAM disk and assign it a drive letter using the PowerShell cmdlets from the built-in disk and partition management module Storage with a following one-liner:
Get-Disk | Where partitionstyle -eq 'raw' | Initialize-Disk -PartitionStyle MBR -PassThru | New-Partition -AssignDriveLetter -UseMaximumSize | Format-Volume -FileSystem NTFS -NewFileSystemLabel "disk2" -Confirm:$false
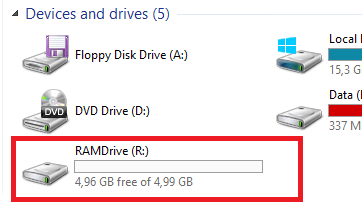
Now you can move app files to the RAM disk and reconfigure your software to use it.
After rebooting the server, the RAM disk is removed with all its contents and you will have to re-create it again.Some third-party programs that create RAM disks allow saving RAM disk data as a file on your hard drive. When the system is restarted, the data are extracted and moved to the RAM disk.
To remove your RAM disk, use the following commands:
Remove-IscsiVirtualDiskTargetMapping -TargetName targetRAMDisk -DevicePath "ramdisk:testRAM.vhdx"
Remove-IscsiServerTarget -TargetName targetRAMDisk
Remove-IscsiVirtualDisk -Path "ramdisk:testRAM.vhdx"