From time to time we notice that some connected network printers go offline, stop printing and print jobs begin to queue on the print servers running Windows Server. In this post we’ll look at why a network printer may go to offline state and how to fix this problem without printer re-installation or print server restart.
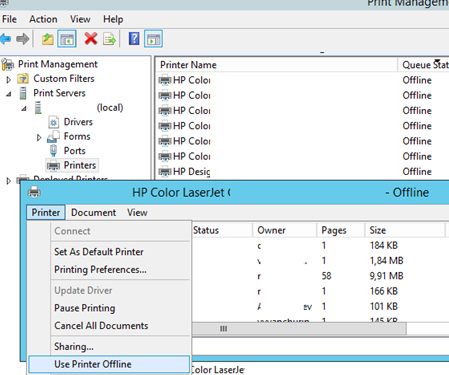
Open the Print Management console on your print server, find the printer with the Queue Status = Offline state, open its print queue properties and make sure that the “Use Printer Offline” option is not checked in its settings.
Then make sure that the printer is turned on and accessible over the network (check printer availability using ping by IP address, make sure that you can open the printer management web interface).
How does Windows determine network printer availability status? In Windows 7 and newer, by default the SNMP (Simple Network Management Protocol) is used to query the network printer state. The print server sends an SNMP request to the printer and waits for a response. If no SNMP response has been received from the printer, such a printer is considered unavailable and goes offline on the print server. Let’s see how to configure SNMP protocol settings for network printers on Windows print server.
First of all, make sure that your printer supports SNMP. Open your network printer management web interface and make sure that SNMP is enabled in the printer settings and the community name used for it is public.For example, you can find the SNMP settings of HP LaserJet CP1525 in Networking -> SNMP -> Enable SNMP read-only access (uses public for the Get Community Name).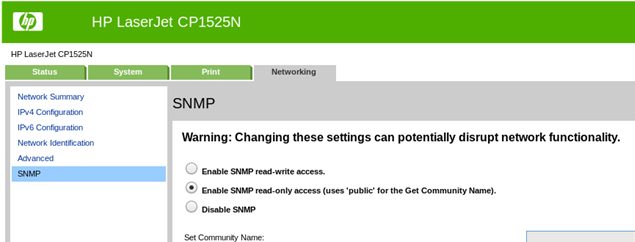
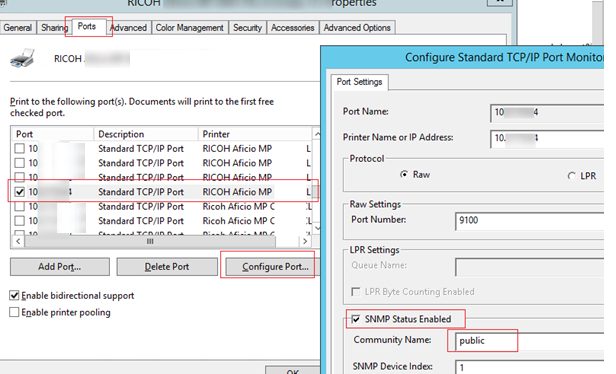
Find your printer in the Print Management console, open its properties and go to the Ports tab. Open the port settings: Standard TCP/IP port -> Configure Port. If your printer supports SNMP, make sure that SNMP Status Enabled option is checked, and the Community Name is set to public.
If your printer doesn’t support SNMP, you must disable it in the printer port settings on the print server. Windows will stop sending SNMP packets to poll the device state.
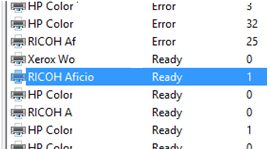
Make sure that the printer state has changed to Ready.
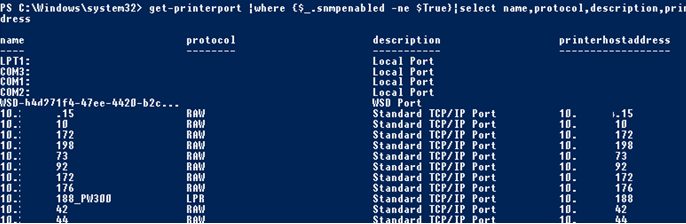
You can find all printers with disabled SNMP on your print server using the following PowerShell cmdlet:
get-printerport |where {$_.snmpenabled -ne $True}|select name,protocol,description,printerhostaddress
The following PowerShell command will help you to find ports of the network printers with the SNMP community name different from Public:
get-printerport |where {$_.SNMPCommunity -ne ‘Public’ –and $_.snmpenabled -eq $True }|select name,protocol,description,printerhostaddress, snmpenabled, SNMPCommunity
If the check of SNMP settings has not helped to get your printer online, you should check the following parameters.
- Make sure that the correct IP address of the printer is specified in the print port settings;
- Make sure that the port type used is “Standard TCP/IP Port” instead of “WSD Port”.

- Make sure that your firewalls are not blocking SNMP traffic (Ports 161/UDP and 162/UDP);
- Remove your printer and print port completely and recreate them. Reinstall the printer drivers;
- Restart the spooler service:
Restart-Service "Spooler" - You can completely disable SNMP polling for all printers on Windows by creating a new DWORD parameter with the name SNMPLegacy and the value 1 in this registry key: HKEY_LOCAL_MACHINE\SYSTEM\CurrentControlSet\Control\Print.