In this post we will show how to configure a tagged VLAN interface on Windows 10 and Windows Server 2016 (2019/2012R2). The VLAN (Virtual LAN) standard is described in IEEE 802.1Q standard and implies traffic tagging (vlanid) so that a network packet may be referred to a particular virtual network. VLANs are used to separate and segment networks, restrict broadcast domains and isolate network segments to improve security. In Windows, you can configure several different logical network interfaces with different VLANID in a single physical interface using different tools.
To use VLAN, you will have to configure the physical switch port, to which your computer/server is connected. The port must be switched from access mode to trunk mode. By default, all VLANs are allowed on the trunk port, but you can set the list of allowed VLAN numbers (1 to 4094) available at this Ethernet switch port.
Creating Multiple VLAN Interfaces on Windows 10
Windows desktop editions don’t natively support VLAN tagging. Only in the latest Windows 10 builds you can set one VLAN tag for a network adapter. To do so, a PowerShell cmdlet to manage network settings is used. For example:
Set-NetAdapter –Name "Ethernet0" -VlanID 24
However, there are two ways to create a separate virtual interface with the specific VLAN ID in Windows 10: using a special driver and tool by your network adapter manufacturer or using Hyper-V.
Multiple VLANs on a Realtek NIC in Windows 10
For Realtek network cards you can configure multiple virtual network adapters with different VLANs using a special tool — Realtek Ethernet Diagnostic Utility. See the description on the manufacturer website to make sure that your Realtek network adapter supports VLAN configuration.
Download and install the latest network driver for your Realtek adapter and run the Ethernet Diagnostic Utility.
Go to the VLAN section, click Add and add the required VLAN ID. Then a new network connection will appear in Windows.

After creating network interfaces for your VLANs, you can assign them IP addresses from the corresponding IP subnet.
How to Setup VLAN on an Intel Ethernet Network Adapter?
To configure VLAN, Intel has its own tool — Intel Advanced Network (Intel® ANS) VLAN. Of course, your network adapter model must support VLAN (for example, VLAN is not supported for NICs such as Intel PRO/100 or PRO/1000). When you install a driver, select to install Intel PROSet for Windows Device Manager and Advanced Network Services.
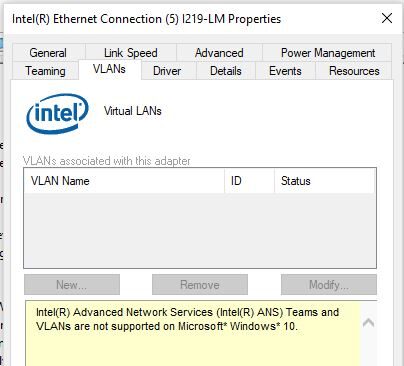
Then a separate VLANs tab appears in the properties of your physical Intel network adapter, where you can create multiple VLAN interfaces.
However, this method works in all previous Windows versions (up than Windows 10 build 1809). In the newer Windows versions, the following message is displayed in the VLANs tab:
Intel(R) Advanced Network (Intel(R) ANS) Teams and VLANs are not supported on Microsoft Windows 10.
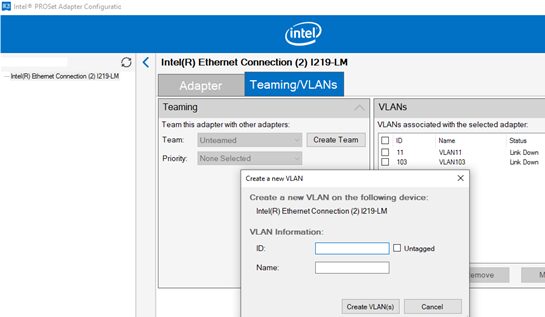
Recently, Intel has released an updated network adapter driver and Intel PROSet Adapter Configuration Utility for the latest Windows builds. Download and install the latest Intel driver version and the configuration tool.
Run it, open the Teaming/VLANs tab, click New and enter the name of your network interface and its VLANID.
Also, you can add/remove/view the list of VLANs using special PowerShell cmdlets from the IntelNetCmdlets module:
Get-IntelNetVLAN, Add-IntelNetVLAN

Multiple VLANs in Windows 10 Using Hyper-V Virtual Switch
There is another way to create multiple VLANs on Windows 10 using Hyper-V (it is available only in Pro and Enterprise). To use it, install Hyper-V components:
Enable-WindowsOptionalFeature -Online -FeatureName:Microsoft-Hyper-V -All
Create a new virtual switch in the Hyper-V Manager or using PowerShell commands (see an example in the post on how to configure Hyper-V Server).
Then run the following commands for each VLAN you want to create:
Add-VMNetworkAdapter -ManagementOS -Name VLAN24 -StaticMacAddress “11-11-AA-BB-CC-DD” -SwitchName vSwitch2
Set-VMNetworkAdapterVlan -ManagementOS -VMNetworkAdapterName VLAN24 -Access -VlanId 24
So a network adapter with the VLAN you want will appear in Windows.
How to Configure Multiple VLANs in Windows Server 2016?
In Windows Server 2016, you can configure VLAN using built-in tools, you don’t need to install any special drivers or utilities. Let’s try to configure some different VLANs on a single physical network adapter on Windows Server 2016 using NIC Teaming. Make sure that no VLAN number is set in the network adapter advanced settings (VLAN ID = 0). 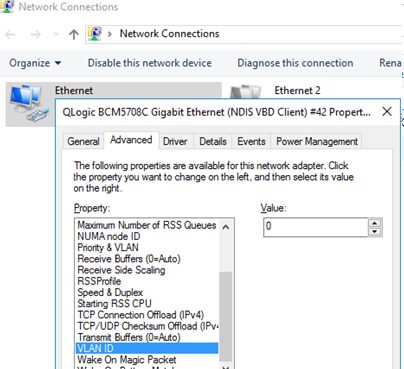
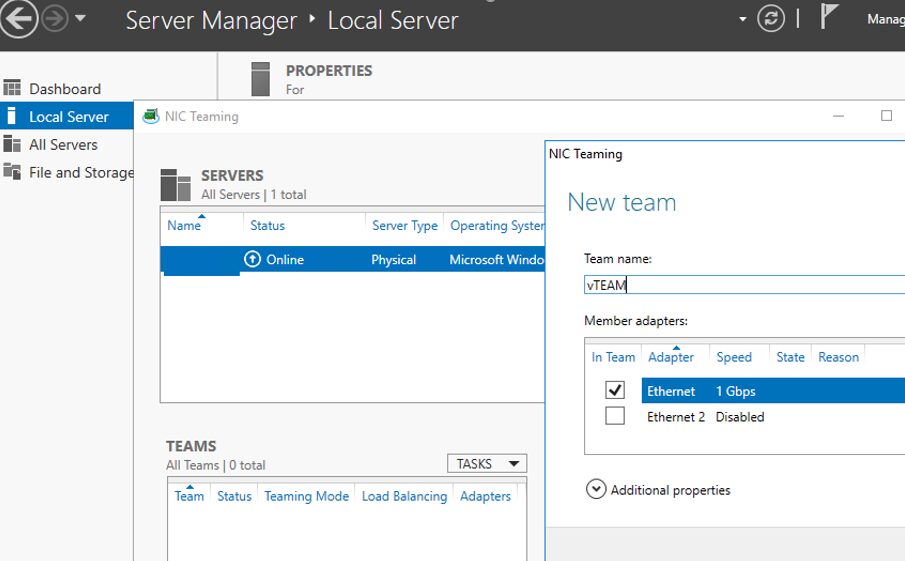
- Start Server Manager -> Local and click the NIC Teaming link;
- In the Teams section, click Task -> New Team. Specify the group name and select network adapters to add;
 You can create a NIC Teaming group using PowerShell:
New-NetLbfoTeam -Name vTeam -TeamMembers "Ethernet1","Ethernet2" -TeamingMode SwitchIndependent -LoadBalancingAlgorithm Dynamic - Then in the “Adapter and Interfaces” section, add virtual network interfaces. Click Tasks -> Add Interface;
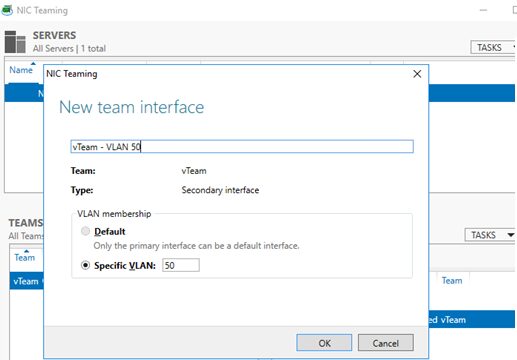
- Enter the name of the interface you are going to create and a VLAN number; You can add a network interface and set a VLAN for it in PowerShell:
Add-NetLbfoTeamNic -Team vTeam -VlanID 24 -Name VLAN24 - In the same way you can add as many VLAN network interfaces as you need;
- Then configure the IP settings of all virtual network interfaces you created in
ncpa.cpl.
 You can create a NIC Teaming group using PowerShell:
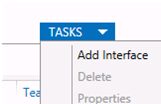
 You can add a network interface and set a VLAN for it in PowerShell: