All Windows versions has a built-in feature for automatically updating root certificates from the Microsoft websites. As part of the Microsoft Trusted Root Certificate Program, MSFT maintains and publishes a list of certificates for Windows clients and devices in its online repository. If the verified certificate in its certification chain refers to the root CA that participates in this program, the system will automatically download this root certificate from the Windows Update servers and add it to the trusted ones.
Windows requests a trusted root certificate lists (CTL) renewal once a week. If Windows doesn’t have a direct access to the Windows Update directory, the system won’t be able to update the root certificates, so a user may have some troubles with opening websites (which SSL certificates are signed by an untrusted CA, or with installing/running signed scripts and apps.
In this article, we’ll try to find out how to manually update the list of root certificates in TrustedRootCA on isolated networks or computers/servers without a direct Internet connection.
Note. If your computers access the Internet through a proxy server, in order to automatically update root certificates on users’ computers, Microsoft recommends that you open direct access (bypass) to Microsoft websites. However, it isn’t always possible or applicable due to corporate restrictions.
Managing Trusted Root Certificates in Windows 10
How to see the list of root certificates of a Windows computer?
- To open the root certificate store of a computer running Windows 10/8.1/7/Windows Server, start the mmc.execonsole;
- Select File -> Add/Remove Snap-in, select Certificates (certmgr) in the list of snap-ins -> Add;
- Select what you want to manage certificates of local Computer account;
- Next -> OK -> OK;
- Expand the Certificates node -> Trusted Root Certification Authorities Store. This section contains the list of trusted root certificates on your computer.
You can also get a list of trusted root certificates with expiration dates using PowerShell:
Get-Childitem cert:LocalMachineroot |format-list
You can list the expired certificates, or which expire in the next 30 days:
Get-ChildItem cert:LocalMachineroot | Where {$_.NotAfter -lt (Get-Date).AddDays(40)}

In the mmc console, you can view information about any certificate or remove it from trusted ones.For security reasons, I recommend that you periodically check the certificate store of your computer for suspicious and revoked certificate using the Sigcheck tool.
You can manually transfer the root certificate file between Windows computers using the Export/Import function.
- You can export any certificate to a .CER file by clicking on it and selecting All Tasks -> Export;
- You can import this certificate on another computer using the option All Tasks -> Import.
Rootsupd.exe Utility
In Windows XP, the rootsupd.exe utility was used to update computer`s root certificates. The list of root and revoked certificates in it was regularly updated. The utility was distributed as a separate update KB931125 (Update for Root Certificates). Let’s see if we can use it now.
- Download the rootsupd.exe utility using the following link
http://download.windowsupdate.com/msdownload/update/v3/static/trustedr/en/rootsupd.exe - To install the Windows root certificates, just run the rootsupd.exe file. But we will try to examine its contents more carefully. Extract the certificates from the executable file with the command:
rootsupd.exe /c /t: C:PSrootsupd - Certificates are stored in SST files, like authroots.sst, delroot.sst, etc. To delete/install a certificate, you can use the following commands:
updroots.exe authroots.sst
updroots.exe -d delroots.sst
However, as you can see, these certificate files were created on April, 4, 2013 (almost a year before the end of official support of Windows XP). Thus, since then the utility has not been updated and cannot be used to install up-to-date certificates. A little later we will need the updroots.exe file.
Certutil: Getting Latest Root Certificates from Windows Update
The latest version of the Certutil.exe tool for managing certificates (available in Windows 10), allows you to download from Windows Update and save the actual root certificates list to the SST file.
To generate an SST file, run this command with the administrator privileges on a computer running Windows 10 and having a direct access to the Internet:
certutil.exe -generateSSTFromWU roots.sst

As a result, an SST file containing up-to-date list of root certificates will appear in the target directory. Double-click to open it. This file is a container containing trusted root certificates.
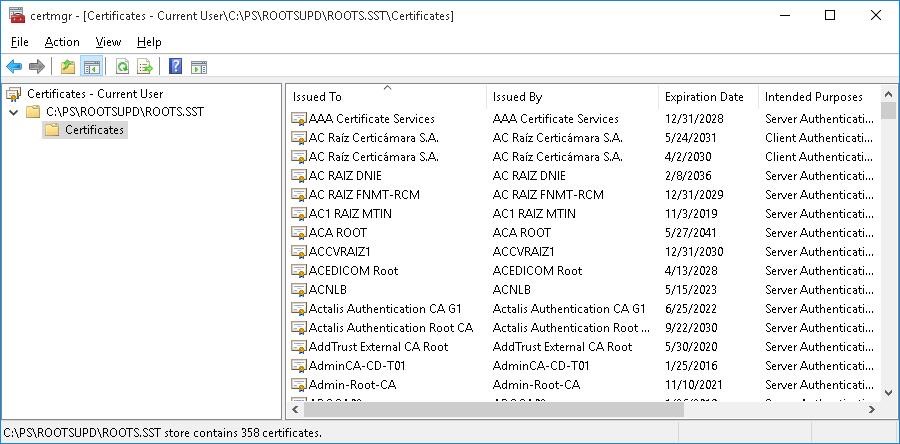
As you can see, a familiar Certificate Management snap-in opens, from which you can export any of the certificates you have got. In my case, there have been 358 items in the list of certificates. Obviously, it is not rational to export the certificates and install them one by one.
Tip. To generate individual certificate files, use the command certutil -syncWithWU. The certificates obtained in this way can be deployed on Windows clients using GPO.
To install all the certificates from the SST file and add them to the list of trusted root certificates on a computer, you can use the PowerShell commands:
$sstStore = ( Get-ChildItem -Path C:psrootsupdroots.sst )
$sstStore | Import-Certificate -CertStoreLocation Cert:LocalMachineRoot
To install all certificates listed in the file, use the updroots.exe (it is located in the rootsupd.exe file we extracted in the previous section).
updroots.exe roots.sst
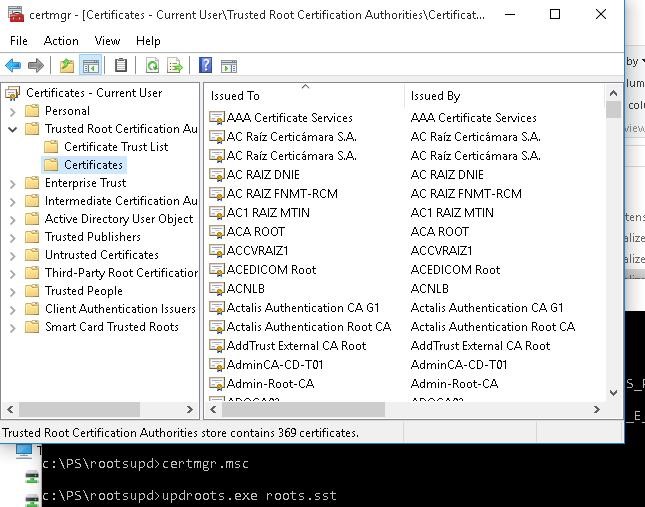
Run the certmgr.msc snap-in and make sure that all certificates have been added to the Trusted Root Certification Authority.
The List of Root Certificates in STL Format
There is another way to get the list of root certificates from Microsoft website. To do it, download the file http://ctldl.windowsupdate.com/msdownload/update/v3/static/trustedr/en/authrootstl.cab (updated twice a month). Using any archiver (or even Windows Explorer) unpack authrootstl.cab. It contains one file authroot.stl.

The Authroot.stl file is a container with a list of trusted certificates in Certificate Trust List format.
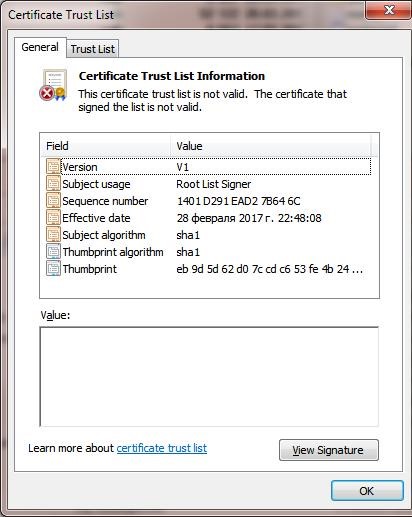
You can install this file in the system using the context menu of the STL file (Install CTL).

Or using certutil.exe tool:
certutil -addstore -f root authroot.stl

root "Trusted Root Certification Authorities"
CTL 0 added to store.
CertUtil: -addstore command completed successfully.
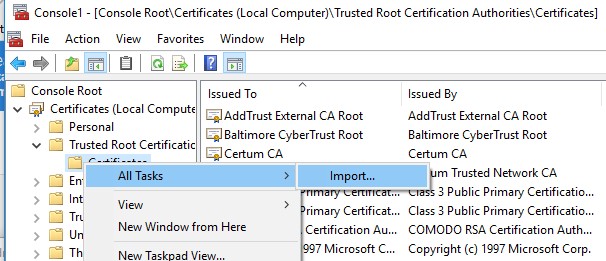
You can also import certificates using the certificate management console (Trust Root Certification Authorities -> Certificates -> All Tasks> Import). Specify the path to your STL file with certificates.
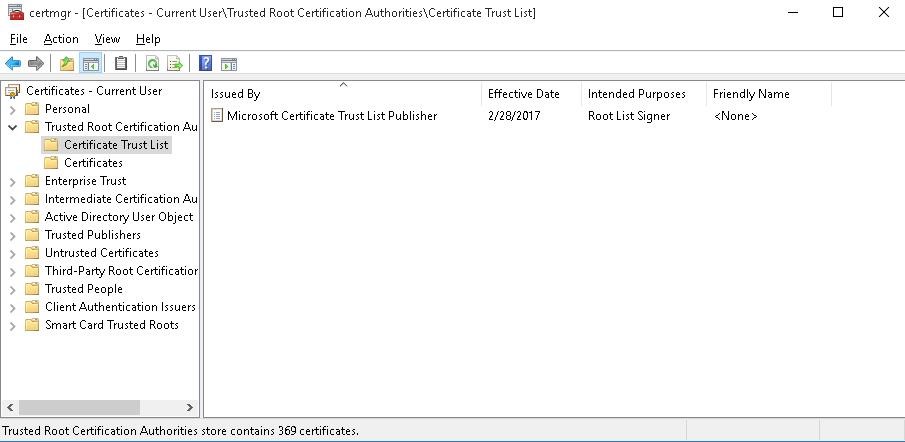
After you have run the command, a new section Certificate Trust List appears in Trusted Root Certification Authoritiescontainer of the Certificate Manager console (certmgr.msc).
In the same way, you can download and install the list of the revoked (disallowed) certificates that have been removed from Root Certificate Program. To do it, download disallowedcertstl.cab(http://ctldl.windowsupdate.com/msdownload/update/v3/static/trustedr/en/disallowedcertstl.cab), unpack it and add to the Untrusted Certificates section using this command:
certutil -addstore -f disallowed disallowedcert.stl
Updating Root Certificates in Windows with GPO in an Isolated Environment
If you have the task of regularly updating root certificates in an Internet-isolated Active Directory domain, there is a slightly more complicated scheme for updating local certificate stores on domain joined computers using Group Policies. You can configure root certificate updates on a user computers in the isolated Windows networks in several ways.
The first way assumes that you regularly manually download and copy to your isolated network a file with root certificates obtained as follows:
certutil.exe –generateSSTFromWU roots.sst
Then the certificates from this file can be distributed via SCCM or PowerShell logon script in GPO:
$sstStore = (Get-ChildItem -Path \my-dc-01SYSVOLcontoso.comrootcertroots.sst )
$sstStore | Import-Certificate -CertStoreLocation Cert:LocalMachineRoot
The second way is to obtain the actual root certificates using the command:
Certutil -syncWithWU -f \my-dc-01SYSVOLcontoso.comrootcert
A number of root certificate files (CRT file format) will appear in the specified network shared folder, including files (authrootstl.cab, disallowedcertstl.cab, disallowedcert.sst, thumbprint.crt).

Then, using Group Policy Preference, you need to change the value of the RootDirURL parameter in the registry key HKLMSoftwareMicrosoftSystemCertificatesAuthRootAutoUpdate. This parameter should point to the shared network folder from which your Windows computers should receive new root certificates. Run the domain GPMC console, create a new GPO, switch to the edit policy mode and expand the section Computer Configuration -> Preferences -> Windows Settings -> Registry. Create a new registry property with the following settings:
- Action: Update
- Hive: HKLM
- Key path: SoftwareMicrosoftSystemCertificatesAuthRootAutoUpdate
- Value name: RootDirURL
- Type: REG_SZ
- Value data: file://\my-dc-01SYSVOLcontoso.comrootcert
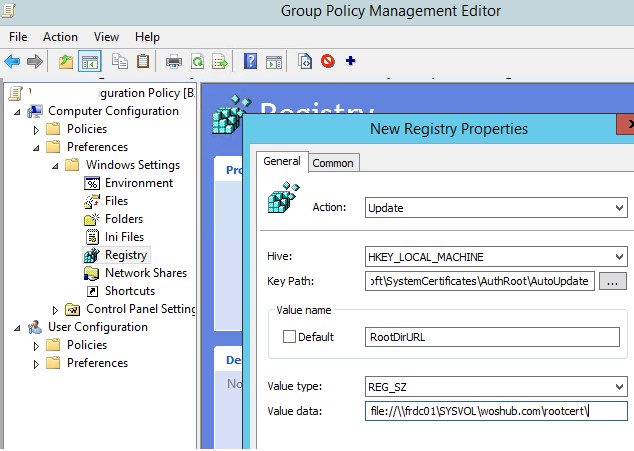
It remains to link this policy on a computer`s OU and after updating the policies to check for new root certificates in the certstore.The policy Turn off Automatic Root Certificates Update under Computer Configuration -> Administrative Templates -> System -> Internet Communication Management -> Internet Communication settings should be disabled or not configured.
In this article, we looked at several ways to renew trusted root certificates on a Windows network that is isolated from the Internet.

