In this article we’ll look at the disk, partition and volume management from PowerShell console. You can perform from PowerShell all the operations of managing local disks and partitions, that you are used to performing from the “Disk Management” GUI (diskmgmt.msc) or from the diskpart.exe command line tool. Disk management cmdlets are included in the Storage module available in PowerShell 3.0. We’ll consider how to initialize a disk, create a partition table on it, create a volume and format it. The commands given below will work in Windows 10 / Server 2016 and Windows 8.1 / Server 2012 R2 (for previous Windows versions you will have to update PowerShell first).
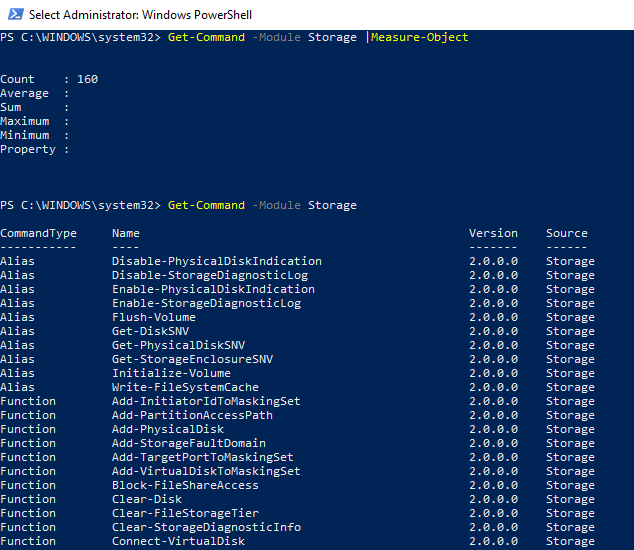
There are 160 PowerShell cmdlets in the Storage module in Windows 10. To display all available commands related to disk management, run the following command:
Get-Command -Module Storage
Important. Be very careful when managing disks and partitions from PowerShell in order not to accidentally delete or format a partition containing data.
PowerShell: List Local Disks and Partitions
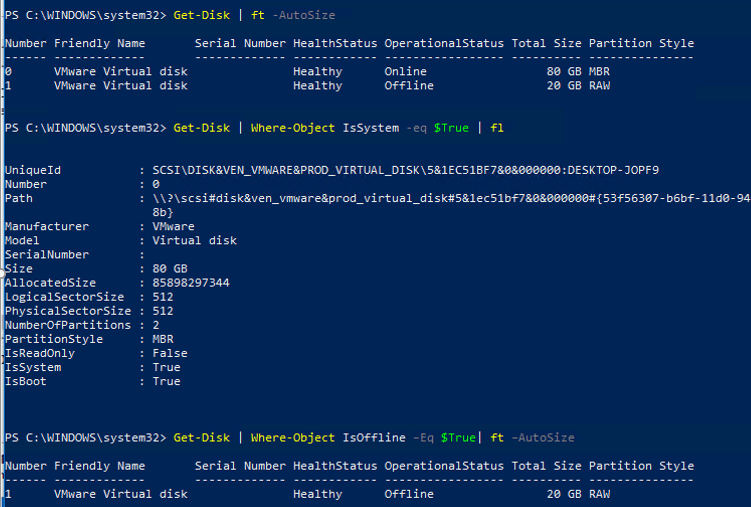
First of all, try to display the list of local disks available in your system at the logical level. To do it, run this command:
Get-Disk | ft -AutoSize
To select only the system disk on which Windows is installed, enter the following command:
Get-Disk | Where-Object IsSystem -eq $True | fl
As you can see, the command has returned the following attributes of the system disk (you can use them in the selection as well):
UniqueId : SCSI\DISK&VEN_VMWARE&PROD_VIRTUAL_DISK\5&1EC51BF7&0&000000:DESKTOP-JOPF9
Number : 0
Path : \\?\scsi#disk&ven_vmware&prod_virtual_disk#5&1ec42ba7&0&000000#{21f23456-a6bf-12d0-94f2-001efb8b}
Manufacturer : VMware
Model : Virtual disk
SerialNumber :
Size : 98 GB
AllocatedSize : 98432321434
LogicalSectorSize : 512
PhysicalSectorSize : 512
NumberOfPartitions : 2
PartitionStyle : MBR
IsReadOnly : False
IsSystem : True
IsBoot : True
You can display Offline disks only:
Get-Disk | Where-Object IsOffline –Eq $True| ft –AutoSize
If you need the information about physical disks (the characteristics and status of physical disks on a computer), use Get-PhysicalDisk cmdlet.

You can detect the type of connected disk: SSD, HDD (usually connected over SATA bus) or a USB flash drive (UnSpecified media type).
DeviceId Model                      MediaType   BusType         Size

——— ——                      ———   ——-         —-

0        TOSHIBA MK3775VSXP         HDD         SATA    500156374016

1        Samsung SSD 840 PRO Series SSD         SATA    128060514304

2        Transcend                 UnSpecified USB     128169757184
You can display the list of partitions on all disks:
Get-Partition
Or partitions on the specified disks only:
Get-Partition –DiskNumber 1,2
To display the list of all volumes in Windows, run this command:
Get-Volume

Please note that the disk numbering starts from 0, and partition numbering – from 1.
Disk Initialization in PowerShell
In the previous example you have seen that one of the disks is Offline and has a RAW label in the Partition Style column. Let’s try to initialize it, create a GPT or MBR partition table and create a new partition on it.
First of all, you must get the disk Online:
Get-Disk | Where-Object IsOffline –Eq $True | Set-Disk –IsOffline $False
Now you can initialize it (its index is 1):
Initialize-Disk -Number 1

By default, a GPT (GUID) partition table is created on a disk, but if you need an MBR one, run this command:
Initialize-Disk 1 –PartitionStyle MBRIf there are some data on the disk, you can change the partition table from MBR to GPT without removing the data using the mbr2gpt.exe tool.
In order not to specify the disk number, you can initialize all disks with the RAW partition table:
Get-Disk | Where-Object PartitionStyle –Eq 'RAW' | Initialize-DiskPlease note that a disk may have the RAW status when the partition table is corrupted.
How to Create Partitions on a Disk?
To create a new partition on a disk, the New-Partition cmdlet is used. Let’s create a 10 GB partition and assign the letter L: to it:
New-Partition –DiskNumber 1 -Size 10gb -DriveLetter L
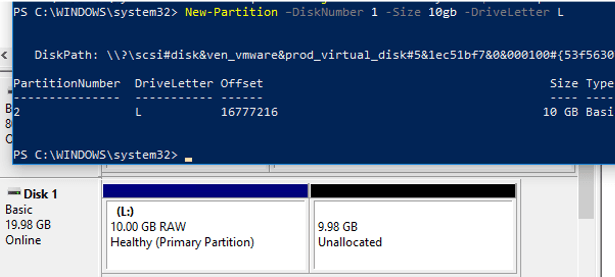
If you want the partition to occupy all available disk space, use the UseMaximumSize attribute. To assign a letter automatically, the AssignDriveLetter parameter is used.
New-Partition –DiskNumber 1 -AssignDriveLetter –UseMaximumSize
You can change the assigned letter using this command:
Set-Partition –DriveLetter L -NewDriveLetter U
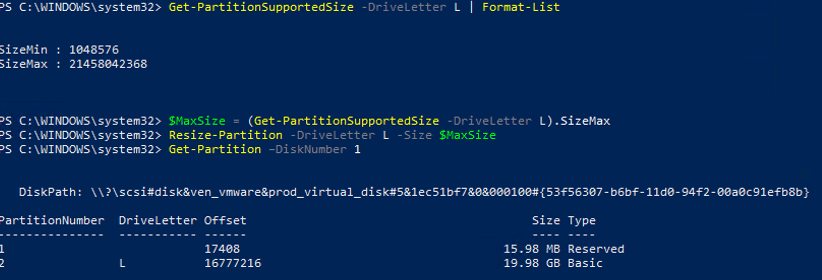
If you want to expand the existing partition, first of all display the available unallocated space to extend this partition:
Get-PartitionSupportedSize -DriveLetter L | Format-List
Then you can extend the size of the partition to the maximum:
$MaxSize = (Get-PartitionSupportedSize -DriveLetter L).SizeMax
Resize-Partition -DriveLetter L -Size $MaxSize
If you want to make a partition active, this command is used:
Set-Partition -DriveLetter U -IsActive $true
Formatting a partition with PowerShell
Let’s format new partition in the NTFS and set the DBData volume label:
Format-Volume -DriveLetter L -FileSystem NTFS -NewFileSystemLabel DBData -Confirm:$false

How to Remove Partitions from a Disk?
To remove all partitions on disks 1 and 2 without confirmation, run this command:
Get-Partition –DiskNumber 1,2 | Remove-Partition -Confirm:$false

To delete all partitions from disks and completely clear data, run the command
Clear-Disk -Number 1 -RemoveData -Confirm:$false
If there are OEM partitions on a disk (OEM recovery partition, EFI partition, System Reserved), use the RemoveOEM parameter to remove them:
Clear-Disk -Number 1 -RemoveData –RemoveOEM
The next PowerShell one-liner will initialize all new connected RAW-type disks, create the partition table on them and create an NTFS partitions with the maximum available size. It is convenient to use it when connecting a new disk:
Get-Disk |Where-Object PartitionStyle -eq 'RAW' |Initialize-Disk -PartitionStyle MBR -PassThru |New-Partition -AssignDriveLetter -UseMaximumSize |Format-Volume -FileSystem NTFS -Confirm:$false