You can use PowerShell to view or change BIOS settings on your computer running Windows. Let’s review some examples you can use to get or modify some BIOS settings with PowerShell through the WMI classes (Windows Management Instrumentation) on the computers of popular vendors: HP, Lenovo, Dell.
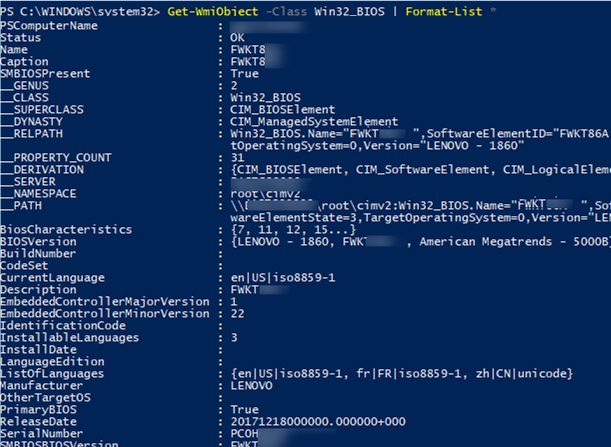
You can view basic BIOS parameters on your computer using the Get-WmiObject cmdlet from the Win32_BIOS class:
Get-WmiObject -Class Win32_BIOS | Format-List *
This command allows you to view your BIOS version (SMBIOSBIOSVersion, BIOSVersion), hardware manufacturer, computer serial number, the ReleaseDate and some other information.
You can list only some of these BIOS parameters:
Get-WmiObject -Class Win32_BIOS | Select-Object Manufacturer, SMBIOSBIOSVersion
You can use the Win32_BIOS class to view some BIOS information on any computer running Windows. However, some hardware vendors provide special WMI classes to direct access BIOS from Windows OS (the native drivers by your hardware manufacturer must be installed on a computer).
Lenovo BIOS Settings Management from PowerShell
You can get the list of BIOS parameters and their values on Lenovo computers like this:
Get-WmiObject -class Lenovo_BiosSetting -namespace root\wmi
To display only the names of BIOS settings and their current values:
Get-WmiObject -class Lenovo_BiosSetting -namespace root\wmi | select-object InstanceName, currentsetting
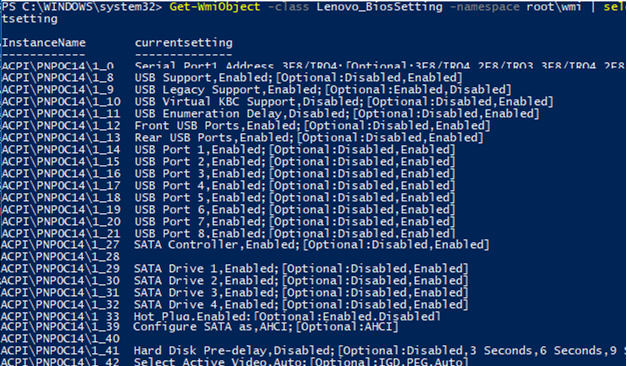
Let’s check if the password to access BIOS is set on your Lenovo computer:
(gwmi -Class Lenovo_BiosPasswordSettings -Namespace root\wmi).PasswordState
If the command returned 0, then the password to enter BIOS is not set.

You can change some BIOS parameters on Lenovo computers. For example, let’s enable WOL (Wake-On-LAN):
$getLenovoBIOS = gwmi -class Lenovo_SetBiosSetting -namespace root\wmi
$getLenovoBIOS.SetBiosSetting("WakeOnLAN,Enable")
$SaveLenovoBIOS = (gwmi -class Lenovo_SaveBiosSettings -namespace root\wmi)
$SaveLenovoBIOS.SaveBiosSettings()
Change BIOS Setting from PowerShell on Hewlett-Packard Computers
To get BIOS settings, their values and available options on HP computers, you can use the following command:
Get-WmiObject -Namespace root/hp/instrumentedBIOS -Class hp_biosEnumeration | select Name, value, possiblevalues –AutoSize
You can change some BIOS settings on HP computers from PowerShell. For example, you want to disable booting your computer from USB devices.
$getHPBios = gwmi -class hp_biossettinginterface -Namespace "root\hp\instrumentedbios"
$getHPBios.SetBIOSSetting('USB Storage Boot','Disable')
If a password is required to change BIOS settings, you can use this script:
$HPBIOSPassword = "<utf-16/>"+"Passw0rd!1"
$getHPBios = gwmi -class hp_biossettinginterface -Namespace "root\hp\instrumentedbios"
$getHPBios.SetBIOSSetting(‘Network (PXE) Boot','Disable',$HPBIOSPassword)
If the last command has returned “0”, it has been executed successfully. You can use a simple PowerShell handler:
$ChangeBIOS_State = $bios.setbiossetting(Network (PXE) Boot', 'Disable' , $HPBIOSPassword)
$ChangeBIOS_State_Code = $ChangeBIOS_State.return
If(($ChangeBIOS_State_Code) -eq 0)
{
write-host "OK"
}
Else
{
write-host "Error - (Return code $ChangeBIOS_State_Code)" -Foreground Red
}
If you want to enable LAN/WLAN Switching in BIOS on an HP laptop to automatically disconnect from Wi-Fi when an Ethernet connection is available, run this command:
$getHPBios.SetBIOSSetting('LAN/WLAN Switching','Enable')
Configuring DELL BIOS Settings with PowerShell
To view and manage BIOS settings on DELL computers, you can use the DCIM-BIOSService WMI class or the more modern root\dellomci class (available after the installation of the OMCI package — Open Manage Client Instrumentation).
To view the boot device order in BIOS on Dell computers, run the following command:
Get-WmiObject -NameSpace root\dellomci Dell_BootDeviceSequence | sort bootorder | select BootDeviceName, BootOrder

For example, you can enable Wake on LAN in BIOS like that:
(Get-WmiObject DCIM-BIOSService -namespace rootdcimsysman).SetBIOSAttributes($null,$null,"Wake-On-LAN","4")
Also, Dell released a separate PowerShell module, DellBIOSProvider, which is installed alongside driver installation or you can install it manually with this command:
Install-Module -Name DellBIOSProvider -Force
You can use this module to view the boot sequence on a Dell computer:
Get-ChildItem DellSmbios:\BootSequence\Bootsequence
To change a specific BIOS setting, use the Set-Item cmdlet. For example, to change the BIOS password:
Set-Item -Path Dellsmbios\Security\AdminPassword –Value BadDellPa$$ –Password G00dDe11P@ss
Using the methods described above, you can create a PowerShell script to export the current BIOS settings from a reference computer (e. g., to a CSV file). Then, you can use PowerShell to deploy the same BIOS settings on all computers in your company.

