I received several emails from readers asking me to help solve the problem of displaying computers in a network environment on the latest Windows 10 builds. Indeed, there are device network discovery problems in the latest releases of Windows 10: you can’t see other computers on network, or your Windows 10 is not showing up in Workgroup. Let’s see how to fix Network Discovery on the latest Windows 10 builds (up to 1909).
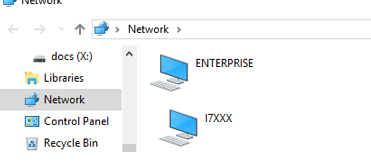
Windows 10 Can’t See Other Network Computers in Workgroup
The problem of not displaying network computers in Windows 10 Workgroup environment began to appear since the Windows 10 1703 (Creators Update). After upgrading to this (or newer) Windows 10 build, your computer may stop seeing neighboring computers when viewing devices in Network of File Explorer.
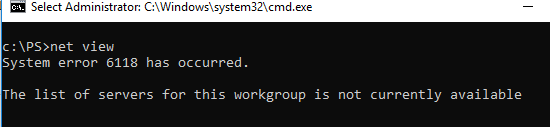
You can see the list of computers in the network environment in the File Explorer or with the command:
net view
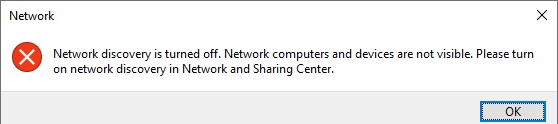
And when you click on the Network icon in Windows 10 File Explorer, this error is displayed:
Network discovery is turned off. Network computers and devices are not visible. Please turn on network discovery in Network and Sharing Center.
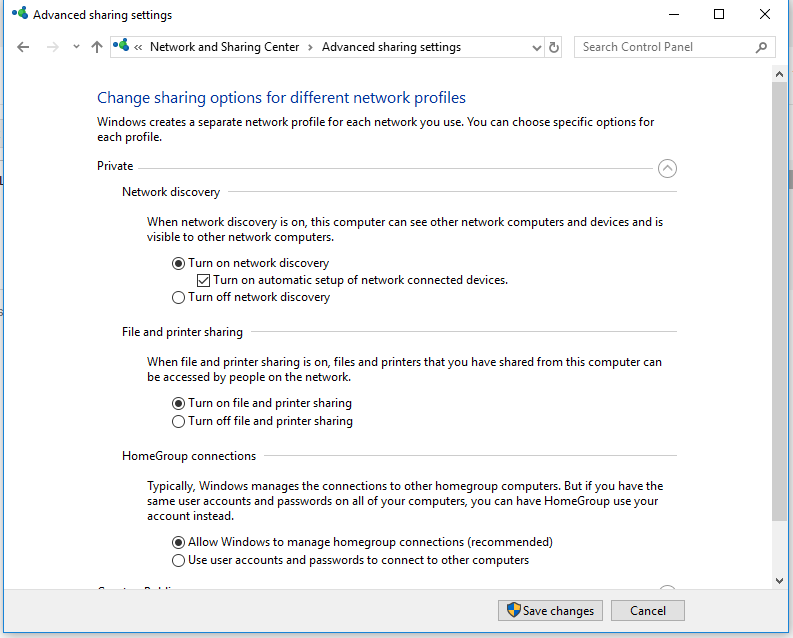
Advanced sharing settings. Make sure that in the Private network profile section the following options checked:
- Turn on network discovery + Turn on automatic setup of network connected devices;
- Turn on file and printer sharing;
- Allow Windows to manage homegroup connections (recommended).
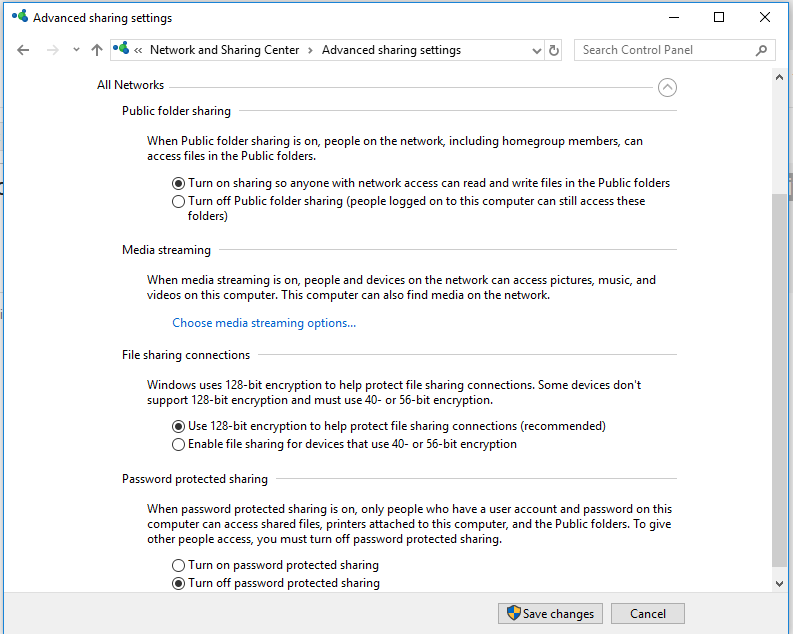
Then enable the following options in the All networks section:
- Turn on sharing so anyone with network access can read and write files in the Public folders;
- Turn off password Protected Sharing (if you trust all the devices in your network); You can open anonymous network access to your computer. So, when you enable this option, you must correctly set the permissions on the shared network folders and printers.
- If there are legacy network devices in your network (old Windows version, Samba shares, NAS devices), enable the option “Enable file sharing for devices that use 40-bit or 56-bit encryption”.
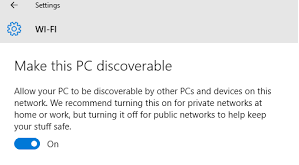
Then go to Settings -> Network and Internet -> Ethernet (or select Wi-Fi, if you are connected to a local network through a wireless connection). Click the network icon and verify that the Make this PC discoverable option is enabled.
Flush the DNS cache on the computer:
ipconfig /flushdns
To enable the Network Discovery traffic on Windows 10 Defender Firewall, you must run the following command in the elevated command prompt:
netsh advfirewall firewall set rule group="Network Discovery" new enable=Yes Or you can enable the network discovery traffic in Windows Firewall with the PowerShell :
Get-NetFirewallRule -DisplayGroup "Network Discovery" -Enabled True -Action Allow -Direction Inbound
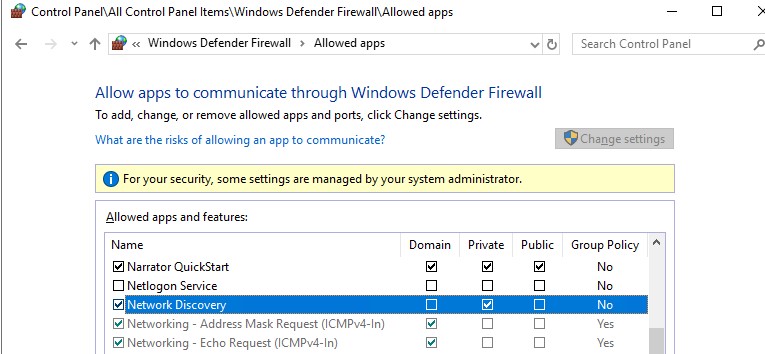
Also, you can manually enable the Network Discovery protocol for at least the Private network in the Windows Defender Firewall settings (Control PanelAll Control Panel ItemsWindows Defender FirewallAllowed apps).
In some cases, Windows computer may not be displayed in the network environment due to incorrect workgroup settings. Try to re-add this computer to the workgroup. Go to the Control Panel -> System and Security -> System -> Change Settings -> Network ID.
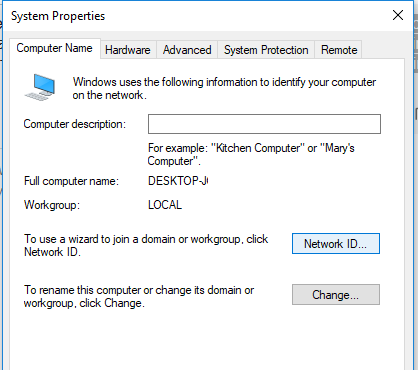
In the Join Domain or Workgroup Wizard that opens, select: This computer is part of a business network -> My company uses a network without a domain -> enter your workgroup name. After that, you need to restart the computer.
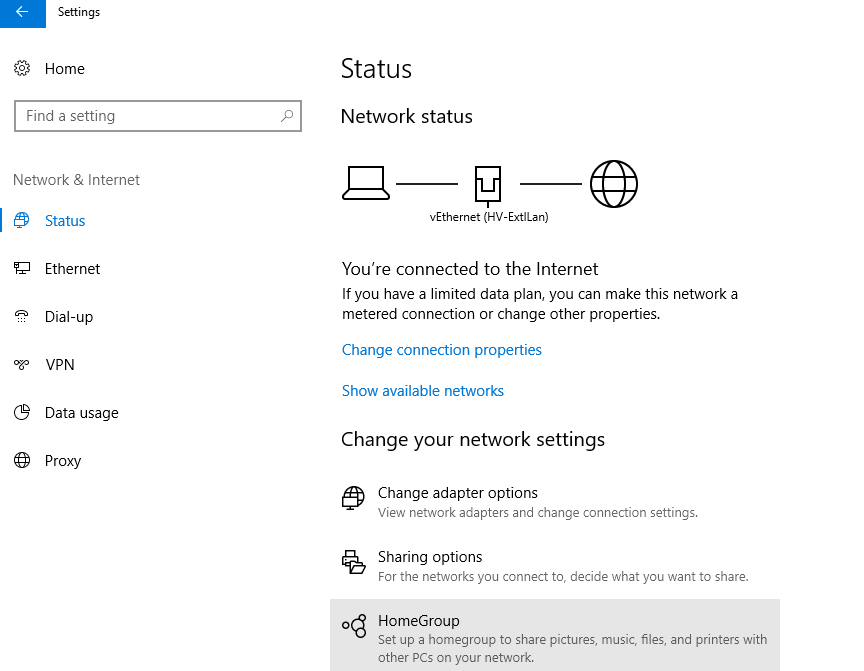
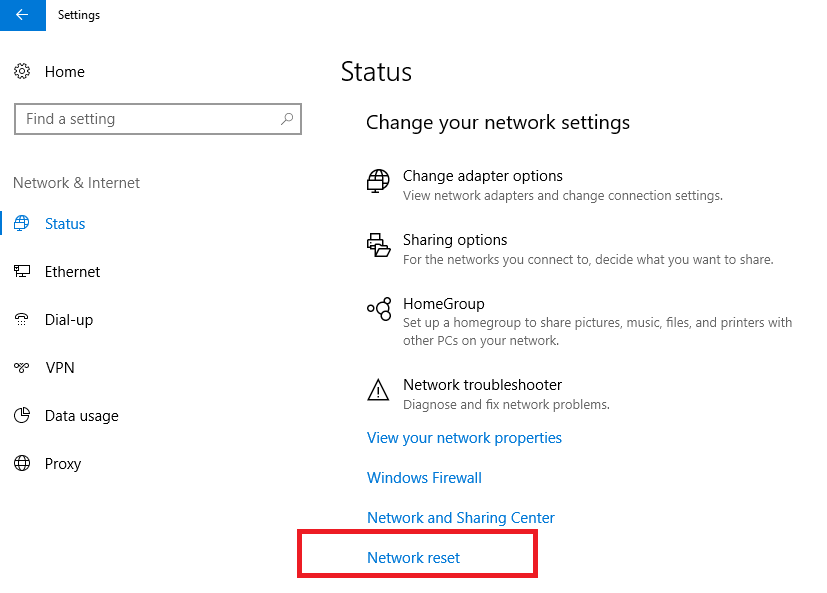
If after rebooting the computer appeared in a network environment, but you can’t access it, check the network profile type (location) on your computer. Most likely your local network was recognized as Public. You need to change the network location to Private. To do this, open the Settings -> Network and Internet -> Status -> Homegroup.
Click Change network location, then select “Yes” in the dialog box “Do you want to allow your PC to be discoverable by other PCs and devices on this network? We recommend allowing this on your home and work network, but not public ones”.
Open the Network and verify that you are now seeing the neighboring Windows computers.
If these tips did not help, and the computers in the workgroup are still not displayed, try to reset the network settings (Settings -> Network and Internet -> Status -> Network Reset).
You can also reset the network settings and firewall rules with the commands:
netsh int ip reset reset.txt
netsh winsock reset
netsh advfirewall reset
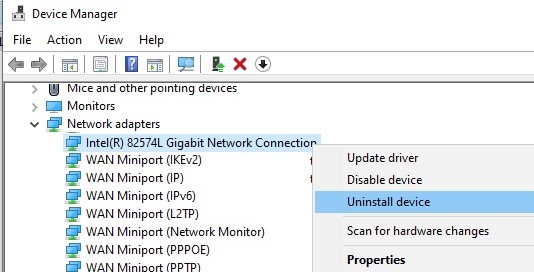
Then you need to reboot the computer. In some cases, you need to completely remove your network adapter using the Device Manager (run the devmgmt.msc console -> Network Adapters -> your network card -> Delete device).
Then restart your computer. Windows should automatically detect your network adapter and install the appropriate drivers. In this case, all old protocol settings for the network card will be reset.
Also, check whether the following services are running (they should be in the automatic startup state to correctly display your network environment). Run the services.mcs console and check the services state:
- FdPHost – Function Discovery Provider Host (responsible for other computers discovering on the network);
- FDResPub – Function Discovery Resource Publication (allows other computers to detect your device on the network);
- Dnscache – DNS Client;
- SSDPSrv – SSDP Discovery;
- Upnphost – PnP Device Host.
In some cases, third-party anti-viruses and firewalls can block NetBIOS name resolution requests, WDS and broadcast DNS queries (there was definitely a problem with ESET NOD32). Try to temporarily disable your antivirus/firewall and check if the network discovery works properly on your Windows 10 device.
How to Enable Network Discovery on Windows 10?
Starting with Windows 10 1803 (Spring Creators Update), Microsoft developers removed the ability to create a HomeGroup. In addition, Windows 10 computers no longer displayed in the network environment of the File Explorer when viewing network devices.
From Microsoft’s point of view, a HomeGroup is a legacy way to create a local area network to share folders and printers. Instead of using a HomeGroup, Microsoft suggests using its cloud services (OneDrive or access through Microsoft Accounts).
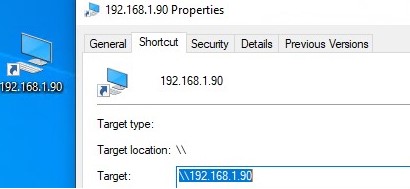
In Windows 10 1803 (and newer), in order to access the shared resources on another computer over the local network, you need to know its hostname (\pcname1) or IP address (\192.168.1.90), but neighboring computers in a network are not showed. However, this can be fixed. You can create desktop shortcuts to neighboring computers by specifying the UNC path to them (by computer name or IP address).
The fact is that a separate Function Discovery Provider Host service is responsible for discovering neighboring computers on a Windows 10 network. Another service, Function Discovery Resource Publication, is responsible for discovering of your computer. The FdPHost service uses the Simple Services Discovery Protocol (SSDP) and Web Services Discovery (WS-Discovery) protocols to discover devices on the network.
These protocols replace the NetBIOS over TCP/IP, which has historically been used to discover devices on Microsoft Windows networks with Master Browser. Accordingly, you can safely disable the NetBIOS protocol for your network adapters.
After installing the latest Windows 10 builds, these services can be disabled (the startup type is changed from Automatic to Disabled). If these services are stopped, the computer is not discovered on the network by other computers and cannot see others. You can enable the network discovery services in Windows 10 as follows.
- Open the Windows Services Management Console (services.msc);
- In the list of services, find the Function Discovery Resource Publication service;
- Change the service startup type from Manual to Automatic (Delayed Start);

- In the same way, enable the Function Discovery Provider Host service;You can change the startup type of these services with a following PowerShell one-liner command:
get-Service fdPHost,FDResPub|Set-Service -startuptype automatic -passthru|Start-Service - Restart your computer

After rebooting, other computers on the local network will be able to discover this computer and its resources (shared network printers and folders).
The SMB 1.0 Protocol and Master Browser Problems on Windows 10
It happens that problems with displaying computers in a network environment are related to the Computer Browser service. This service is responsible for generating and maintaining a list of active computers on the local network. In the local network there can be only one computer with the role of the Master Browser.
You can identify current Master Browser in your network by running the following command for each computer in your network:
nbtstat -a ComputerName
The computer that is the Master Browser is the only one that has the value __MSBROWSE__.
In Windows 10 1703, the Computer Browser service works incorrectly. It is recommended to completely disable this service on Windows 10 and use the computer with Windows 7 as the Master Browser on your network. You can set the Master Browser computer via the registry. To disable the Computer Browser go to the registry key HKEY_LOCAL_MACHINESYSTEMCurrentControlSetServicesBrowserParameters and change the value of MaintainServerList to False. To force set which computer is the network Master Browser change the value of MaintainServerList to Yes.
In addition, in Windows 10 1709 and newer (1803, 1809, 1903, 1909), the Computer Browser service and the SMB v1.0 protocol are disabled by default. The Computer Browser service is responsible for compiling the list of computers on the network and displaying them (this discovery protocol is widely used before switching to the SSDP and WS-Discovery protocols).
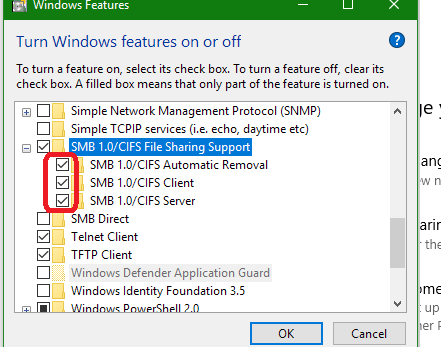
If you have only computers with Win 10 1709 and newer in your local network, and you still want to use the Computer Browser, you must enable the SMB v1.0 protocol (it is unsafe!) on at least one computer. This computer will be used as the Master Browser on your network.
You can enable the SMB 1.0 support by enabling the following Windows features from the Control Panel:
- SMB 1.0 /CIFS Client;
- SMB 1.0 /CIFS Server.
Or you can enable the SMB 1 client and server features from OptionalFeatures.exe or with the DISM commands:
Dism /online /Enable-Feature /FeatureName:"SMB1Protocol-Client"We remind you that it is not recommended to enable the SMB1 server in Windows. The SMB 1.0 protocol is unsecure, a lot of SMB1 vulnerabilities can be easily exploited remotely.
Dism /online /Enable-Feature /FeatureName:"SMB1Protocol-Server"
If you enabled the SMB1 protocol, then in order to assign the current computer as the Master Browser on the network, run the following commands:
reg add "HKEY_LOCAL_MACHINESYSTEMCurrentControlSetServicesBrowserParameters" /v IsDomainMaster /t REG_SZ  /d True /f
reg add "HKEY_LOCAL_MACHINESYSTEMCurrentControlSetServicesBrowserParameters" /v MaintainServerList /t REG_SZ  /d Yes /f
This computer will be the Master Browser in your network.
Windows 10 Can’t Connect Network Shared Folders
In some cases, Windows 10 can see and explore a neighboring device in a workgroup environment, but cannot display a list of shared network folders on it. This is most often accompanied by the error “0x80070035 – Network path not found”. The solution to this problem is described in this article.
If the neighboring computer (device) is visible on the network, but when you try to open any network folder from the network environment or using the UNC path (\Hostname_or_IP), an error appears “You can’t access this shared folder because your organization’s security policies block unauthenticated guest access”. In this case, you need to enable the AllowInsecureGuestAuth registry parameter using the command:
reg add HKLMSYSTEMCurrentControlSetServicesLanmanWorkstationParameters /v AllowInsecureGuestAuth /t reg_dword /d 00000001 /f
