In this post we’ll review some ways to block access to the specific websites, domain names, URLs or IP addresses in Windows without using third-party tools. In our case, we will try to block certain websites using the built-in Windows 10 tools and PowerShell automation features. Usually it is easier to block websites on your network router (switch or Wi-Fi access point you are using to access the Internet) or using third-party software (content filters, DNS filters, etc.).
Blocking Websites Using the Hosts File in Windows
The most popular method to block a specific website on Windows is to edit the hosts file. Usually it is located in %windir%\system32\drivers\etc\ directory. Please note that hosts file does not have an extension. The path to the directory containing hosts file is set in the DataBasePath parameter under the registry key HKEY_LOCAL_MACHINE\SYSTEM\CurrentControlSet\Services\Tcpip\Parameters. By default it is %SystemRoot%\System32\drivers\etc. 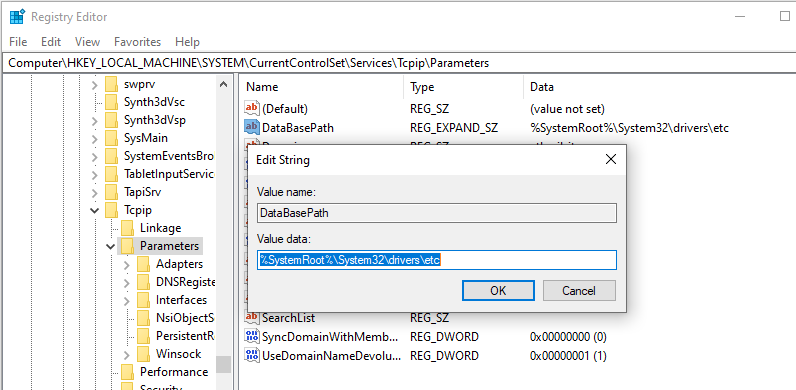
The hosts file is used to manually assign mappings between IP addresses and DNS names. When resolving names, the hosts has higher priority than DNS servers specified in the network connection settings.
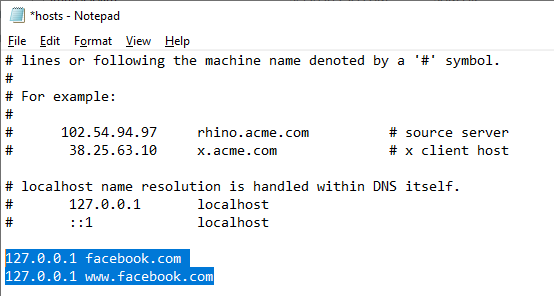
To block a specific website (for example, facebook.com), open the hosts file (with the administrator privileges) and add the strings like these to it:
127.0.0.1 facebook.com
127.0.0.1 www.facebook.com
Save the file and restart your computer (or clear the DNS cache using the command: ipconfig /flushdns).
After that, when trying to open the facebook.com in any browser you will see the message “Page not found” / “Page not available”.
You can add new lines containing website URLs to your hosts file using such a .bat file:
@echo off
set hostspath=%windir%\System32\drivers\etc\hosts
echo 127.0.0.1 www.facebook.com >> %hostspath%
echo 127.0.0.1 facebook.com >> %hostspath%
exit
Or you can use the following PowerShell functions to automatically block specific websites in your hosts file.
Function BlockSiteHosts ( [Parameter(Mandatory=$true)]$Url) {
$hosts = 'C:\Windows\System32\drivers\etc\hosts'
$is_blocked = Get-Content -Path $hosts |
Select-String -Pattern ([regex]::Escape($Url))
If(-not $is_blocked) {
$hoststr="127.0.0.1 ” + $Url
Add-Content -Path $hosts -Value $hoststr
}
}
Function UnBlockSiteHosts ( [Parameter(Mandatory=$true)]$Url) {
$hosts = 'C:\Windows\System32\drivers\etc\hosts'
$is_blocked = Get-Content -Path $hosts |
Select-String -Pattern ([regex]::Escape($Url))
If($is_blocked) {
$newhosts = Get-Content -Path $hosts |
Where-Object {
$_ -notmatch ([regex]::Escape($Url))
}
Set-Content -Path $hosts -Value $newhosts
}
}
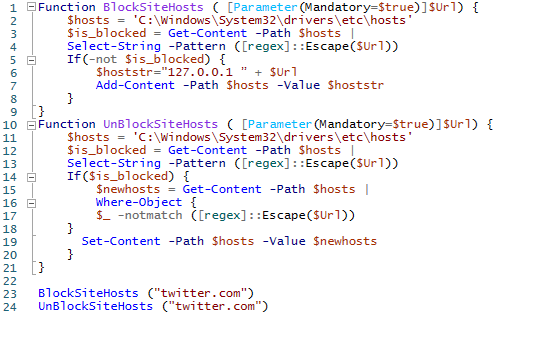
To add a website to the list of blocked URLs, just execute the command:
BlockSiteHosts ("twitter.com")
To unblock the website, run:
UnBlockSiteHosts ("twitter.com")
Block Websites Using DNS Filtering
If your clients use the same DNS server, in the same way you can block certain websites by creating a DNS entry in that DNS and specify something like 127.0.0.1 in it. By the way, most commercial DNS content filters (OpenDNS, SafeDNS, Cisco Umbrella, etc.) use the same principle.
How to Block Website IP Address in Windows Defender Firewall?
Also, you can block some websites using the built-in Windows Defender Firewall. The main disadvantage of this method is that you won’t be able to use the name of a domain or a website URL in the blocking rule. Windows Defender Firewall allows you to specify only an IP address or a subnet as a source/destination.
First of all, you have to get the IP address of the website you want to block. It is easier to do it using the nslookup command:
nslookup twitter.com
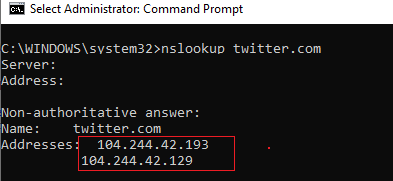
As you can see, the command has returned several IP addresses assigned to the website. You have to block all of them.
Run the Windows Defender Firewall management snap-in (Control Panel\All Control Panel Items\Windows Defender Firewall\Advanced Settings or by running firewall.cpl).
In the Outbound Rules section, create a new rule with the following settings: 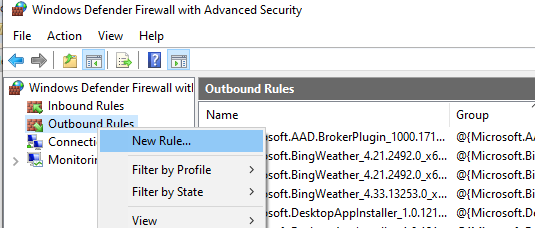
- Rule Type: Custom
- Program: All programs
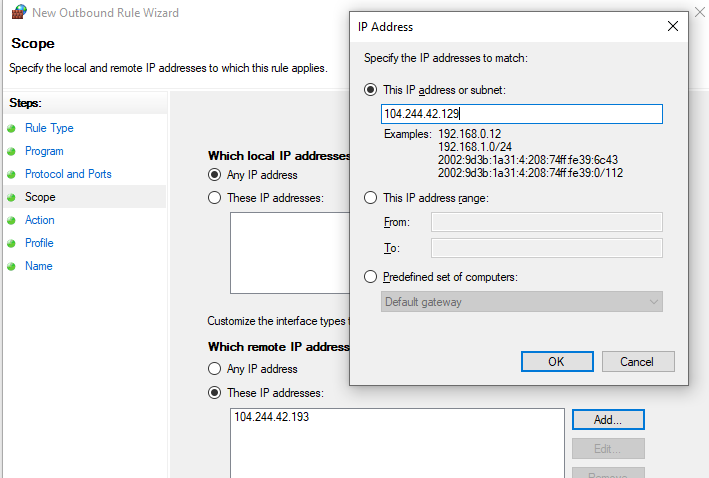
- Protocol Type: Any
- Scope: In the “Which remote IP addresses does this rule apply to?” section select “These IP addresses” -> Add. In the next window, enter the IP addresses, subnets or a range of IP addresses you want to block.
Click OK -> Next -> Action -> Block the connection.
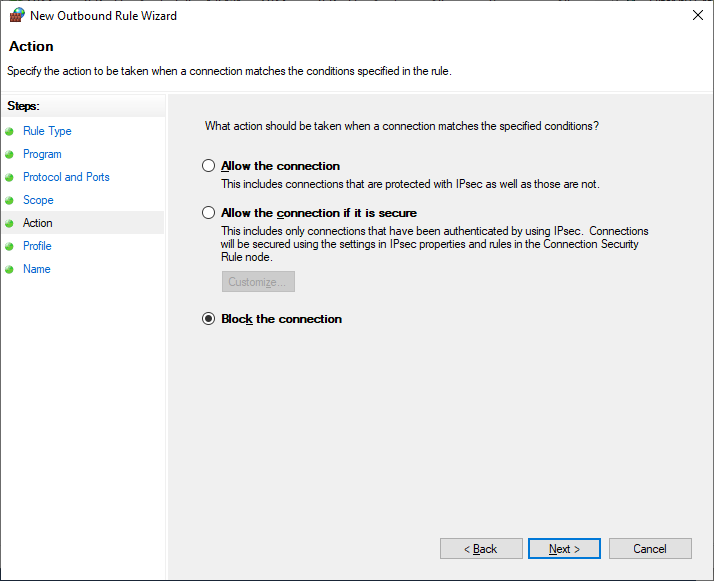
Leave all options as they are in the window with Firewall profiles the rule is applied to. Then specify the rule name and save it.
After that Windows Defender Firewall will block all outgoing connections to the specified website‘s IP adresses. The following message will appear in your browser when trying to connect to the blocked site:
Unable to connect
Or
Your Internet access is blocked
Firewall or antivirus software may have blocked the connection
ERR_NETWORK_ACCESS_DENIED
In your AD domain you can deploy a Windows Firewall policy to block access to a website on user computers using GPO. However, it is not rational. It is better to filter websites on your Internet access router (gateway).
Using PowerShell to Create Firewall Rule to Block Website by Domain Name or IP Address
You can also create a Firewall rule that blocks the connection to the website using PowerShell:
New-NetFirewallRule -DisplayName "Block Site" -Direction Outbound –LocalPort Any -Protocol Any -Action Block -RemoteAddress 104.244.42.129, 104.244.42.0/24
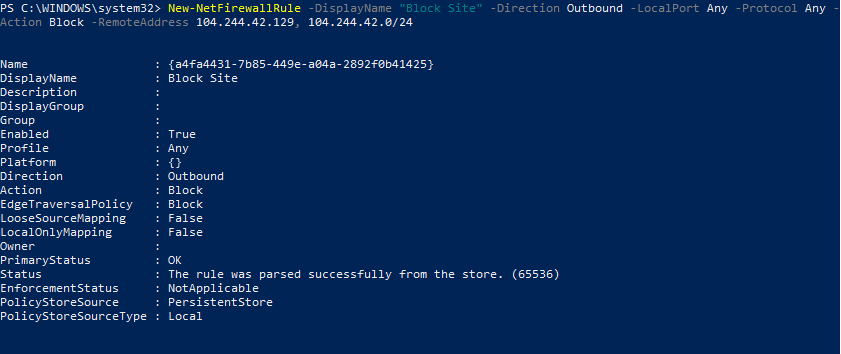
The string “The rule was parsed successfully from the store” means that the new Firewall rule has been successfully applied. You can find it in the graphical interface of your Windows Defender Firewall.

In order not to resolve the website names into IP addresses manually, you can use the Resolve-DnsName PowerShell cmdlet to get the website IP addresses:
Resolve-DnsName "twitter.com"| Select-Object -ExpandProperty IPAddress

Thus, you can convert the name of the website into its IP addresses and add a block rule to the firewall settings:
$IPAddress = Resolve-DnsName "twitter.com"| Select-Object -ExpandProperty IPAddress
New-NetFirewallRule -DisplayName "Block Site" -Direction Outbound –LocalPort Any -Protocol Any -Action Block -RemoteAddress $IPAddress
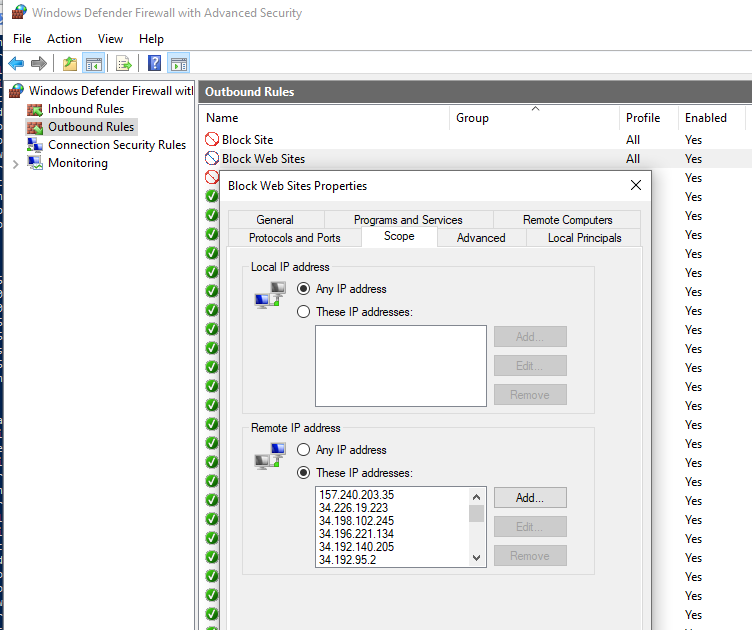
So you can now add a blocking rule to your Windows Firewall for multiple websites at once:
$SitesToBlock = "facebook.com","instagram.com","youtube.com"
$IPAddress = $SitesToBlock | Resolve-DnsName -NoHostsFile | Select-Object -ExpandProperty IPAddress
New-NetFirewallRule -DisplayName "Block Web Sites" -Direction Outbound –LocalPort Any -Protocol Any -Action Block -RemoteAddress $IPAddress
I have added the –NoHostsFile parameter to the Resolve-DnsName cmdlet in order not to use the hosts file for resolving.
Let’s make sure that a block outbound rule has appeared in the Windows Firewall console.
This article is mostly a brain training exercise. In a corporate network, you must use website filtering on your Internet access gateway, router or a proxy server. The host-level blocking is not very effective